By: Team CS2103-T11-1 Since: October 2019 Licence: MIT
- 1. Setting up
- 2. Design
- 3. Implementation
- 4. Documentation
- 5. Testing
- 6. Dev Ops
- Appendix A: Product Scope
- Appendix B: User Stories
- Appendix C: Use Cases
- Appendix D: Non Functional Requirements
- Appendix E: Glossary
- Appendix F: Instructions for Manual Testing
- F.1. Launch and Shutdown
- F.2. Saving data
- F.3. Access Control
- F.4. Account Management (User)
- F.5. Account Management (Admin)
- F.6. Creating an incident report
- F.7. Filling an incident report
- F.8. Submitting an incident report
- F.9. Finding incidents
- F.10. Listing incidents
- F.11. Editing submitted incidents
- F.12. Adding vehicles
- F.13. Finding vehicles
- F.14. Listing vehicles
- F.15. Deleting vehicles
1. Setting up
Refer to the guide here.
2. Design
2.1. Architecture
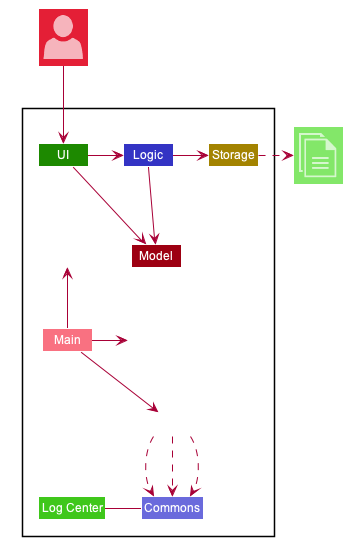
The Architecture Diagram given above explains the high-level design of the App. Given below is a quick overview of each component.
The .puml files used to create diagrams in this document can be found in the diagrams folder.
Refer to the Using PlantUML guide to learn how to create and edit diagrams.
|
Main has two classes called Main and MainApp. It is responsible for,
-
At app launch: Initializes the components in the correct sequence, and connects them up with each other.
-
At shut down: Shuts down the components and invokes cleanup method where necessary.
Commons represents a collection of classes used by multiple other components.
The following class plays an important role at the architecture level:
-
LogsCenter: Used by many classes to write log messages to the App’s log file.
The rest of the App consists of four components.
Each of the four components
-
Defines its API in an
interfacewith the same name as the Component. -
Exposes its functionality using a
{Component Name}Managerclass.
For example, the Logic component (see the class diagram given below) defines it’s API in the Logic.java interface and exposes its functionality using the LogicManager.java class.
How the architecture components interact with each other
The Sequence Diagram below shows how the components interact with each other for the scenario where the user issues the command delete 1.
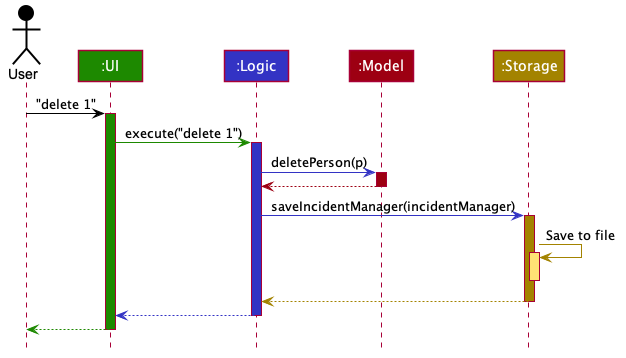
delete 1 commandThe sections below give more details of each component.
2.2. UI component
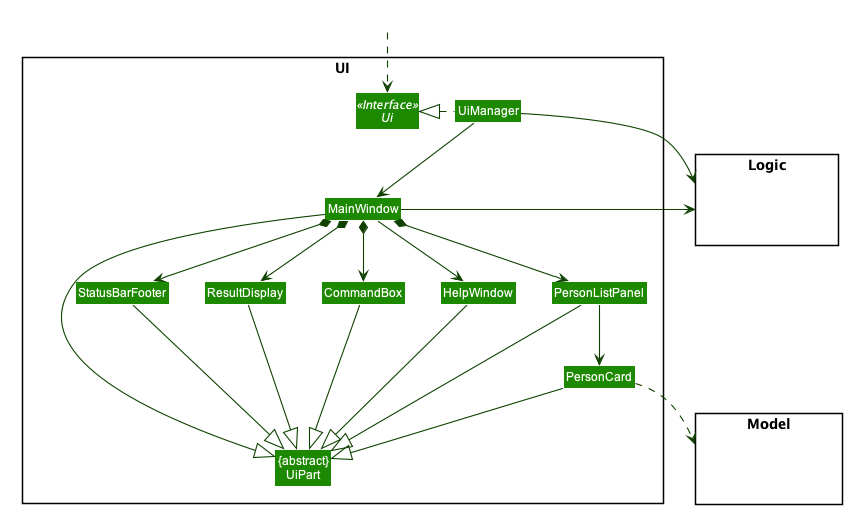
The UI consists of a MainWindow that is made up of parts e.g.CommandBox, ResultDisplay, PersonListPanel, StatusBarFooter etc. All these, including the MainWindow, inherit from the abstract UiPart class.
The UI component uses JavaFx UI framework. The layout of these UI parts are defined in matching .fxml files that are in the src/main/resources/view folder. For example, the layout of the MainWindow is specified in MainWindow.fxml.
The UI component,
-
Executes user commands using the
Logiccomponent. -
Listens for changes to
Modeldata so that the UI can be updated with the modified data.
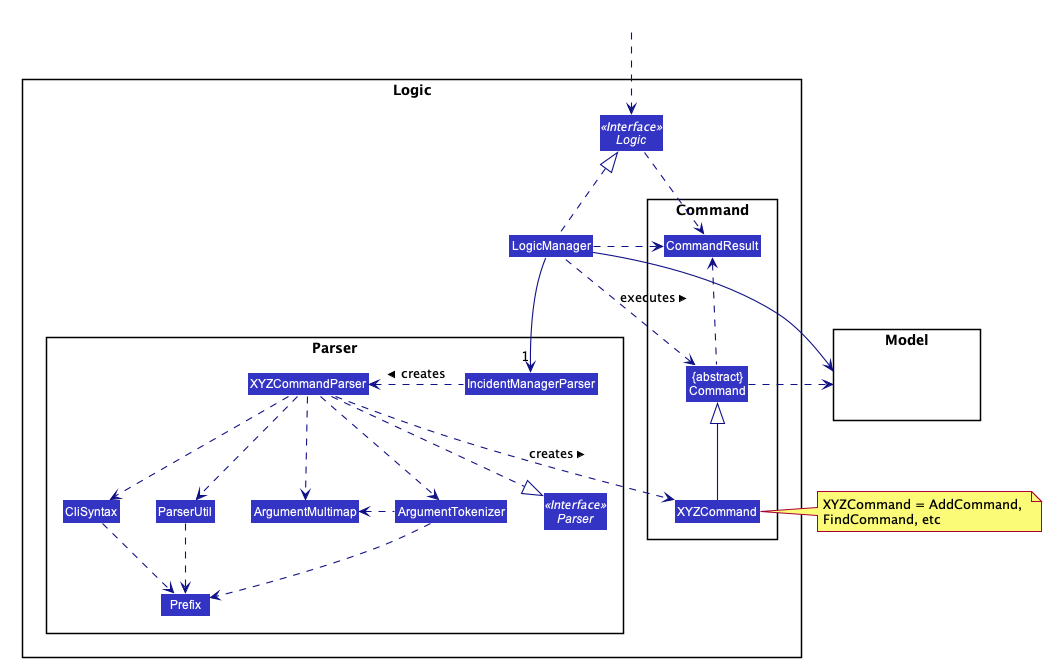
2.3. Logic component
-
Logicuses theIncidentManagerParserclass to parse the user command. -
This results in a
Commandobject which is executed by theLogicManager. -
The command execution can affect the
Model(e.g. adding a person). -
The result of the command execution is encapsulated as a
CommandResultobject which is passed back to theUi. -
In addition, the
CommandResultobject can also instruct theUito perform certain actions, such as displaying help to the user.
Given below is the Sequence Diagram for interactions within the Logic component for the execute("delete 1") API call.
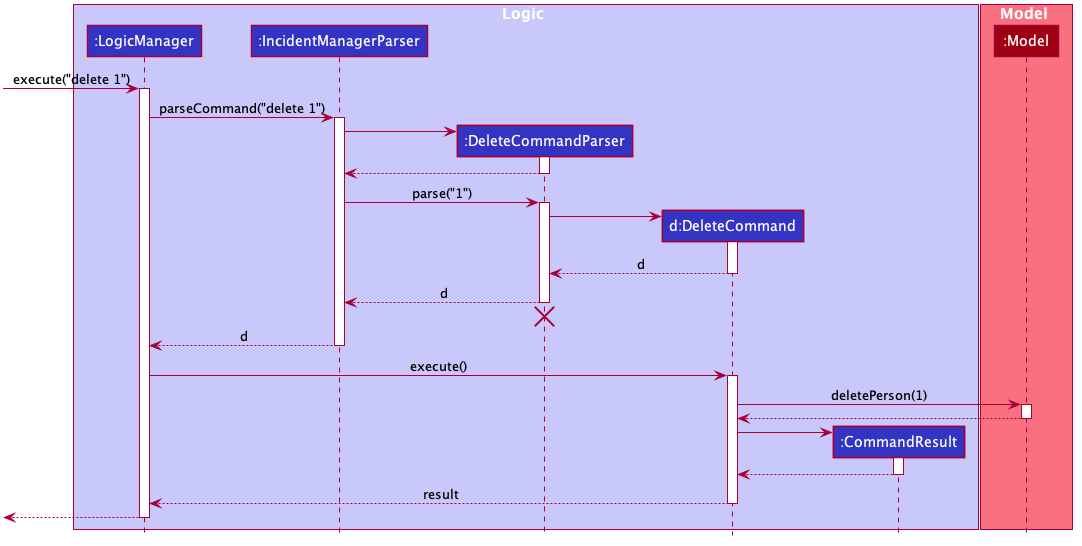
delete 1 Command
The lifeline for DeleteCommandParser should end at the destroy marker (X) but due to a limitation of PlantUML, the lifeline reaches the end of diagram.
|
2.4. Model component
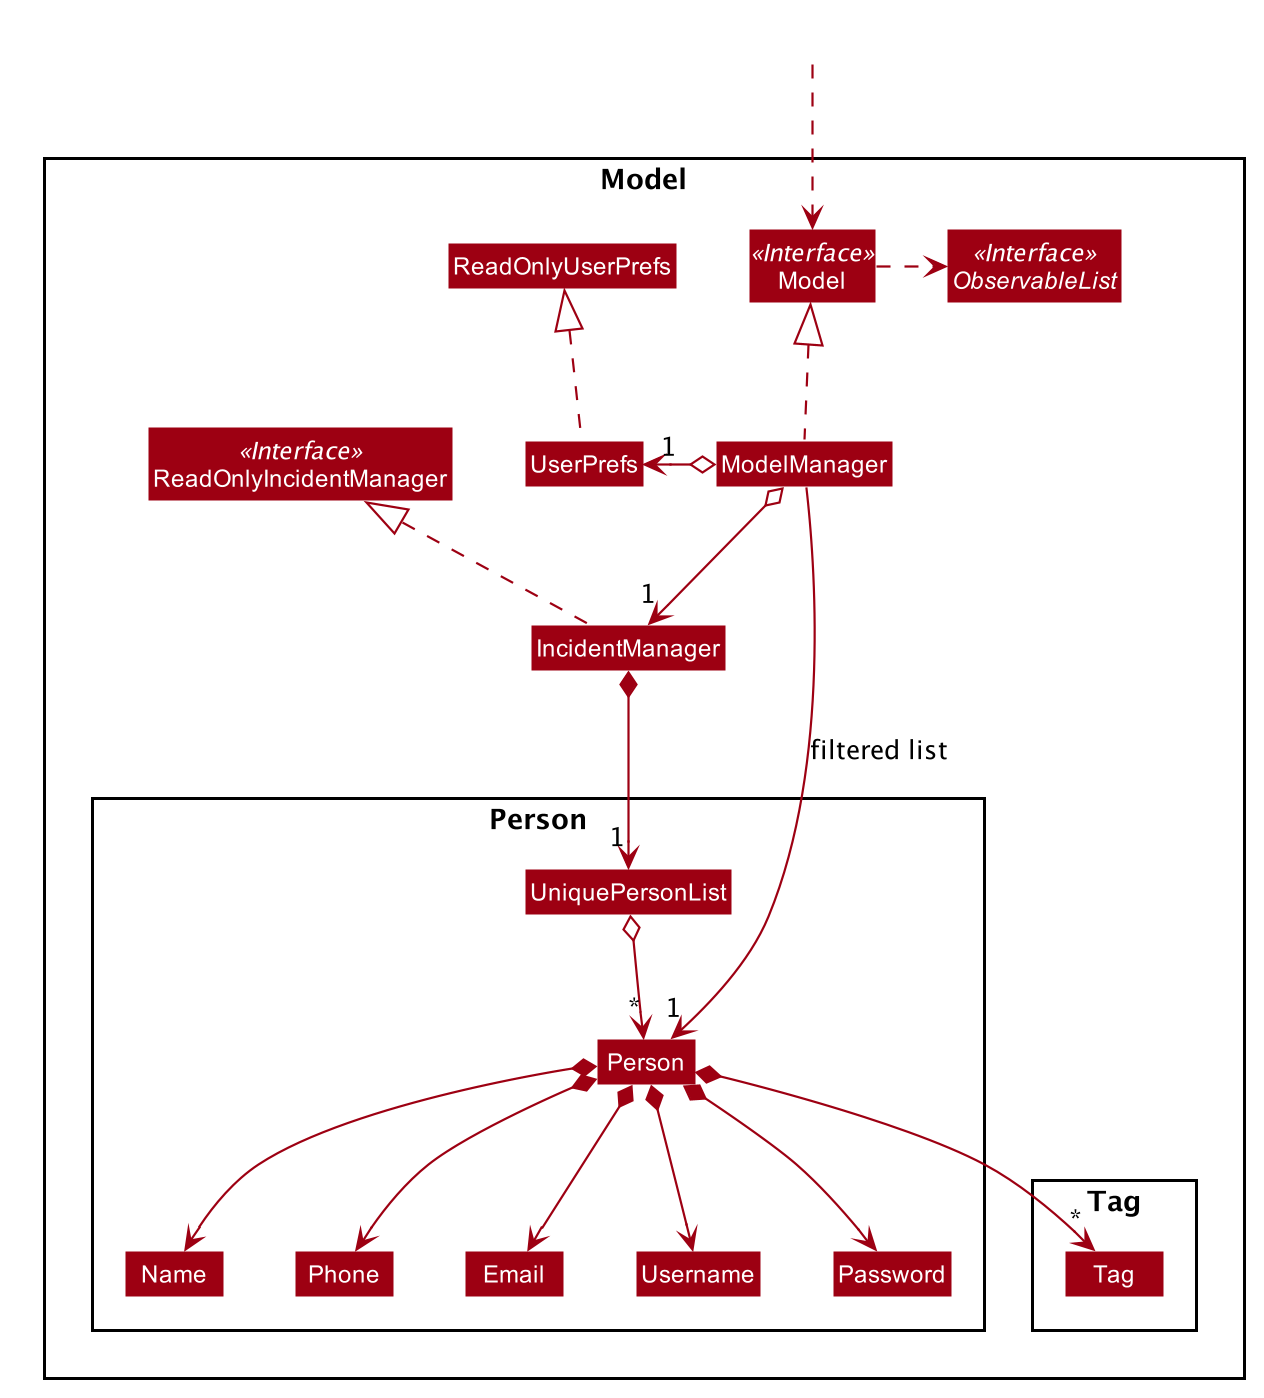
The Model:
-
Stores a
UserPrefobject that represents the user’s preferences. -
Stores the Incident Manager data.
-
Exposes an unmodifiable
ObservableList<Person>that can be 'observed' e.g. the UI can be bound to this list so that the UI automatically updates when the data in the list change. -
Does not depend on any of the other three components.
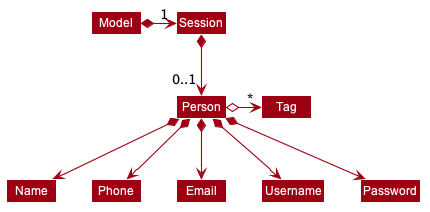
As a more OOP model, we can store a Tag list in IncidentManager, which Person can reference. This would allow IncidentManager to only require one Tag object per unique Tag, instead of each Person needing their own Tag object. An example of how such a model may look like is given below.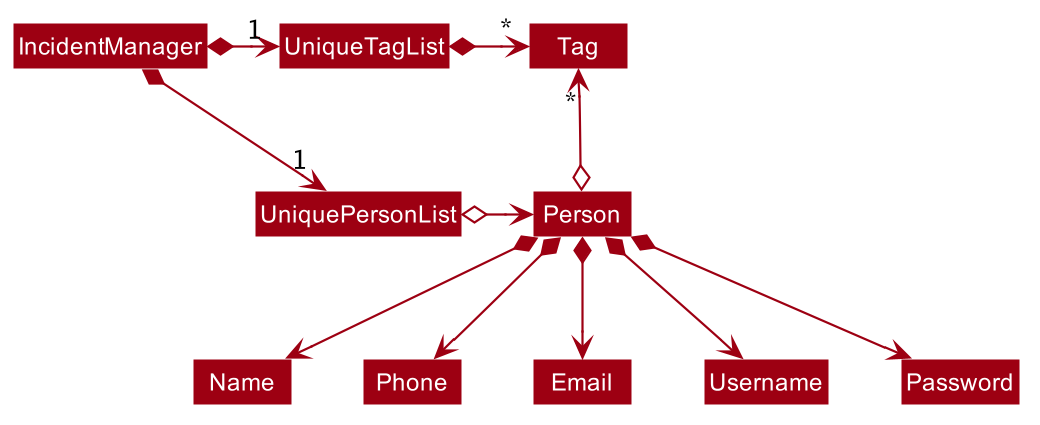
|
2.4.1. Person Model component
The Person:
-
Represents a user account on the incident manager.
-
Contains the account
Username,Password,Name,Phone,Email
2.4.2. Incident component
The Incident:
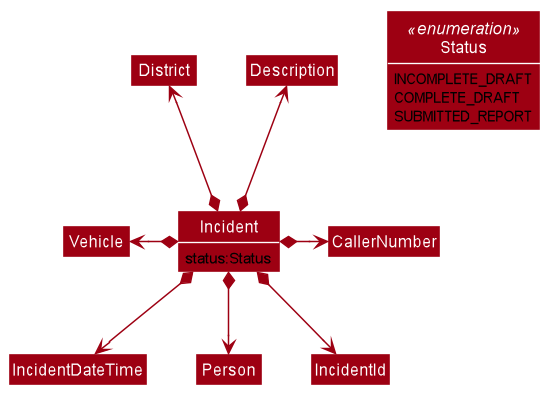
-
Represents an incident report in the incident manager.
-
Contains the attributes
CallerNumber,Description,IncidentDateTimeand IncidentId`. -
Also contains a
Personobject representing the 'Operator' who filed the incident, aDistrictwhich represents the location of the incident, and aVehiclerepresenting the vehicle dispatched to investigate this incident. -
Has three states encapsulated by a
Statusenum -INCOMPLETE_DRAFT(report not completely filled and not submitted),COMPLETE_DRAFT(report completely filled but not submitted), andSUBMITTED_REPORT(report completely filled and submitted).
2.4.3. Vehicle component
The Vehicle:
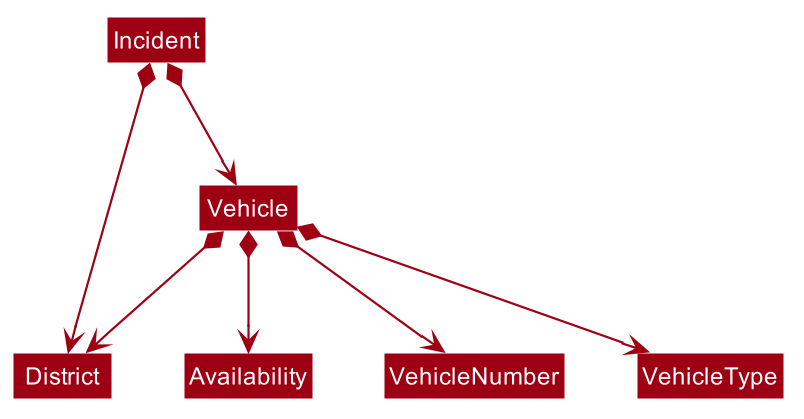
-
Represents a vehicle that can be dispatched to incident sites.
-
Contains the attributes
VehicleNumber,VehicleType,DistrictandAvailability. -
Is assigned to an incident in the same district.
2.5. Storage component
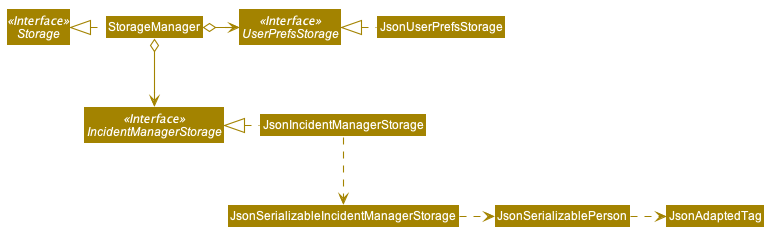
The Storage component:
-
Can save
UserPrefobjects in json format and read it back. -
Can save the Incident Manager data in json format and read it back.
2.6. Common classes
Classes used by multiple components are in the seedu.incidentManager.commons package.
3. Implementation
This section describes some noteworthy details on how certain features are implemented.
3.1. Access Control feature
3.1.1. Implementation
The access control feature is centered around three core concepts:
-
Command Restrictions: Restriction of access to commands until after identity is verified
-
Identity Verification: Verification of identity via unique credentials and a confidential key
-
Account Management Restrictions: Access level restrictions for commands affecting other accounts
Command Restrictions
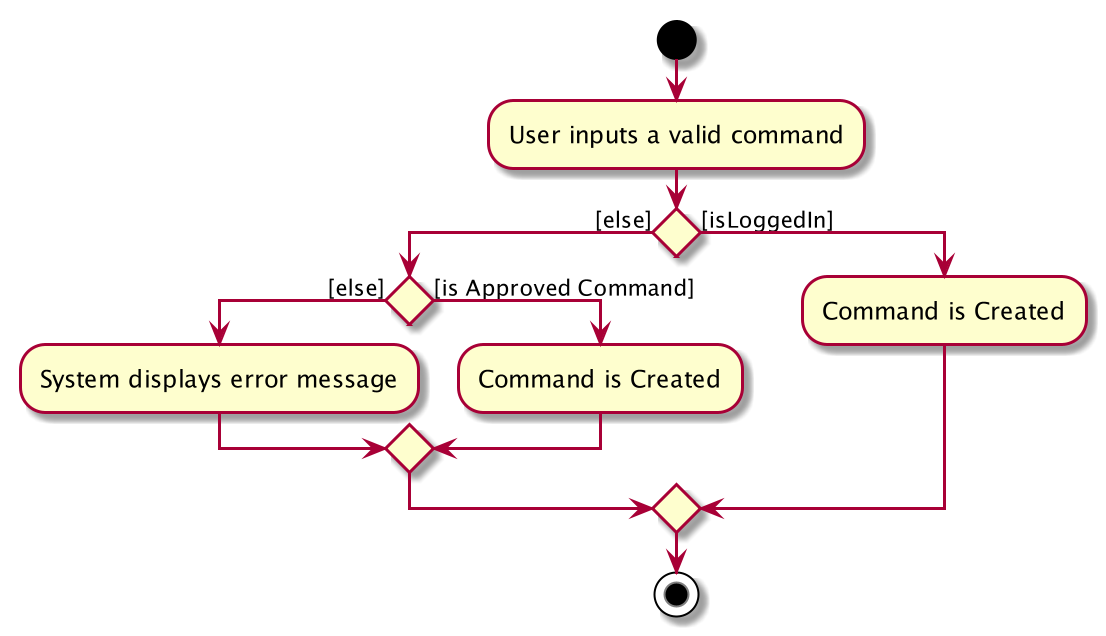
Prior to login, the user is only granted access to the login, register, help, and exit commands. This is achieved via a guard statement in the IncidentManagerParser checking whether the user is logged in or the command created is an approved command that doesn’t require login.
| The guard statement throws a command exception and informs the user of the available commands prior to login. |
Activity Diagram for illustration:
Identity Verification
Users are required to login via the Login command with a Username and Password. See user guide for more details on the command syntax for Login. Users are also allowed to Logout and thus end their Session.
| Session details are displayed on the status bar in the GUI to reflect whether a user is logged in, and the username as well as time logged in if a user is logged in. |
Class Diagram for illustration:
Uniqueness of a username is ensured by preventing duplicates during the account creation [RegisterCommand] and account update [UpdateCommand] processes. The respective commands will check the list of accounts in the model and throw an exception if a duplicate is found.
Account Management Restrictions
To prevent abuse (e.g. adding a dummy account and editing/deleting other accounts), all new accounts are differentiated from Admin accounts. This restriction based on access level is implemented via account Tags:
-
Only a
Personwith an adminTagcan access account management features. Such a person will henceforth be referred to as an Admin. -
Users who are not admins are not allowed to add tags (via both
RegisterCommandandUpdateCommand). -
Only Admins are allowed to edit or add tags (via both
RegisterCommandandUpdateCommand).
Non-admins can still edit their own account details via the UpdateCommand. Refer to user guide for more info.
|
Additional access restrictions:
-
Only admins can update an account that is not their own.
-
Only admins can access the delete command.
-
Admins cannot delete their own account.
-
Admins cannot 'downgrade' themselves by removing their own admin tag.
The checks described above all function in the command execution stage. The RegisterCommand, UpdateCommand, and DeleteCommand retrieves the logged in Person from the Model via utilisation of the Session.
Simplified Sequence Diagram for illustration:
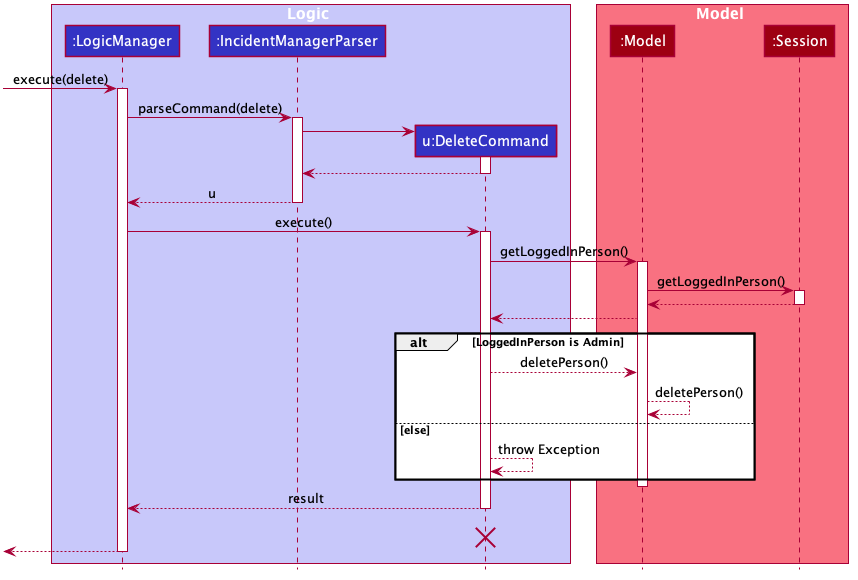
| The lifeline for DeleteCommand should end at the destroy marker (X) but due to a limitation of PlantUML, the lifeline reaches the end of the diagram. |
3.1.2. Design Considerations
Aspect: How Command Restrictions are Managed
-
Current Choice: Guard statement in IncidentManagerParser prior to Command Creation.
-
Pros: Early catching of restriction, command doesn’t get instantiated unnecessarily. Better user experience as error message is displayed early.
-
Cons: Need to expose model to parser as session is managed by model, increasing coupling.
-
-
Alternative: Guard statement in LogicManager prior to Command Execution.
-
Pros: Model does not need to be exposed to parser as it is already managed by command execution, decreasing coupling.
-
Cons: Command still gets instantiated, memory allocated to command creation. Decreases user experience as user still has to type a proper command before the access error is thrown.
-
Aspect: How Identity Verification is Managed
-
Current Choice: Unique username and password.
-
Pros: Easy to implement.
-
Cons: Sufficiently advanced users can access the data file directly to retrieve user passwords.
-
-
Alternative: Physical security USB dongle.
-
Pros: Secure individually identifiable token.
-
Cons: Prone to loss and potential duplication. Hard to implement.
-
Aspect: How Account Management Restrictions are Managed
-
Current Choice: Utilisation of Account Tags
-
Pros: Easy to implement.
-
Cons: Easy to exploit, requires additional restrictions (e.g. users cannot add tags unless they are an admin).
-
-
Alternative: Addition of an Admin account attribute.
-
Pros: Distinct object class, improves cohesiveness.
-
Cons: Hard to implement.
-
3.1.3. Known Issues
A sufficiently advanced user can access the data file directly to manipulate account details. Data file encryption (to be implemented in v2.0) will resolve this issue.
3.2. Account Management feature
3.2.1. Implementation
The account management feature functions as a suite of commands available to the user. The commands available as part of this suite:
-
Register Command - Creates a new user account.
-
Update Command - Edits a user account. Not including an index updates your own account.
-
Delete Command - Deletes a a user account. Not allowed to delete your own account.
-
List Persons Command - Lists all user accounts or those whose tags match the user input.
-
Find Persons Command - Searches for user accounts based on matching name or username keywords.
-
Swap Command - Swaps GUI interface between account management and incident management.
Users are restricted from accessing commands affecting objects not on display. They need to invoke Swap to access the different command suites.
|
Only Admin accounts can access the full suite of account management features. See access control feature for more information. Non-Admins only have access to Register, List, Find, and Swap commands, as well as Update for their own account.
In the code base, Persons represent user accounts. See person model for more information.
3.2.2. Design Considerations
Aspect: Interface Implementation
-
Current Choice: Utilising a swap command that transitions between two distinct interfaces.
-
Pros: Distinct difference in command suite utilisation (account vs incidents), giving users a much cleaner distinction of what’s being managed, improves user experience.
-
Cons: Hard to implement.
-
-
Alternative: Having account information display alongside incidents and vehicles in a separate pane.
-
Pros: Easy to implement.
-
Cons: User might be overloaded with information in one screen, and text might get truncated in lower resolutions, decreases user experience.
-
Aspect: How Update executes
-
Current Choice: No index indicates own account update
-
Pros: Improves user experience, user does not need to look for their own index.
-
Cons: Susceptible to user error.
-
-
Alternative: Select index of own account for update
-
Pros: Easy to implement.
-
Cons: Decreases user experience, user will first need to find their own index.
-
Aspect: How Tag searching executes
-
Current Choice: Adding keywords after the list command performs a search
-
Pros: Does not require argument prefixes, improves user experience.
-
Cons: Decreases system cohesiveness as searching is performed in two separate commands.
-
-
Alternative: Utilising find command to search for tags
-
Pros: Centralise all account search operations in one command, improves system cohesiveness.
-
Cons: Requires the addition of argument prefixes, decreases user experience.
-
3.3. Incident Draft Creation feature
3.3.1. Implementation
The incident draft creation mechanism is facilitated by the New Command. It creates a new draft incident report based on district of incident, optional automatic vehicle dispatchment. As of now, when there is no vehicle available in the district of incident, a new report cannot be generated.
If created successfully, the draft incident only has three fields filled: operator, district and vehicle dispatched.
There are two ways to use the New Command: 1. Auto dispatchment 2. Manual dispatchment, which requires user to provide a valid index that selects a vehicle
3.3.2. Automatic Vehicle Dispatchment:
Vehicle will be automatically assigned to the incident draft if any is available in the district. If no vehicle is available, an exception will be thrown.
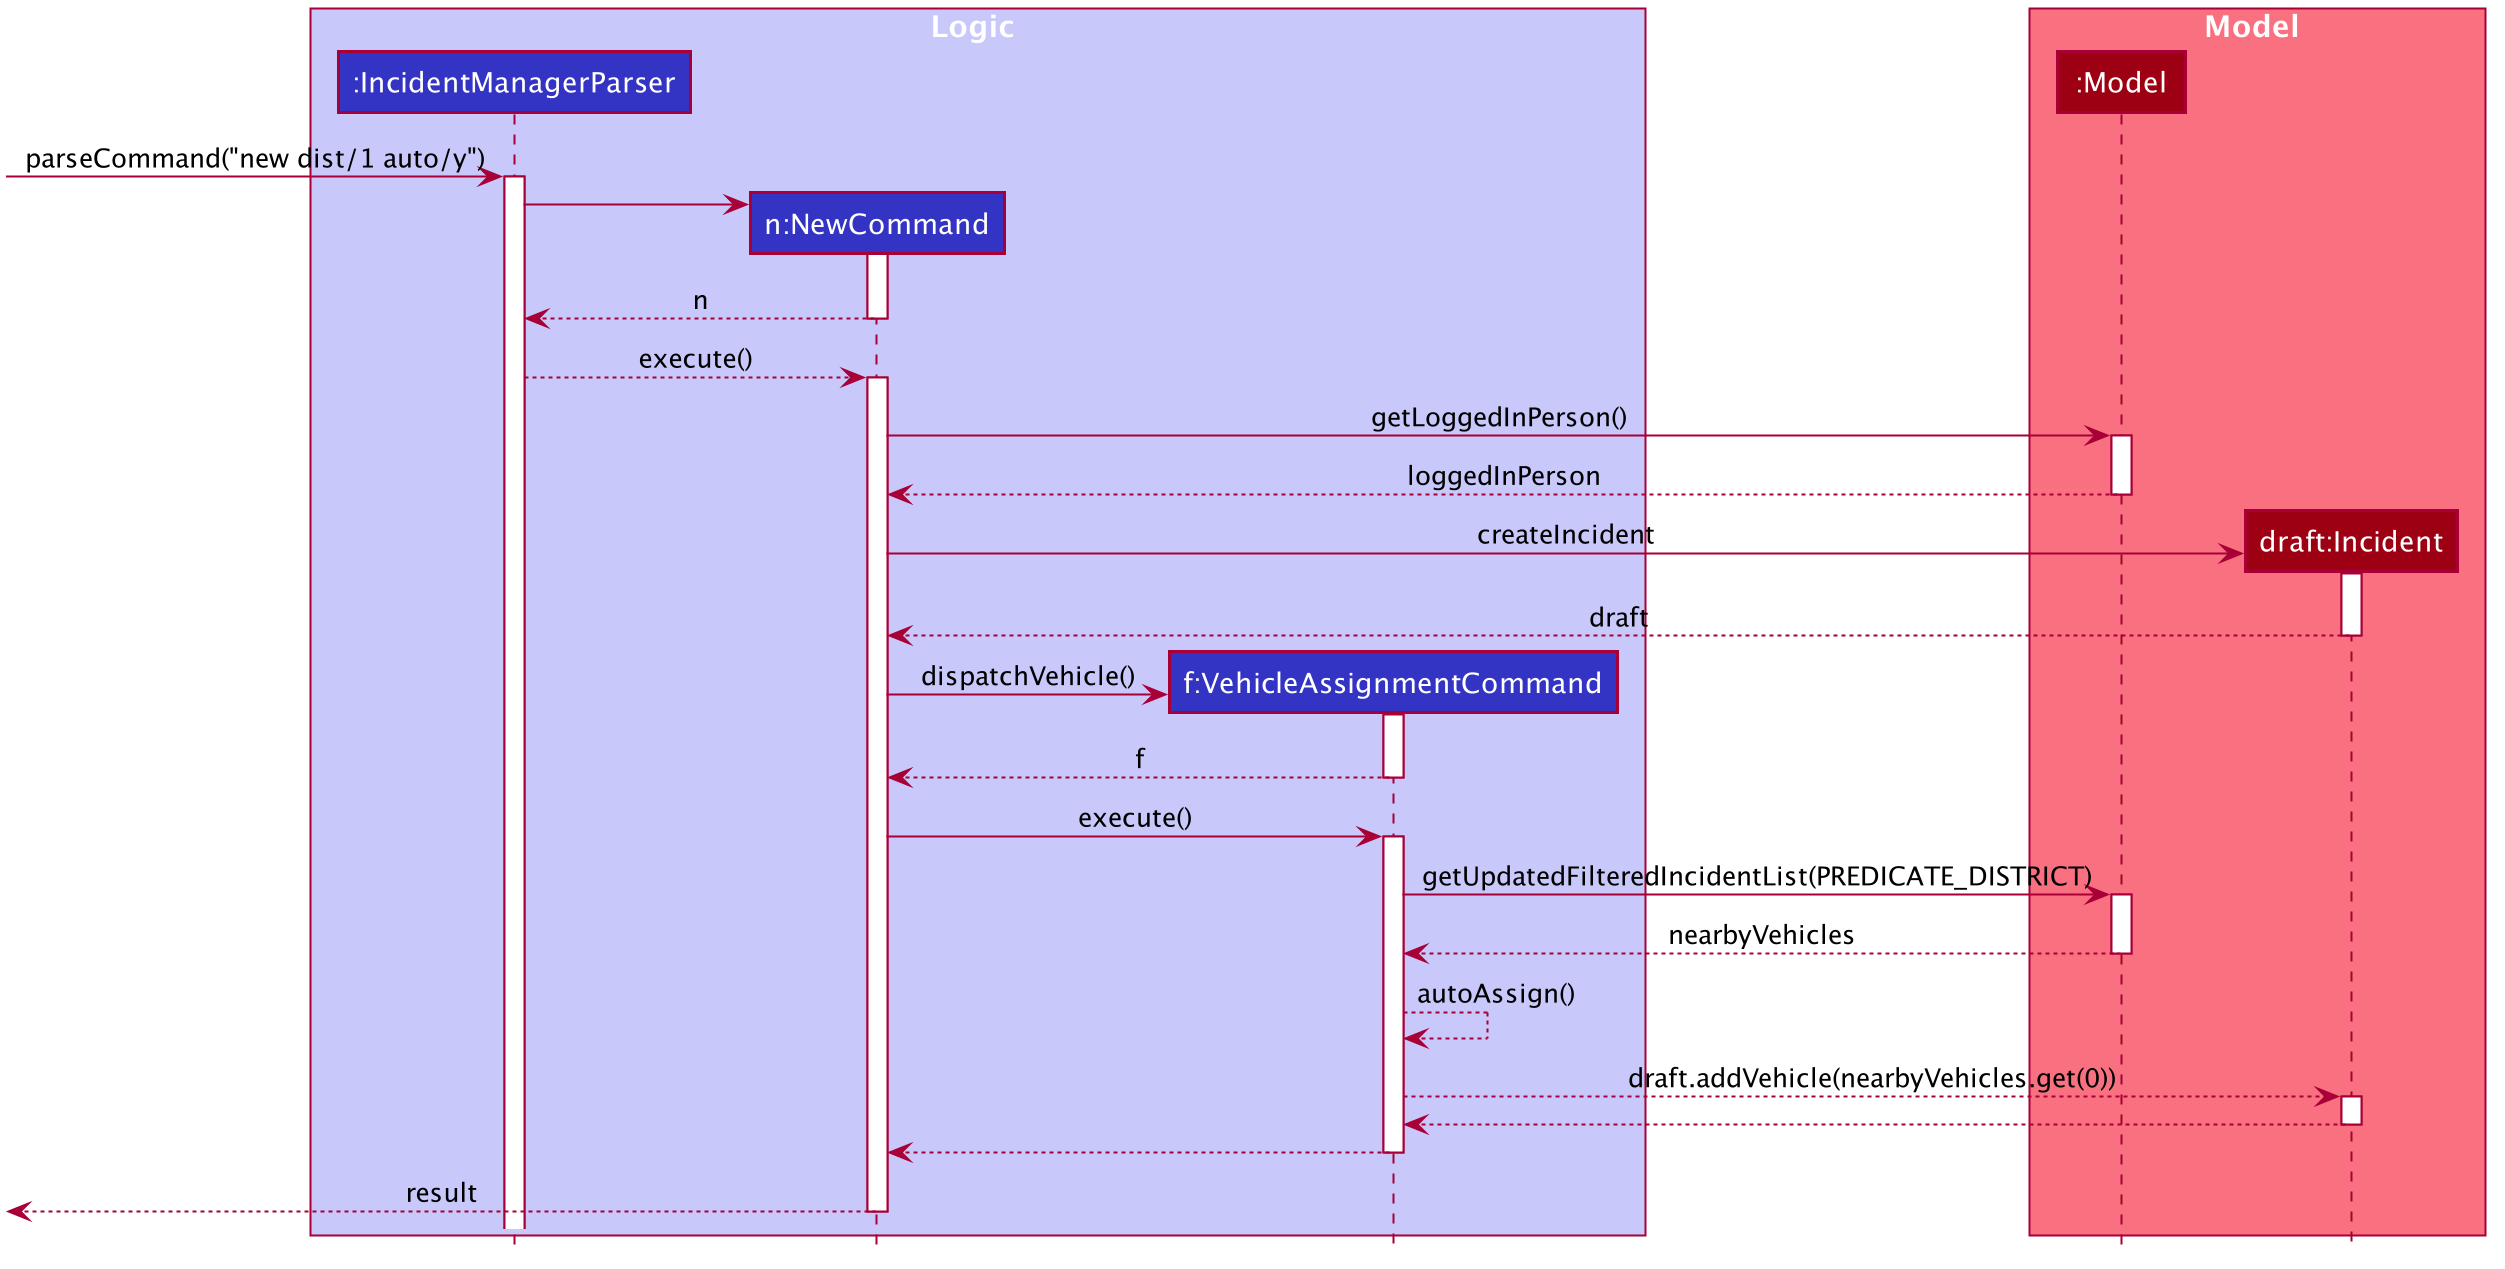
Below is a sequence diagram of a successful case:
3.3.3. Manual Vehicle Dispatchment:
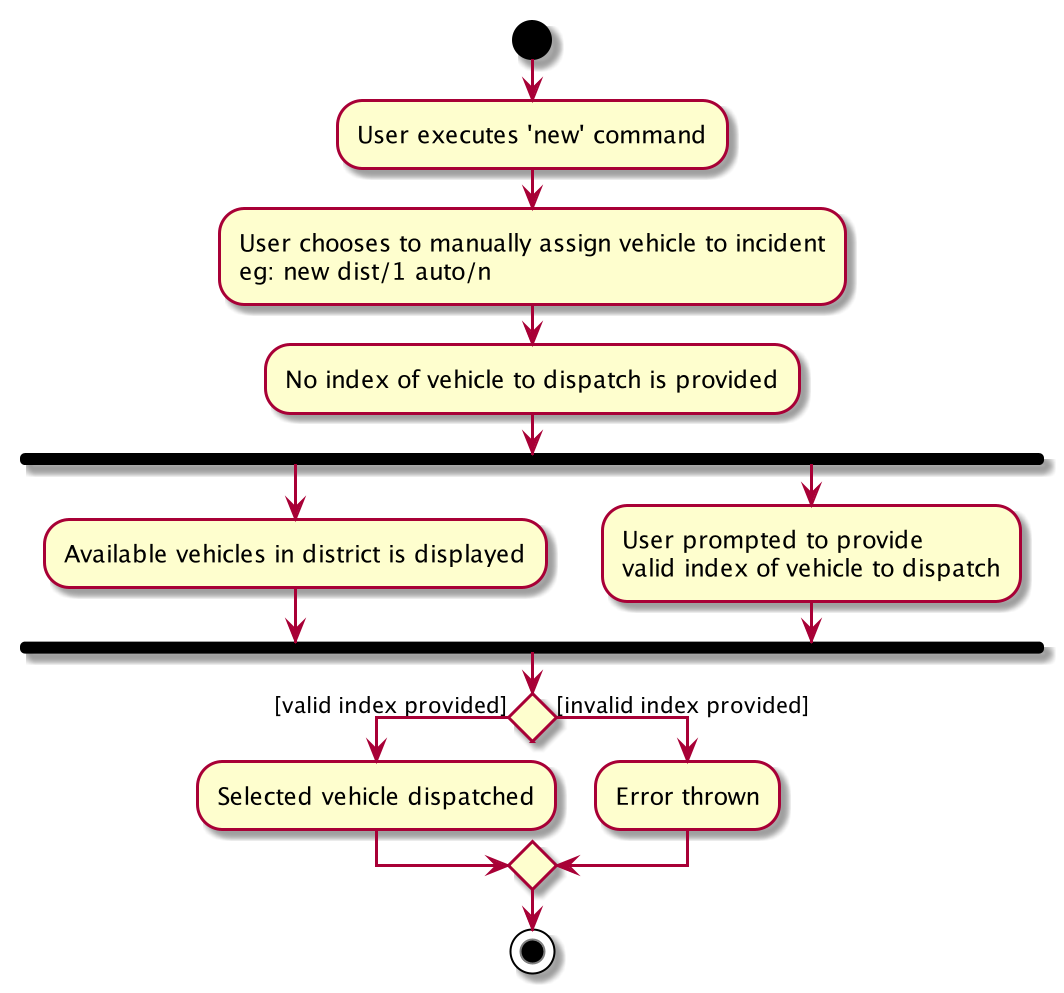
User first obtains list of vehicles available in specified district with new dist/DISTRICT auto/n, which prompts user for index of vehicle to dispatch. Note that this list can only be obtained with the input new dist/DISTRICT auto/N, and not based on the list of vehicles currently displayed.
User then inputs the index of vehicle based on the list of available vehicle in given district to dispatch. If no index is provided, or the index is not valid, an exception will be thrown and user will be prompted to provide a valid index.
Below is an activity diagram illustrating the above:
3.3.4. Design Considerations
Aspect: How incident draft creation executes
For auto vehicle assignment:
-
Current Choice: Taking first vehicle on list of available vehicles in district.
-
Pros: Easy to implement
-
Cons: May not be the vehicle nearest to the incident site in real life, thus may not be optimal.
-
-
Alternative: Add details to location of vehicles to actually allocate the vehicle closest to the incident site.
-
Pros: Optimal efficiency in dispatching vehicles.
-
Cons: Difficult to implement; we do not have enough time.
-
Fro manual vehicle assignment:
-
Current Choice: Throw exception to prompt user to enter index of vehicle to dispatch.
-
Pros:
-
User need not key in the entire new command again, only need to add the relevant prefix and index.
-
Easy to implement.
-
-
Cons: May not seem logical to throw an exception for this.
-
-
Alternative: Show prompt message as a command result instead of exception message.
-
Pros: Logically seems to make more sense.
-
Cons: User has to retype the entire command, potentially a waste of time.
-
3.4. Incident Filling and Submission feature
3.4.1. Implementation
The incident filling and submission subroutines are facilitated by the fill and submit commands respectively.
In the IMS, each incident can have one of three statuses - INCOMPLETE_DRAFT, COMPLETE_DRAFT, and SUBMITTED REPORT.
These three statuses are maintained by an enum in Incident. Executing the fill command changes the status of
drafts (complete or incomplete) into COMPLETE_DRAFT while the submit command changes the status of only COMPLETE_DRAFTS to SUBMITTED_REPORT.
To prevent potential misuse, only the operator who has created the incident report is allowed access to execute the fill and submit commands on that report.
Overview of Fill and Submit commands
Each command works in two modes:
-
Without parameters: In this mode, the command -
fillorsubmit- lists the incidents that are ready for Filling (i.e. only all complete and incomplete drafts) or Submitting (i.e. only all complete drafts). -
With parameters: In this mode, the command -
fillorsubmit- actually fills (i.e. makes incident statusCOMPLETE_DRAFT) or submits (i.e. changes incident status fromCOMPLETE_DRAFTtoSUBMITTED_REPORT) the specified incident.
The implementation of these two modes is discussed below. As both fill and submit are rather similar in their implementation, a detailed discussion of only the fill command is given below.
No parameter mode (listing incidents)
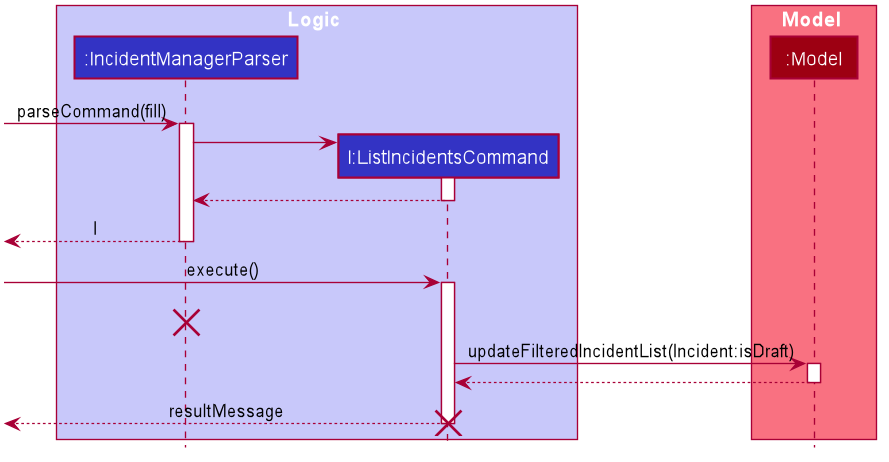
This mode leverages the ability of the ListIncidentsCommand to list incidents by different predicates.
When the IncidentManagerParser parses a fill command without parameters, it returns a new ListIncidentsCommand
with predicate Incident::isDraft. This ListIncidentsCommand is then executed as per usual.
For the submit command, the predicate Incident::isCompleteDraft is used instead.
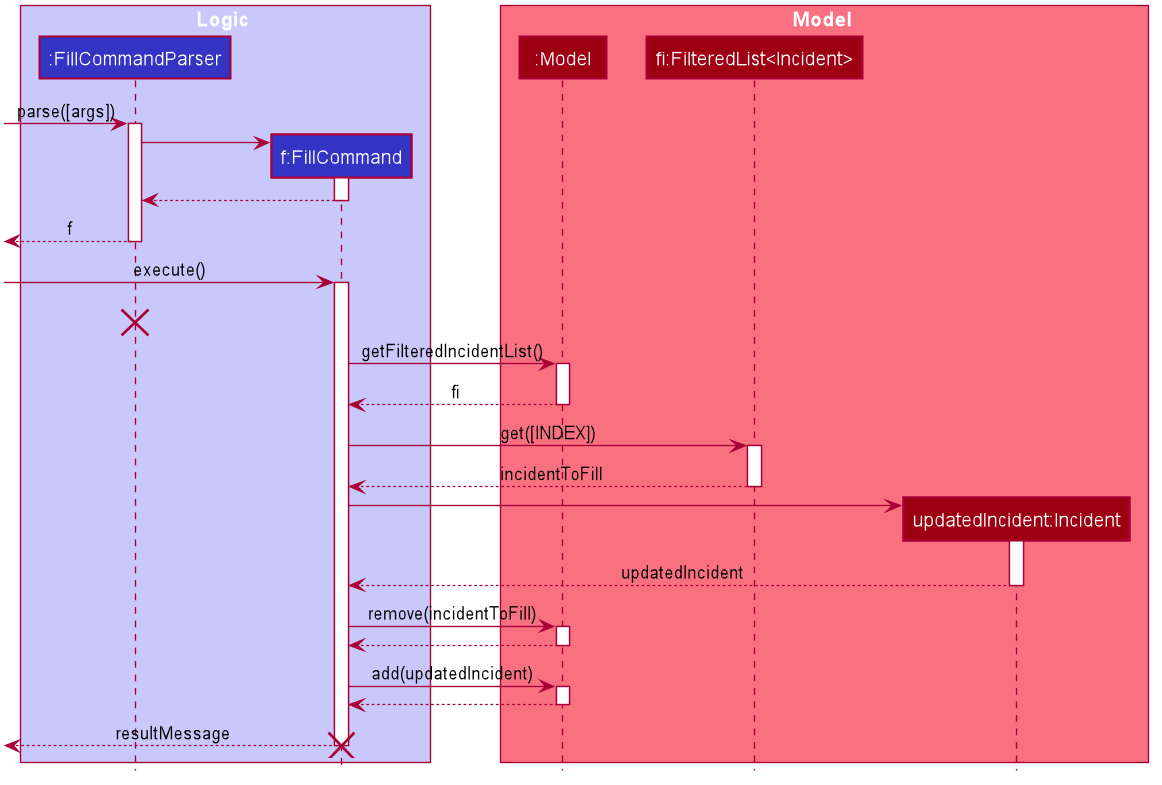
Parameter mode (modifying incidents)
-
For the
fillcommand with parameters, theFillCommandParserwill be invoked to parse the fieldstargetIndex,callerNumber, anddescriptionand return aFillCommandcontaining these non-null fields. -
The
execute()method inFillCommandwill then retrieve the specified incident if there are drafts to be filled and if the index is valid. -
Two helper methods -
processReportFillingandfillReport- will complete the filling process.fillReportreturns a newIncidentwhich is a copy of the incident report to be filled, but with the specified caller and description details and aCOMPLETE_DRAFTstatus. -
The old incident report will be removed from the system and be replaced with the new updated incident report.
-
The new incident report is placed at the front of the incident list for easy access.
In this sequence diagram, the helper methods within FillCommand are omitted for clarity.
The SubmitCommand functions similarly, with one crucial difference. As no Incident fields are to be updated, the specified incident is simply retrieved, and its fields are copied into a new Incident object with a SUBMITTED_REPORT status.
3.4.2. Design Considerations
Aspect: How incident Fill and Submit commands execute in no parameter mode
-
Current choice: Use
ListIncidentscommand with appropriate predicate to fulfillfillandsubmitfunctionalities in no-parameter mode.-
Pros:
-
Intuitive and convenient to use. If user needs easy access to reports that can be filled or submitted, they do not need to remember a new command keyword.
-
Requires lesser code. Abstraction of the filtered listing subroutine reduces the amount of redundant code.
-
-
Con: 1. Might be potentially confusing to user as
FillCommandis performing a function of listing that is extraneous to the function of filling.
-
-
Alternative 1: Extend
FillCommandto create two child classesFillCommandNoParamsandFillCommandWithParams.-
Pros:
-
Better use of the OOP principle of inheritance.
-
Reduce coupling between
ListIncidentsCommandandFillCommand.
-
-
Cons:
-
Increases amount of code and hence marginally reduces app performance as one additional new class needs to be created.
-
Misleading use of abstraction as the
FillCommandNoParamsis technically not performing the function of filling but that of listing.
-
-
-
Alternative 2: Separate the 'listing' and the 'filling' aspect by using separate command words.
-
Pro: 1. Most appropriate use of abstraction and single responsibility principle, which are crucial OOP concepts.
-
Con: 1. User needs to either remember an additional command word or type a longer
list-icommand by specifying the filter predicate, which reduces user convenience.
-
Aspect: How incident Fill and Submit commands execute in parameter mode
-
Current choice: Both
callerNumberanddescriptionfields need to be specified when filling specified incident report. The other incident report fields are auto-filled and can only be changed by using theeditcommand once the incident report has been submitted.-
Pros:
-
Improved accountability. Prevents a user from changing the most important fields of the incident report, such as
incidentId,incidentDateTime, andvehicle, without first committing the report into the system. -
More convenient for the user as they only have to specify 2 report fields instead of 6 or 7.
-
-
Con: 1. User is unable to fill
callerNumberindependently ofdescriptionunless they first submit the incident report and then use theeditcommand.
-
-
Alternative 1: Combine
fillandsubmitfunctions i.e. filling a report completely will automatically submit it.-
Pros:
-
Easier to implement as Incident reports have two statuses - DRAFT or SUBMITTED - instead of three.
-
More convenient as this results in one less step in the user’s workflow and one less command word for the user to remember.
-
-
Con: 1. Less adaptable and modular. If new fields are added to the incident report, then the user might want to enter / replace those fields by executing repeated fill commands without committing the report into the system with incomplete / likely to change information.
-
-
Alternative 2: Allow
fillcommand to fill variable number of fields.-
Pro: 1. Satisfies the cons of the two approaches above as it is versatile enough to allow the user to independently fill different incident report fields as well as adaptable enough to accommodate extra fields.
-
Con: 1 . Harder to implement as we would need more elaborate methods to parse the variable arguments.
-
3.4.3. Known Issues
A user cannot independently fill the various incident report fields unless they first submit the incident report. This might be an acceptable issue it encourages users to completely fill a new incident report before submitting it, which reduces the likelihood of finding incomplete drafts in the system.
3.4.4. Activity diagram summarising Incident creation, filling, and submission features
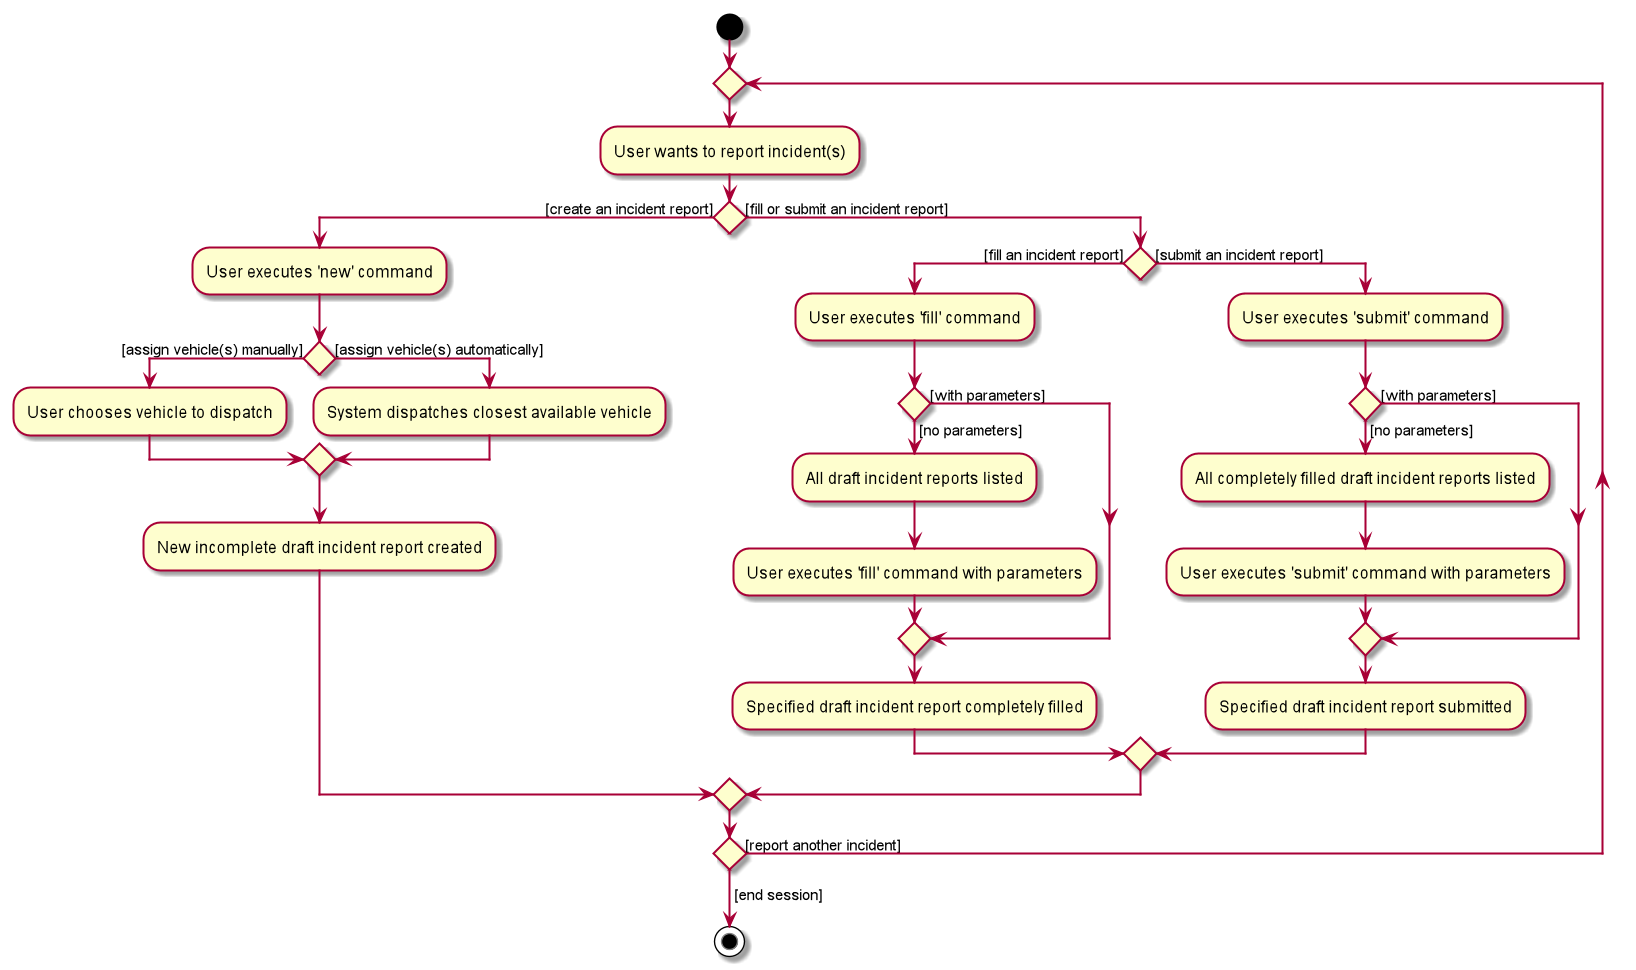
In this activity diagram, the catch-all term 'report' is used to encompass the acts of creating, filling, and submitting incident reports.
3.5. Incident Finding and Listing feature
3.5.1. Implementation
The incident search mechanism features a set of different types of searches that a user could utilise to list out all related incidents, regardless of status of report. Further documentation on the commands available in this set can be found in the User Guide. It is facilitated by the List Incidents Command and the Find Incidents Command. To differentiate the reports by statuses, the Incident Filling and Submission feature cover these capabilities already, as mentioned earlier.
Overview of Running Find Incidents and List Incidents commands
-
Listing all - Displays all incidents in
Model, taking in no parameters
eg.list-i -
Finding based on parameters- Displays all incidents in
Modelbased on matching parameters indicated-
ID - Displays all incidents with exact matches in
IncidentId incidentIdinIncident incident, withinModel
eg.find-i id/0620150001 -
Description - Displays all incidents with keyword(s) contained within the
Description descriptioninIncident incident, withinModel+ eg.find-i desc/traffic -
Operator - Displays all incidents with keyword(s) contained within the name of the
Person operatorinIncident incident, withinModel
eg.find-i op/bill -
Operator - Displays all incidents with the name of the
Person operatorinIncident incidentmatching the logged-in user’s name exactly, withinModel
eg.find-i self
-
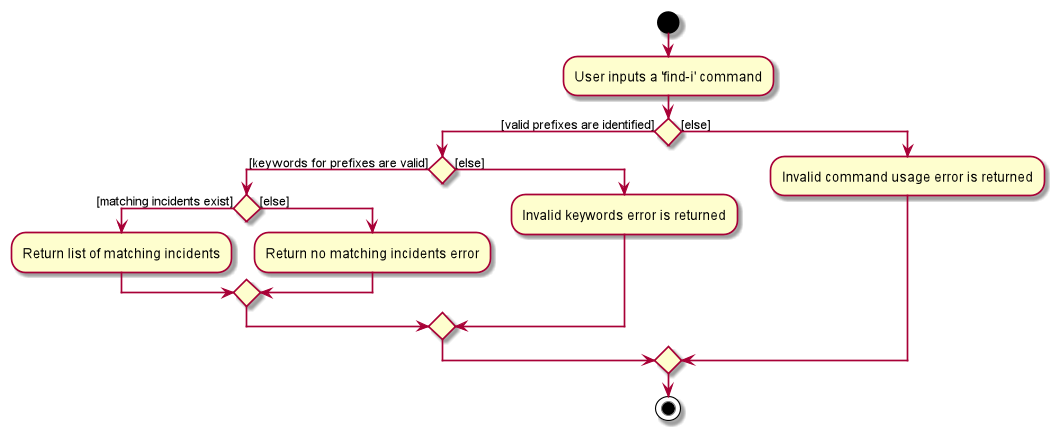
Activity Diagram for illustration:
Overview of Implementation of Find Incidents and List Incidents commands
-
The incident search mechanism is facilitated by
ModelManager, which implements abstract classModel. -
ModelManagercontains aFilteredList<Incidents> filteredIncidents, which internally stores the list of displayed incidents in the GUI. -
filteredIncidentsimplements the following key methods utilised in the List Incidents and Find Incidents command:-
updateFilteredIncidentsList(Predicate<Incident> predicate)- Updates the stored filtered incidents list with the new predicate -
getFilteredIncidentsList()- Returns full list of all incidents
-
Implementation of List Incidents Command
The following sequence diagram shows how the list-i command works when list-i is called:
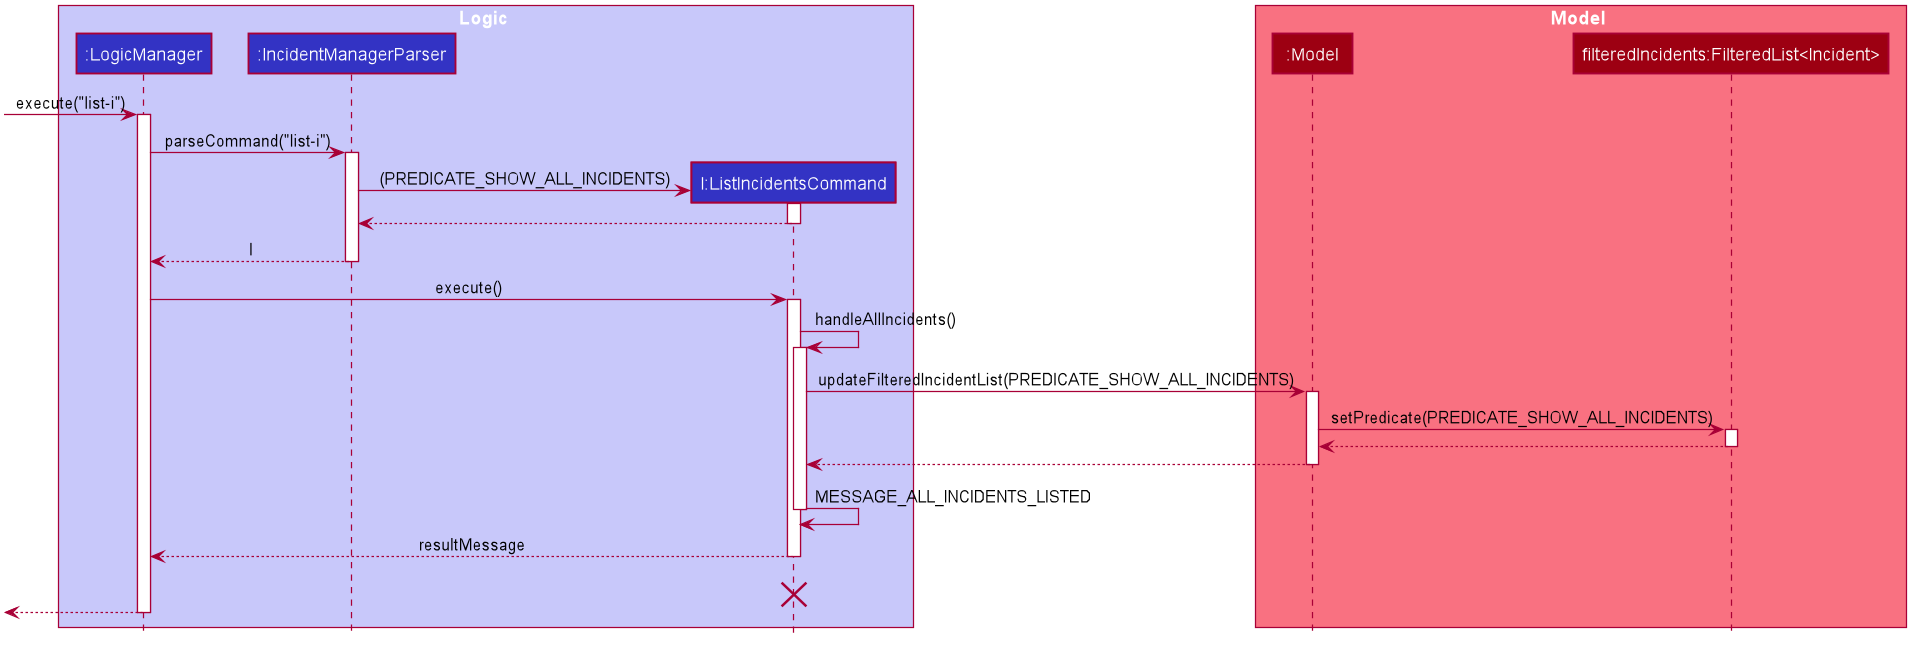
list-i-
The
LogicManagerpasses the command toIncidentManagerParserwhen running commandexecute("list-i"), which instantiates aListIncidentsCommandwithPredicate<Incident> PREDICATE_SHOW_ALL_INCIDENTSthat returns all incidents regardless of state. -
The
LogicManagerthen callsListIncidentsCommand#execute(), which runsListIncidentsCommand#handleAllIncidents(), a private method withinListIncidentsCommand. -
handleAllIncidents()runsModel#updateFilteredIncidentList()withPredicate<Incident> PREDICATE_SHOW_ALL_INCIDENTS, which always evaluates to true. -
This
Predicate<Incident>is passed toFilteredList<Incident> filteredList, as a parameter to run the methodfilteredList#setPredicate(). -
The list of visible incidents is updated.
-
CommandResult commandResultis returned to theLogicManagerto log the success/failure of the method.
Implementation of Find Incidents Command
Next, we will look at an example in which the user calls find-i to look for incidents written by an operator whose name contains Alex.
The execution of this method is a little more complex. The following sequence diagram shows how the find-i command identifies the keyword and flag, and returns related incidents:
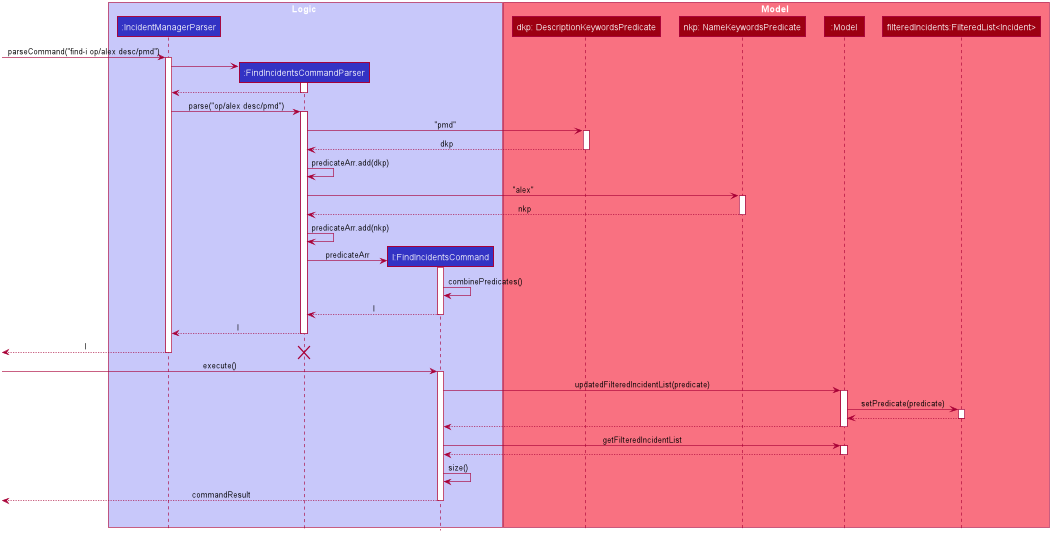
find-i op/alex desc/pmdThe key steps are as follows:
-
IncidentManagerParserpasses the arguments toFindIncidentsCommandParserto parse the keywords after the prefixesdesc/andop/in the command. -
FindIncidentsCommandParserutilisesParserUtilto parse out the keywords, in this case "pmd" for the description prefix and "alex" for the operator name prefix -
FindIncidentsCommandParsercreates a new instance ofDescriptionKeywordsPredicateto be added toList<Predicate<Incident>> predicateArr -
It does the same for
NameKeywordsPredicateand any other valid search parameters identified -
A new instance of
FindIncidentsCommandis passed the newList<Predicate<Incident>> predicateArr, combining the predicates usingcombinePredicates()to account for all predicates in theList -
As before, the
LogicManagercallsFindIncidentsCommand#execute(), which causes the Model to runModel#updateFilteredIncidentList(predicate)using the combined predicate stored inFindIncidentsCommand. -
This filters and updates the list in
FilteredList<Incident> filteredList, by runningfilteredList#setPredicate(predicate)with the passed combined predicate. -
Upon updating the list similar to the List Command above,
FindIncidentsCommandalso callsModel#getFilteredIncidentList()to returnObservableList<Incident>. It obtains the size of this list, and returns it inCommandResult commandResult.
3.5.2. Design Considerations
Aspect: How multiple keywords with the same prefixes are processed
-
Current choice: Keywords are read as an array into
Predicate<Incident>to be fed into a stream to search for any match with any of the keywords-
Pros: Requires lesser code. Abstraction of checking matches in keywords remains within the
Predicate<Incident>class
Able to separate the handling of multiple keywords with the same prefixes, inPredicate<Incident>, with the handling of different prefixes, done inFindIncidentsCommand -
Cons: More difficult to implement
-
-
Alternative: Every new predicate takes in a keyword and returns all results with exact matches, to be combined in
FindIncidentsCommandas separate predicates-
Pros: Easier to implement
-
Cons: May lead to confusing implementation of the
combinePredicates()function for returning results which have all prefixes fulfilled, but only require at least one match in keywords fulfilled for each prefix
-
Aspect: How multiple different prefixes are processed
-
Current choice:
FindIncidentsCommandParserchecks for the presence of every possible prefix and creates a newPredicate<Incident>to be added topredicateArrto be combined inFindCommandParser-
Pros: Intuitive to use, majorly improves the Find Incidents Command
Utilises Inheritance and Polymorphism principles from OOP to combine theDescriptionKeywordsPredicateandNameKeywordsPredicateandIdKeywordsPredicate, inherited fromPredicate<Incident>class, all stored inpredicateArr -
Cons: Challenging to implement.
-
-
Alternative:
FindIncidentsCommandParserreturns a newFindCommandfor every prefix identified-
Pros: Less complicated
-
Cons: More code needed
Does not follow theCommandinterface abstracted from, in that multipleFindCommandswill runexecute()at each time, returning multipleCommandResults
-
-
Alternative: Do not allow multiple different prefixes to be processed
-
Pros: Easy to implement, less challenging.
-
Cons: Very limited capabilities of Find Incidents Command if multiple parameters cannot be accepted at once.
-
Aspect: How predicate is added to FindIncidentsCommand
-
Current choice:
FindIncidentsCommandclass callsModelto create a new Predicate based on search string.-
Pros: Abstracts the creation and management of predicates to the
Model. Maintains Separation of Concerns principle. -
Cons: Requires greater level of coupling between classes.
-
-
Alternative:
FindIncidentsCommandorFindIncidentsCommanddirectly create Predicate based on search string.-
Pros: Less dependencies within the parser class.
-
Cons: Breaks Model-View-Controller pattern.
-
Aspect: How user keys in find-i keywords
-
Current choice: Parse user input after flag (eg.
op\ordesc\)-
Pros: Easy to implement.
-
Cons: Have to parse keyword from command and flag, user has to follow style of flag for successful search.
-
-
Alternative: Prompt user for search input
-
Pros: Separates command from keyword for ease of reading and parsing.
-
Cons: Difficult to implement multi-command execution.
-
Aspect: How listing all incidents is called
-
Current choice: Utilise separate command
list-i-
Pros: Intuitive to use.
-
Cons: Similar code under different command, leading to code reuse.
-
-
Alternative: Utilise
find-icommand (eg.find-i unfiltered)-
Pros: Less overlap in code.
-
Cons: Unintuitive to the user as no search is being made, even more keywords to remember.
-
Aspect: Whether the search only returns full word matches
-
Current choice: Search only returns full word matches
-
Pros: Intuitive to use.
-
Cons: Unable to return similar words eg. search for "desc/fire" does not return description containing "fires"
-
-
Alternative: Search returns all keyword-containing matches
-
Pros: Able to account for similar words to be returned.
-
Cons: Unintuitive to return certain longer words from certain searches eg. "desc/the" returns descriptions containing "weather"
Faster search as code is less inefficient
-
3.6. Incident Edit feature
3.6.1. Implementation
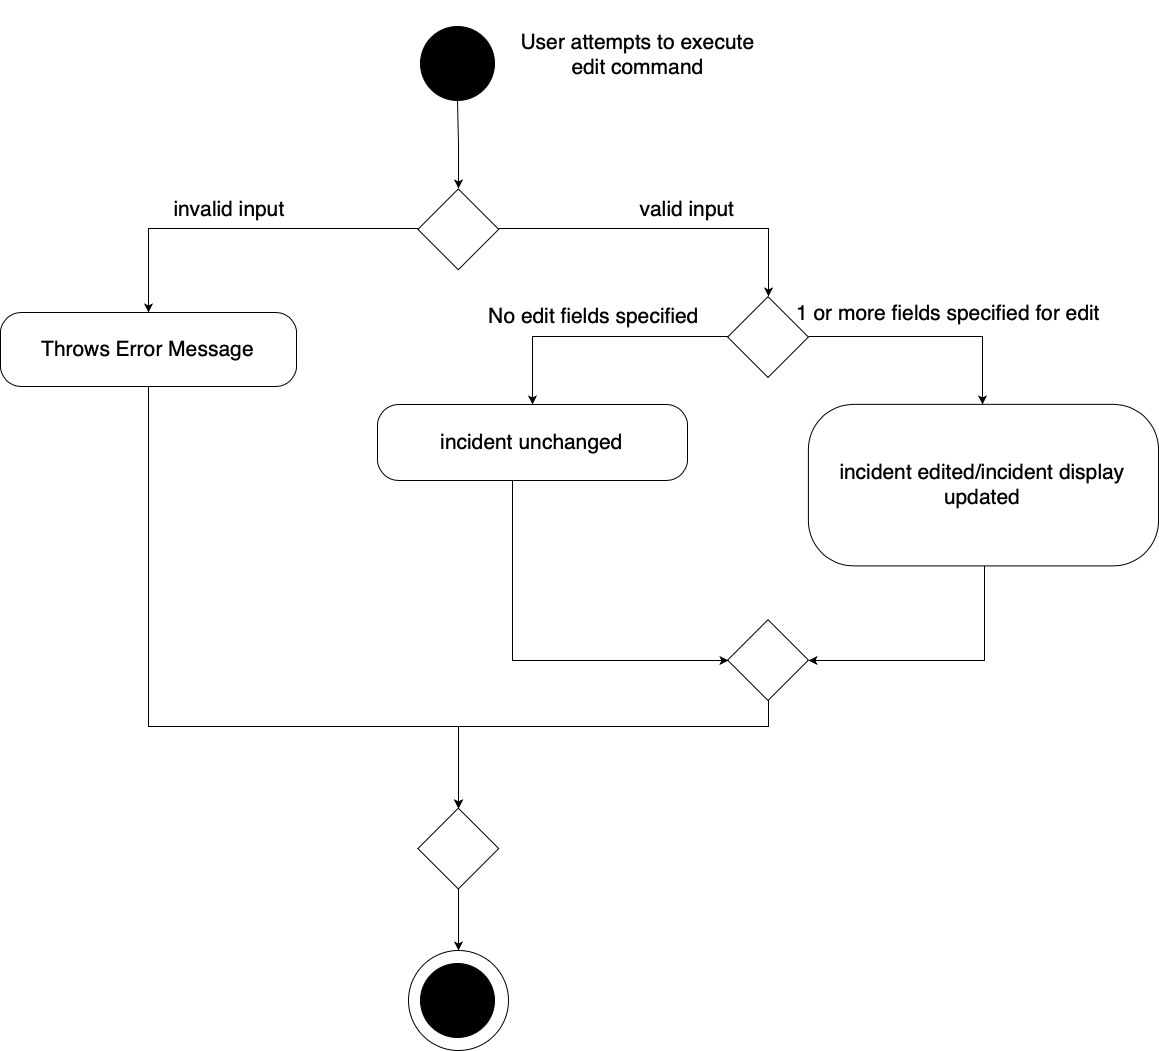
The incident edit mechanism is facilitated by EditCommand class. Validity of user input is checked when execute() is called and an exception is thrown if invalid.
The user can choose to put in any number of fields for editing. There are 2 ways to use the “edit-i” command: 1. ‘edit-i’ without any inputs will filter the incident list to display all incidents available for editing 2. ‘edit-i’ with fields identified for editing.
An exception will be thrown under these 2 conditions:
-
index.getZeroBased() >= listOfIncidents.size() -
!incidentToEdit.equals(editedIncident) && model.hasIncident(editedIncident)
Below is an activity diagram to illustrate the process that the user may go through
EditIncidentCommand` class makes use of EditIncident object to create a new
Incident object with the fields identified by user as well as the untouched
fields from the original incident. This new Incident will replace the original
Incident object in the incident list.
Below is a sequence diagram to illustrate how the command executes:
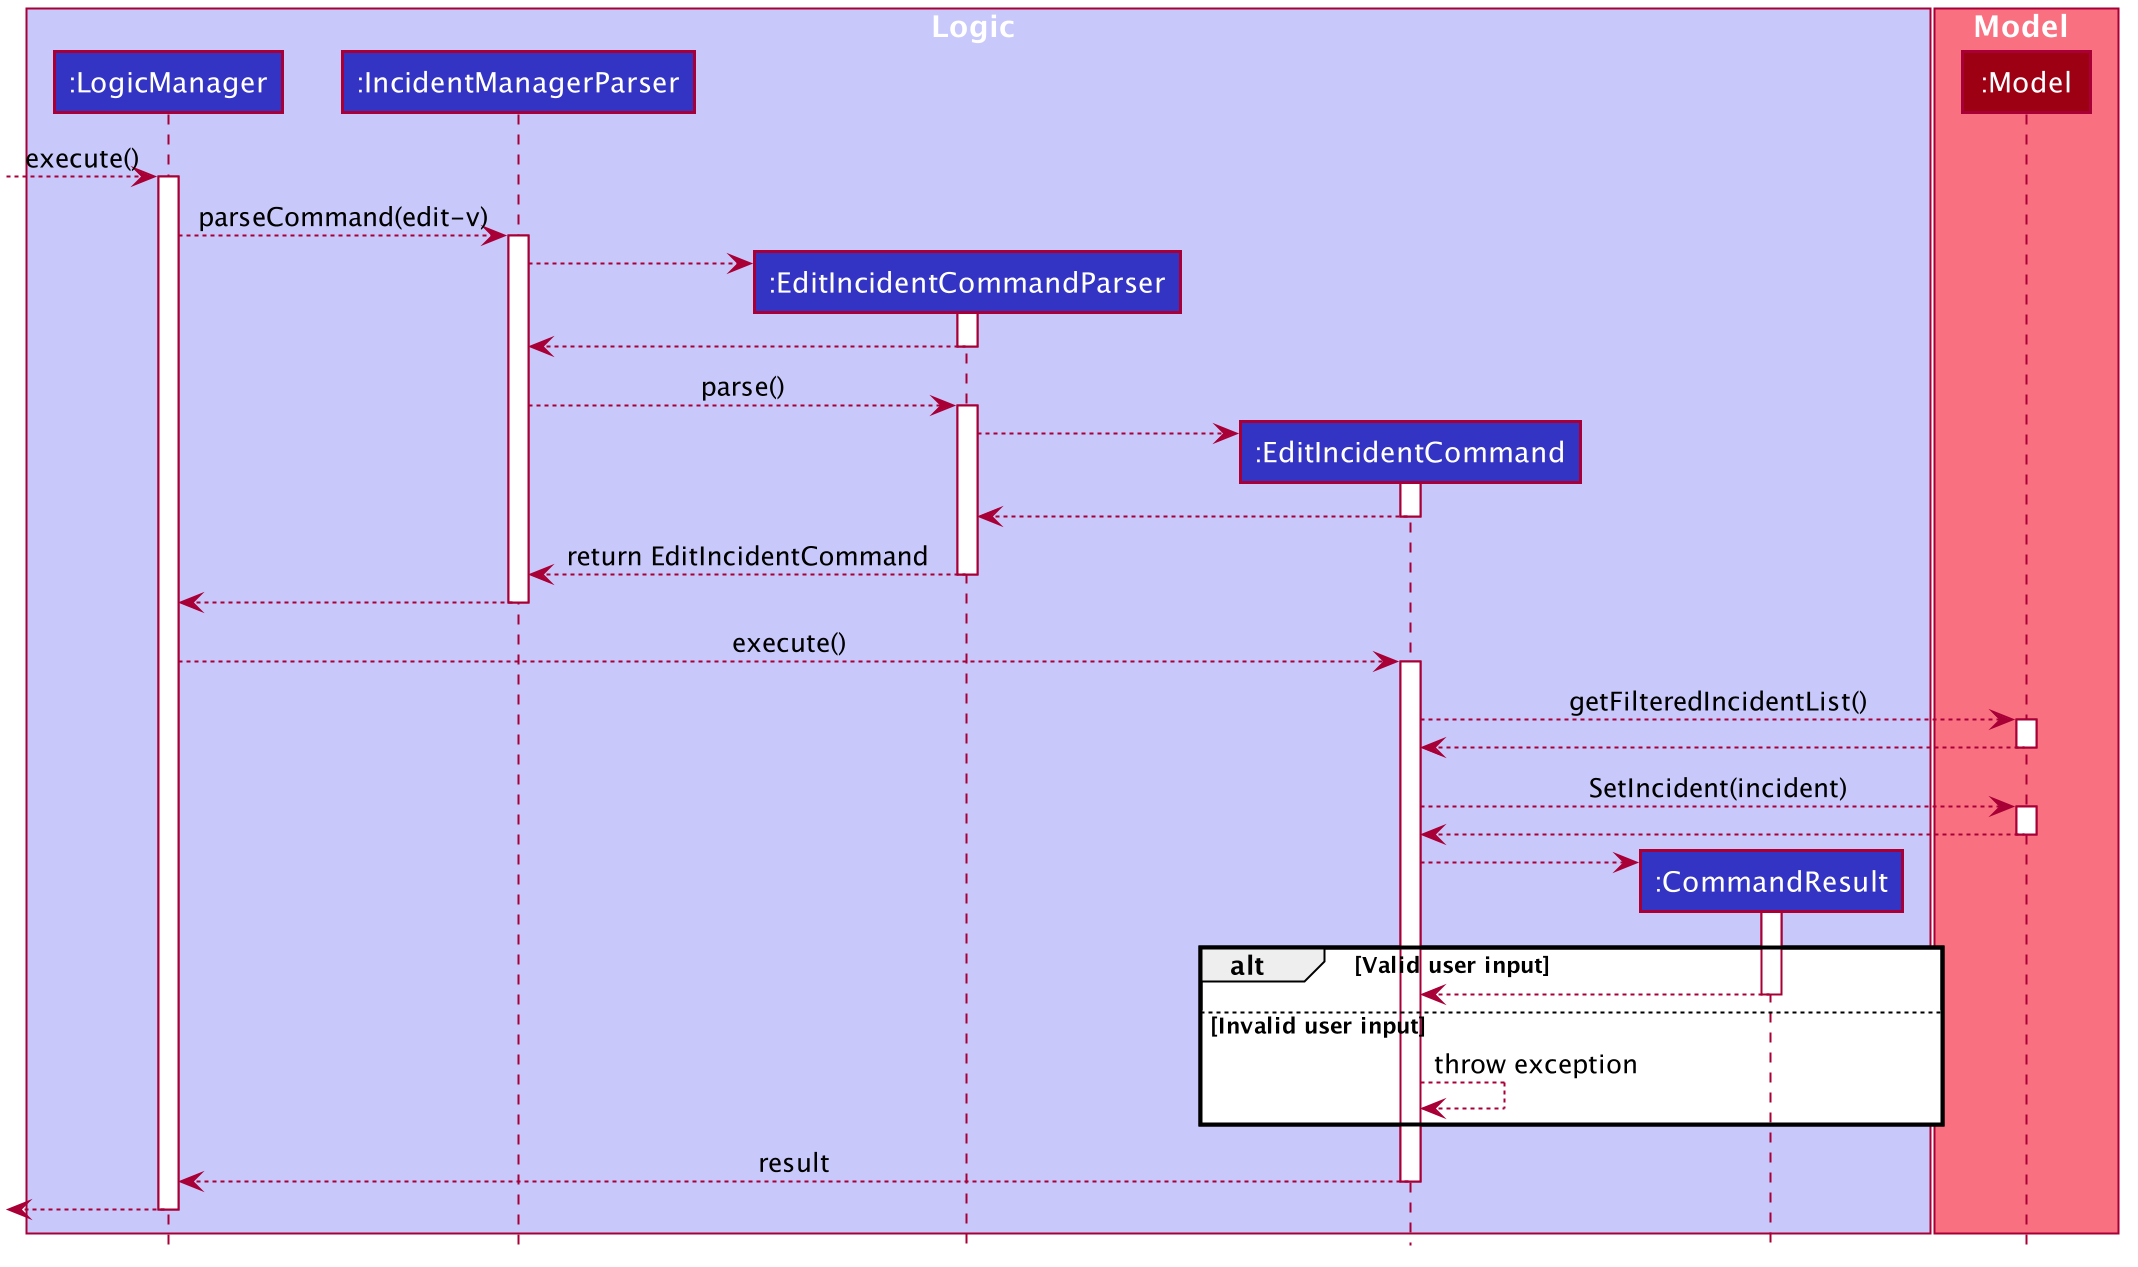
The command can only be used by admin accounts or accounts that created/filled/submitted the incident report. This is to prevent sabotage or accidental edits from operators who may not be familiar with the incident.
3.6.2. Design Considerations
Aspect: How incident edit executes
-
Current Choice: A new incident object with edited fields is created and used to replace the old incident object in the list.
-
Pros: This reduces direct changes to incident objects, hence
EditIncidentCommanddoes not have access toIncidentinternal structure. This helps reduce content coupling between the 2 classes and also makes the program easier to test. -
Cons: A new
Incidentobject is created every time user input is valid, hence may require more memory to run. It also requires the usage of the “EditIncident” class, increasing the complexity of the codebase.
-
-
Alternative: Direct edit of the attributes of incident to be modified
-
Pros: Easier to implement. Less objects created and less classes involved in the function.
-
Cons: High coupling since
EditIncidentCommandwill need to have access to internal details ofIncidentclass in order to directly modify the contents of the object. This will cause the system to be harder to test and maintain.
-
3.7. Vehicle Management
3.7.1. Implementation
These are the commands available to the user related to vehicle management:
-
Changing the details of a vehicle:
edit-v -
Adding a new vehicle:
add-v -
Deleting a vehicle:
delete-v
Only vehicles with the status Avaliable are valid for editing or deleting. This is to prevent removing or changing the details of a vehicle that is currently being dispatched.
|
-
Only accounts with admin access are eligible to delete vehicles
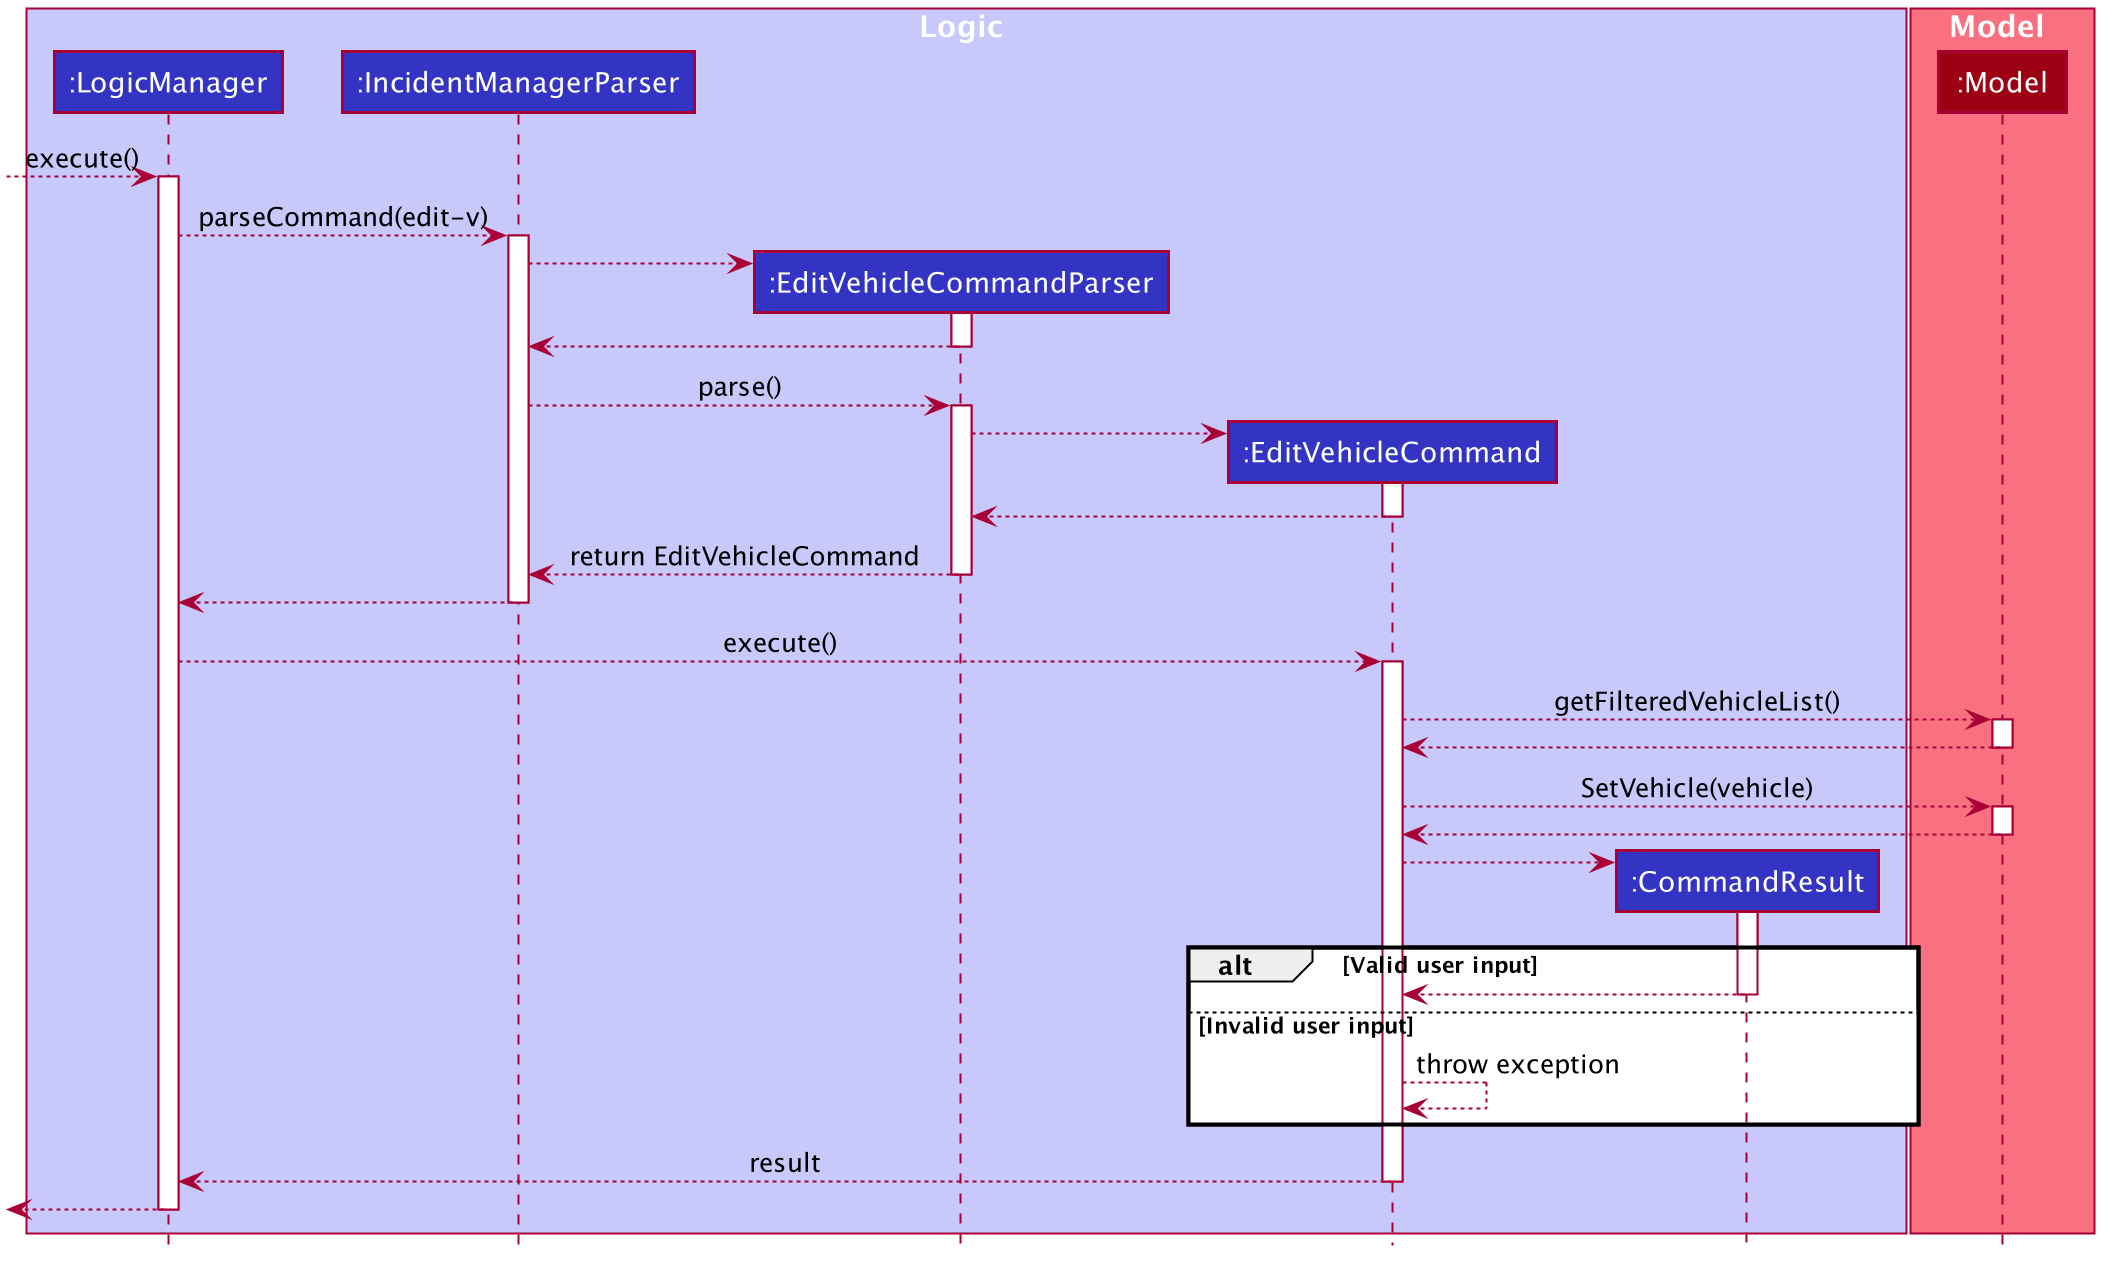
3.7.2. Editing Vehicles: edit-v
Implementation of edit-v is similar to edit-i where EditVehicleCommand makes use of EditVehicle class to create a new Vehicle object with the modified fields and replaces the original object. Design considerations are also similar to that of edit-i.
Below is a sequence diagram to illustrate the process and classes involved in the edit-v command:
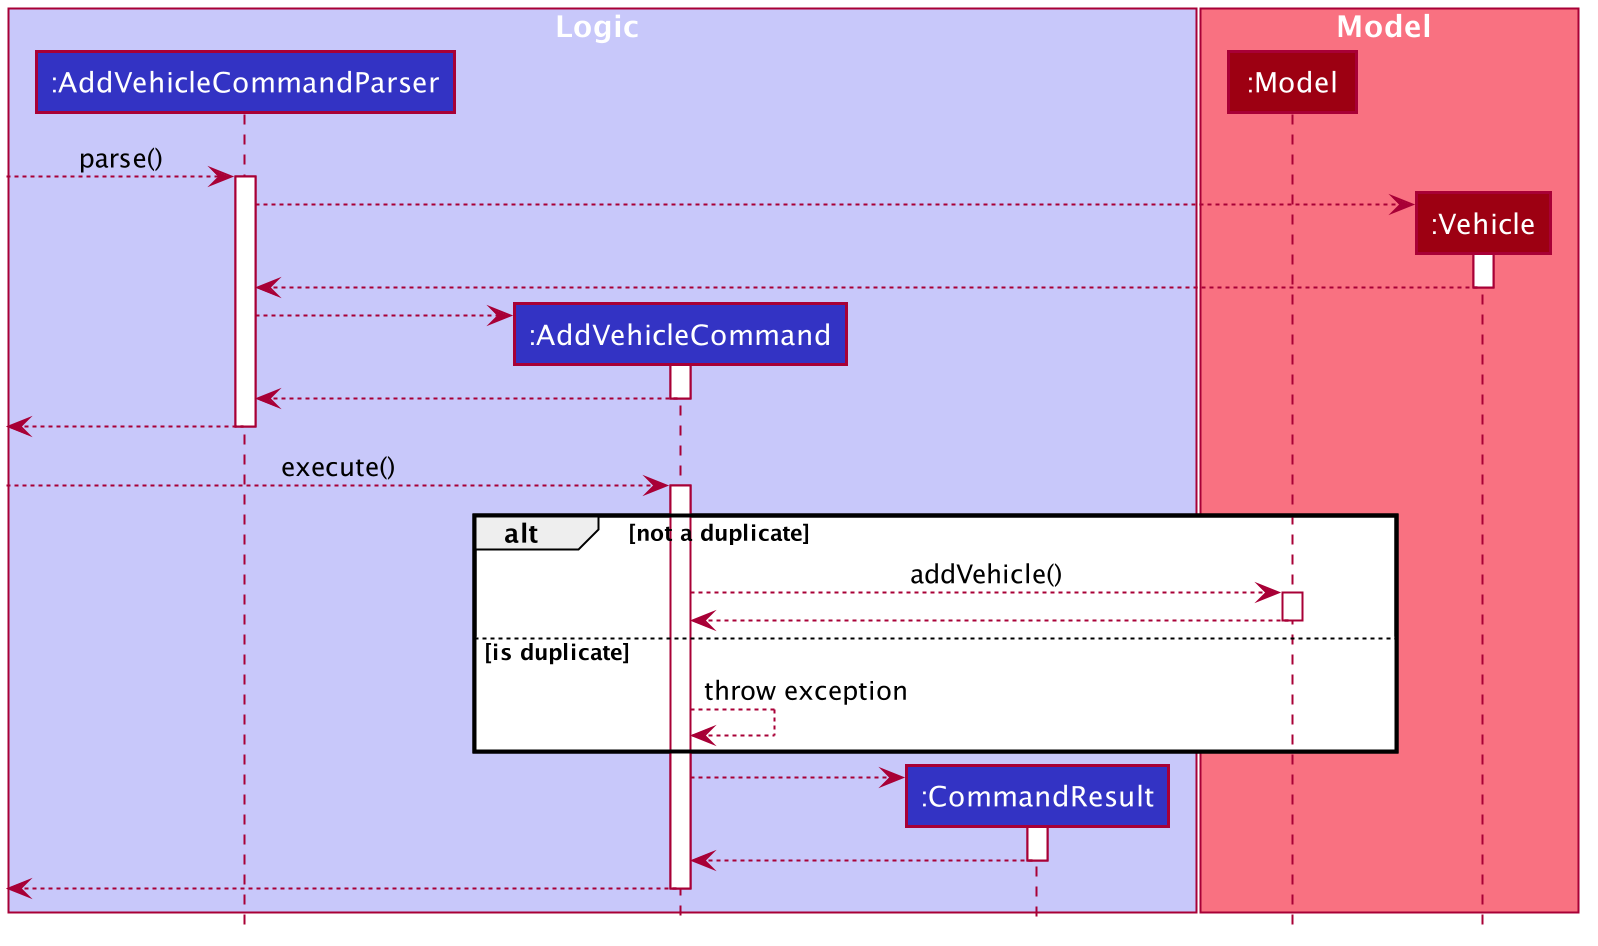
3.7.3. Adding and Deleting Vehicles: add-v/delete-v
Design Considerations: Adding vehicles
-
Current Choice: new Vehicle object is created in the parser and
AddVehicleCommandtakes aVehicleobject in the constructor.-
Pros: compliant with principle of data abstraction since
AddVehicleCommandonly receives a vehicle object that needs to be added and does not need to know how the object is created. -
Cons: Vehicle object needs to be created in the parser. Increases coupling of parser and vehicle model.
-
-
Alternative:
AddVehicleCommandtakes in the fields from parser and creates theVehicleobject in theexecute()method ofAddVehicleCommandclass-
Pros: Vehicle object does not need to be created in the parser.
-
Cons: Constructor for
AddVehicleCommandandVehiclewill be highly similar and almost overlap in functionality. The parameters for creating a vehicle will have to be passed twice.
-
Below is a sequence diagram to illustrate add-v:
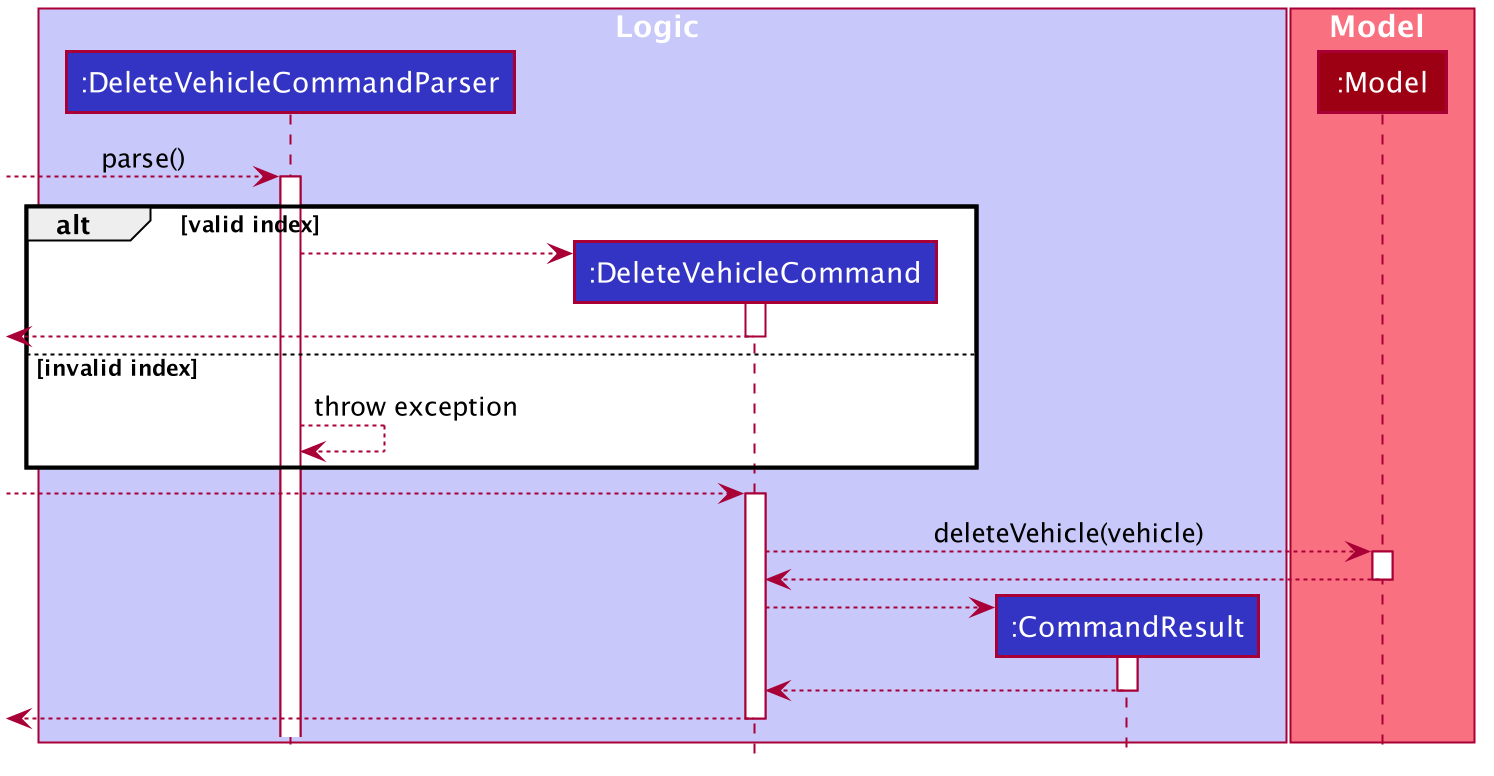
Design Considerations: Deleting vehicles
-
Current Choice: Vehicle object is taken from the list in model and
DeleteVehicleCommandtakes in theVehicleobject to be deleted and identifies it from the list using the signatures of the object.-
Pros: Reduces coupling. By passing a vehicle object instead of the index will mean that
DeleteVehicleCommandneed not know the state of the filtered vehicle list. -
Cons: Requires the vehicle list in to be unique and the signatures of
Vehicleobjects need to be specific. Methods fromModelManagerneeds to be access from bothDeleteVehicleCommandParserandEditVehicleParser. Increases coupling.
-
-
Alternative:
DeleteVehicleCommandcan take in the index of the vehicle to be deleted and delete from the list by identifying the vehicle using the index.-
Pros: Easier implementation
-
Cons: DeleteVehicleCommand needs to know the state of the filtered list. Increases coupling.
-
Below is a sequence diagram to illustrate delete-v:
3.8. Vehicle Search feature
3.8.1. Implementation
The vehicle search mechanism features a set of different types of searches that a user could utilise.The types of searches are as listed:
-
Unfiltered - Displays all vehicles in
Model.
e.g.list-v -
District - Displays all vehicles with
District districtin list of specified districts.
e.g.find-v dist/1 2 3 -
Vehicle Number - Displays all vehicles with
VehicleNumber vehicleNumberKeywordinVehicle vehicle. Need not be exact matches.
e.g.find-v vnum/2 -
Vehicle Type - Displays all vehicles with exact matches in
VehicleType vehicleTypeinVehicle vehicle.
e.g.find-v vtype/patrol car
Further documentation on the commands available in this set can be found in the User Guide.
3.8.2. Design Considerations
Aspect: How vehicle search with keyword is inputted
-
Current choice: Parse user input after flag (eg.
dist/orvnum/)-
Pros:
-
Easy to implement.
-
Reduce number of steps of input, more efficient.
-
-
Cons:
-
Have to parse keyword from command and flag, user has to follow style of flag for successful search.
-
User might have to remember too many flags.
-
-
-
Alternative: Prompt user for search input
-
Pros:
-
Separates command from keyword for ease of reading and parsing.
-
User need not remember flags and will not confuse flags, just key in information as prompted.
-
-
Cons:
-
Difficult to implement multi-command execution.
-
Requires multiple steps of input, slower and less efficient.
-
-
Aspect: How listing all vehicles is called
-
Current choice: Utilise separate command
list-v-
Pros:
-
Intuitive to user, as it contains clear action word.
-
Consistent with other list commands.
-
-
Cons:
-
Some users might find it more intuitive to simply call
vehicles.
-
-
-
Alternative: Utilise separate command
vehicles-
Pros: Intuitive for some.
-
Cons: Appears separate from other list commands even though they are of the same nature and implemented similarly.
-
3.9. Logging
We are using java.util.logging package for logging. The LogsCenter class is used to manage the logging levels and logging destinations.
-
The logging level can be controlled using the
logLevelsetting in the configuration file (See Section 3.10, “Configuration”) -
The
Loggerfor a class can be obtained usingLogsCenter.getLogger(Class)which will log messages according to the specified logging level -
Currently log messages are output through:
Consoleand to a.logfile.
Logging Levels
-
SEVERE: Critical problem detected which may possibly cause the termination of the application -
WARNING: Can continue, but with caution -
INFO: Information showing the noteworthy actions by the App -
FINE: Details that is not usually noteworthy but may be useful in debugging e.g. print the actual list instead of just its size
3.10. Configuration
Certain properties of the application can be controlled (e.g user prefs file location, logging level) through the configuration file (default: config.json).
4. Documentation
Refer to the guide here.
5. Testing
Refer to the guide here.
6. Dev Ops
Refer to the guide here.
Appendix A: Product Scope
Target user profile: Emergency Services Call Operator
-
needs to quickly dispatch emergency vehicles
-
has a need to manage a significant number of incidents
-
prefer desktop apps over other types
-
can type fast, prefers typing over mouse input
-
is reasonably comfortable using CLI apps
Value proposition: manage incidents and vehicle dispatch faster than a typical mouse/GUI driven app
Appendix B: User Stories
Priorities: High (must have) - * * *, Medium (nice to have) - * *, Low (unlikely to have) - *
| Priority | As a … | I want to … | So that I can… |
|---|---|---|---|
|
new user |
see usage instructions |
refer to instructions when I forget how to use the App |
|
operator |
log into the system with a password |
secure the system against unauthorised access |
|
operator |
log into the system with a unique identifier |
hold accountable others who use the system |
|
new user |
create an account |
log into the system to manage incidents |
|
operator |
open the app |
I can dispatch personnel and record an incident |
|
operator |
view available vehicles |
I can dispatch vehicles |
|
confused operator |
automatically prevent sending of non available vehicles |
I won’t be allowed to send occupied vehicles |
|
operator |
to select a vehicle |
it would be dispatched |
|
operator |
to contact the dispatched vehicle and confirm it has been selected |
it would be dispatched |
|
operator |
an ID to be generated for my summaries |
my reports can be tagged for easy search |
|
operator |
to have prompts for fields |
I know the information required |
|
careless operator |
edit the report |
I won’t have to retype everything |
|
operator on shift |
to save the case for future retrieval |
So that others can reference it locally |
|
operator handling many cases |
to quickly find relevant parties |
I can submit the incident log |
|
regular operator |
to view the phone number |
I can contact the caller whenever necessary |
|
regular operator |
to view the address |
I can dispatch personnel based on proximity to address |
|
operator who likes visual cues |
to view the vehicles on patrol on a map |
I have a visual on who to dispatch |
|
As an operator |
to view the available vehicles in descending order of proximity to site |
the vehicle can reach the incident site asap |
|
As an overwhelmed operator |
to filter the available vehicles |
I won’t get confused over which vehicle to send |
|
As a tired operator |
warning prompt when I select the least optimal available vehicle |
I minimise fatigue errors |
|
As a busy operator |
automatic spell and grammar check |
so that I can type fast without worry |
|
As an operator |
keyboard shortcuts |
I can type while I talk |
|
As an operator working under supervisors |
to alert the relevant parties |
So that they can act on it |
|
advanced operator |
to auto-transcribe the call |
I can store the call transcript for record-keeping purposes |
|
operator |
automatic triangulation of the call location |
I can dispatch a vehicle even if the caller does not know his/her address |
|
as an anxious operator |
nearby vehicles to be notified of the incident even though they’re not dispatched |
In case backup is needed |
|
As an operator that has to take many calls |
to select from drop down lists for certain fields |
so that I can fill in the summary report fast |
Appendix C: Use Cases
(For all use cases below, the System is the IMS and the Actor is the user, unless specified otherwise)
Use case: User Login
MSS
-
User inputs username and password
-
IMS checks username & password
-
IMS provides user with access
Use case ends.
Extensions
-
2a. The username is not found or password is incorrect.
-
2a1. IMS shows a generic error message to deter malicious intent. Use case ends.
-
Use case: New incident
MSS
-
User requests to create a new incident
-
User chooses auto vehicle dispatchment
-
IMS creates a new incident with autofill details
-
IMS prompts for completion of incident report
-
User fills in necessary details
-
User submits incident report
Use case ends.
Extensions
-
2a. User opts for manual assignment.
-
2a1. IMS displays list of all available vehicles.
-
2a2. User selects index of vehicle to dispatch.
Use case resumes at step 4.
-
-
6a. User opts to complete report later.
-
6a1. IMS stores incident as a draft.
Use case ends.
-
Use case: Edit Incident
MSS
-
User searches for an incident
-
IMS retrieves the incident
-
User edits the incident details
-
IMS saves the edited incident report
Use case ends.
Extensions
-
2a. The incident is not found.
-
2a1. IMS shows an error message.
Use case ends.
-
Appendix D: Non Functional Requirements
-
Should work on any mainstream OS as long as it has Java
11or above installed. -
Should be able to hold up to 1000 incidents without a noticeable sluggishness in performance for typical usage.
-
A user with above average typing speed for regular English text (i.e. not code, not system admin commands) should be able to accomplish most of the tasks faster using commands than using the mouse.
-
Performance first for vehicle dispatch upon new incident creation.
-
Interface should prioritise user experience since operators function in a high stress environment.
Appendix F: Instructions for Manual Testing
Given below are instructions to test the app manually.
| These instructions only provide a starting point for testers to work on; testers are expected to do more exploratory testing. |
F.1. Launch and Shutdown
-
Initial launch
-
Download the jar file and copy into an empty folder
-
Double-click the jar file
Expected: Shows the GUI with a set of sample contacts. The window size may not be optimum.
-
-
Saving window preferences
-
Resize the window to an optimum size. Move the window to a different location. Close the window.
-
Re-launch the app by double-clicking the jar file.
Expected: The most recent window size and location is retained.
-
F.2. Saving data
-
Dealing with missing/corrupted data files
-
A missing data file will load the application with sample data similar to the first launch.
-
If a data file is corrupted, please delete the file and re-launch the application.
-
F.3. Access Control
This section details general testing for access control.
F.3.1. System Access Restrictions
-
Restriction of commands prior to login.
-
Prerequisites: Application launched successfully. No user logged in.
-
Test Case:
help
Expected: Pop-up box with link to user guide shows. -
Test Case:
logout
Expected: Error message is shown indicating that user must be logged in. -
Only the following commands are available prior to login:
help,register,login,exit. Execution of any other command (prior to login) will display the same error message as above.
-
-
Registering a new account
-
Prerequisites: Application launched successfully. No user logged in.
-
Test Case:
register n/Tester p/12345678 e/test@nus u/Test-1 w/password t/New
Expected: New account is NOT registered. Error message is shown indicating that you must be a logged in admin to include tags. -
Test Case:
register n/Tester p/12345678 e/test@nus u/Test-1 w/password
Expected: New account is registered. -
Other incorrect commands to try:
-
Missing argument prefix (all prefixes are mandatory except
t/) -
Incorrect name syntax (e.g.
n/T35t@-R) -
Incorrect phone syntax (e.g.
p/num) -
Incorrect email syntax (e.g.
e/test.com) -
Incorrect username syntax (e.g.
u/_Test) -
Incorrect password syntax (e.g.
w/123)
-
-
-
Logging in with the provided sample admin account.
-
Prerequisites: Application launched successfully. No user logged in. Sample admin account not deleted.
-
Test Case:
login u/Agent01 w/password
Expected: Login success. Interface swaps to incident view. Status bar reflects username of logged in account. -
Test Case:
login u/Agent01 w/p
Expected: Login failure. Generic error message is shown indicating either an invalid username or password (the error message is intentionally generic so as to deter malicious intent). -
Other incorrect commands to try:
login u/Agentdisplays command usage error message (due to missing argument prefix).
-
-
Logging out
-
Prerequisites: User is logged in.
-
Test Case:
logout
Expected: Logout success. Interface shows the account management view. Status bar reflects that no user is logged in.
-
F.3.2. Interface Command Restrictions
-
Swapping interfaces to access corresponding command suites
-
Prerequisites: User is logged in.
-
Test Case:
swap
Expected: Changes to account management interface if on incident interface, and vice versa. -
Corresponding Restrictions:
-
Account Management Suite (must be in account management view to execute):
register,update,list-a,find-a,delete-a -
Incident Management Suite (must be in incident management view to execute):
new,fill,submit,list-i,find-i,edit-i,list-v,find-v,edit-v,add-v,delete-v -
All other commands can be executed irrespective of interface view (subject to any prevailing login restrictions).
-
-
F.4. Account Management (User)
This section details commands available to regular users (non-Admin).
F.4.1. Updating Own Account
-
Updating own account details and/or information
-
Prerequisites: Logged in. In Account Management View.
-
Test Case:
update p/98765432
Expected: Successful update of phone number for account of user logged in. -
Test Case:
update u/Test-2
Expected: Successful update of username for account of user logged in. Status bar is updated with new username and reflects the time of the update. -
Test Case: `update `
Expected: Error message indicating that no fields have been edited.
-
F.4.2. Listing Accounts (with optional Tag search)
-
Listing all accounts
-
Prerequisites: Logged in. In Account Management View.
-
Test Case:
list-a
Expected: Lists all accounts
-
-
Listing accounts whose tags match given keyword(s)
-
Prerequisites: Logged in. In Account Management View.
-
Test Case:
list-a admin
Expected: Lists all accounts with the admin tag -
Test Case:
list-a admin OC
Expected: Lists all accounts with the admin tag AND the OC tag. Accounts that only have either one of the keywords are not shown.
-
F.4.3. Finding Accounts based on Name/Username
-
Finding accounts whose name or username matches given keyword(s)
-
Prerequisites: Logged in. In Account Management View.
-
Test Case:
find-a alex ahmed
Expected: Account view will show all accounts matching either alex OR ahmed in their username or name. -
Test Case: `find-a `
Expected: Command usage error message shown. This command requires at least one keyword.
-
F.5. Account Management (Admin)
This section details additional commands and command parameters available to administrators. Suffice to say, non admins cannot execute the following tests.
F.5.1. Updating Other Accounts
-
Updating other accounts after a successful
find-aorlist-acommand.-
Prerequisites: Logged in. In Account Management View. Logged in user is an admin. There are accounts in the account management view (either after using
find-aorlist-a). -
Test Case:
update 2 n/Someone
Expected: If there is a second person on the list, updates their name.
-
F.5.2. Add Tags when Registering and Updating
-
Adding tags during registration process or when performing update operation.
-
Prerequisites: Logged in. In Account Management View. Logged in user is an admin. Add any additional prerequisites necessary for either the
registerorupdatecommand as previously covered. -
Test Case:
update 2 t/admin
Expected: If there is a second person on the list, updates their tag to include the admin tag. This makes that account an admin account. -
Test Case:
register n/Tester p/12345678 e/test@nus u/Test-1 w/password t/Admin
Expected: Registers a new admin account. New account with admin tag is populated at the bottom of the accounts list.
-
F.5.3. Deleting a person
-
Deleting a person while all persons are listed
-
Prerequisites: Logged in. In Account Management View. Logged in user is an admin. List all persons using the
list-acommand. -
Test case:
delete-a 1
Expected: First contact is deleted from the list. Details of the deleted account shown in the status message. -
Test case:
delete-a 0
Expected: No account is deleted. Error details shown in the status message. -
Other incorrect commands to try:
delete-a,delete-a x(where x is larger than the list size),delete-a i(where i is the index of the account currently logged in).
Expected: Similar to previous.
-
F.6. Creating an incident report
-
Attempting to execute
newwithout logging in.-
Prerequisites: User not logged in.
-
Test case:
new dist/1 auto/y
Expected: Message "Only Register, Login, Exit, and Help commands are available. Please login to access other commands. See help page for more information."
-
-
Executing
newwith valid inputs and successful auto vehicle dispatchment-
Prerequisites: User must be logged in, and there must be at least one available vehicle in the given district.
-
Test case:
new dist/1 auto/y
Expected: Message "New incident drafted!" with the newly drafted incident appears at the top of the incident pane. All vehicles in district 1 will be listed in the vehicle pane, and the vehicle dispatched will change it availability from "AVAILABLE" to "BUSY".
-
-
Executing
newwith no inputs for manual vehicle dispatchment-
Prerequisites: User must be logged in.
-
Test case:
new dist/1 auto/n
Expected: User prompted to fill in index of vehicle to dispatch with message "Please include the index of the vehicle you would like to assign, with the district prefix! eg new l/1 auto/n v/1 Note that the index must be a positive integer!"
-
-
Executing
newwith valid inputs for manual vehicle dispatchment-
Prerequisites: User must be logged in.
-
Test case:
new dist/1 auto/n v/1
Expected: Message "New incident drafted!" with the newly drafted incident appears at the top of the incident pane. All vehicles in district 1 will be listed in the vehicle pane, and the vehicle dispatched will change it availability from "AVAILABLE" to "BUSY".
-
-
Executing
newwith invalid inputs for manual vehicle dispatchment-
Prerequisites: User must be logged in.
-
Test case:
new dist/1 auto/n v/1.2
Expected: Message "The index must be a positive integer!"
-
-
Executing
newwith no vehicle available for dispatchment.-
Prerequisites: User must be logged in, and no vehicle is available in the district.
-
Test case:
new dist/28 auto/y
Expected: Message "No vehicle available in this district!", for both auto and manual dispatchment.
-
F.7. Filling an incident report
-
Attempting to execute
fillwithout logging in.-
Prerequisites: User not logged in.
-
Test case:
fill
Expected: Message "Only Register, Login, Exit, and Help commands are available. Please login to access other commands. See help page for more information." -
Test case:
fill 1 p/92034950 desc/There was an incident
Expected: Message "Only Register, Login, Exit, and Help commands are available. Please login to access other commands. See help page for more information."
-
-
Executing
fillin both no-parameter and parameter modes one after the other.-
Prerequisites: User must be logged in. There must be incomplete and/or complete draft incident reports in the system. Index, caller number, and description specified for
fillin parameter mode must all be valid. User must have created the incident report. -
Test case:
fill
Expected: All drafts are listed in the incident panel view, with incidents whose status was most recently changed being listed first. Message: "Listed all draft incident reports". -
Test case:
fill 1 p/95860594 desc/There was an incident
Expected: If selected draft was an incomplete draft, its status changes to 'Complete Draft' and the caller number and description fields are added according to the data specified. If selected draft was a complete draft, its status remains 'Complete Draft' and the caller number and description fields are overwritten with the data specified. The incident panel view lists all incidents in the system, with the just modified incident at the top of the list. Message: "Incident report filled: Incident #[ID]"
-
-
Executing
fillin parameter mode with valid parameters.-
Prerequisites: User must be logged in. There must be incomplete and/or complete draft incident reports in the system. Incident panel view must show all incidents (use
list-ito return to this view if needed). Index, caller number, and description specified forfillin parameter mode must all be valid. -
Test case:
fill 1 p/95860594 desc/There was an incident
Expected: If first incident in the list is a draft and the user has created the report, same expected behaviour as case 2 (iii) above. If user has not created the selected incident, the message "You do not have access to fill this draft as another operator has created it." is displayed. If selected incident has already been submitted and user has created the incident, the message "This report has already been submitted" is displayed.
-
-
Executing
fillin parameter mode with invalid parameters (including invalid - zero or out of bounds - index).-
Prerequisites: User must be logged in.
-
Test case:
fill 0 p/95860594 desc/There was an incidentorfill 1 c/95860594 desc/There was an incidentorfill 1 p/95860594 d/There was an incidentExpected: Message "Invalid command format!" is displayed along with command usage message.
-
-
Executing
fillwith no drafts present in the system.-
Prerequisites: User must be logged in. There must be no complete or incomplete drafts in the system.
-
Test case:
fillExpected: Message "No drafts present in the system" shown while the incident panel view remains unchanged. -
Test case:
fill 1 p/95860594 desc/There was an incidentExpected: Message "No drafts present in the system" shown while the incident panel view remains unchanged.
-
F.8. Submitting an incident report
-
Attempting to execute
submitwithout logging in.-
Prerequisites: User not logged in.
-
Test case:
submit
Expected: Message "Only Register, Login, Exit, and Help commands are available. Please login to access other commands. See help page for more information." -
Test case:
submit 1
Expected: Message "Only Register, Login, Exit, and Help commands are available. Please login to access other commands. See help page for more information."
-
-
Executing
submitin both no-parameter and parameter modes one after the other.-
Prerequisites: User must be logged in. There must be complete draft incident reports in the system. Index specified for
submitin parameter mode must be valid. User must have created the incident report. -
Test case:
submit
Expected: All complete drafts are listed in the incident panel view, with incidents whose status was most recently changed being listed first. Message: "Listed all incident reports ready for submission". -
Test case:
submit 1
Expected: The status of the selected complete draft changes to 'Submitted'. The incident panel view lists all incidents in the system, with the just submitted incident at the top of the list. Message: "New incident report submitted: Incident #[ID]"
-
-
Executing
submitin parameter mode with valid index.-
Prerequisites: User must be logged in. There must be complete draft incident reports in the system. Incident panel view must show all incidents (use
list-ito return to this view if needed). Index specified forsubmitin parameter mode must be valid. -
Test case:
submit 1
Expected: If first incident in the list is a complete draft and the user has created the report, same expected behaviour as case 2 (iii) above. If user has not created the selected incident, the message "You do not have access to submit this report as another operator has created it." is displayed. If selected incident has already been submitted and user has created the incident, the message "This report has already been submitted" is displayed.
-
-
Executing
submitin parameter mode with invalid - zero or out of bounds - index.-
Prerequisites: User must be logged in.
-
Test case:
submit 0Expected: Message "Invalid command format!" is displayed along with command usage message.
-
F.9. Finding incidents
-
Attempting to execute
find-iwithout logging in.-
Prerequisites: User not logged in.
-
Test case:
find-i desc/district
Expected: Message "Only Register, Login, Exit, and Help commands are available. Please login to access other commands. See help page for more information."
-
-
Attempting to execute
find-iwith a single blank description keyword.-
Prerequisites: User must be logged in.
Incident pane must be visible in GUI. -
Test case:
find-i desc/
Expected: Message "Description can take any values, and it should not be blank."
-
-
Attempting to execute
find-iwith a single blank incident ID keyword.-
Prerequisites: User must be logged in.
Incident pane must be visible in GUI. -
Test case:
find-i id/
Expected: Message "Incident ID should only contain numerical digits and should not be blank."
-
-
Attempting to execute
find-iwith a single blank operator keyword.-
Prerequisites: User must be logged in.
Incident pane must be visible in GUI. -
Test case:
find-i op/
Expected: Message "Names should only contain alphanumeric characters and spaces, and it should not be blank."
-
-
Executing
find-iwith a single description keyword.-
Prerequisites: User must be logged in, and there are incidents in the incident pane, with matching descriptions.
Incident pane must be visible in GUI. -
Test case: `find-i desc/cRAsH `
Expected: Message "2 incidents listed!", and incidents whereby the description contains the given keyword will be listed in the incidents pane.
-
-
Executing
find-iwith multiple description keywords.-
Prerequisites: User must be logged in, and there are incidents in the incident pane, with matching descriptions.
Incident pane must be visible in GUI. -
Test case: `find-i desc/CrAsh catS `
Expected: Message "3 incidents listed!", and incidents whereby the description contain any of the given keywords will be listed in the incidents pane.
-
-
Executing
find-iwith a single operator keyword.-
Prerequisites: User must be logged in, and there are incidents in the incident pane, with matching operator names.
Incident pane must be visible in GUI. -
Test case:
find-i op/yeoh
Expected: Message "6 incidents listed!", and incidents whereby the involved operator’s name contains the given keyword will be listed in the incidents pane.
-
-
Executing
find-iwith multiple operator keywords.-
Prerequisites: User must be logged in, and there are incidents in the incident pane, with matching operator names.
Incident pane must be visible in GUI. -
Test case:
find-i op/yeoh aHMad
Expected: Message "8 incidents listed!", and incidents whereby the involved operator’s name contains any of the given keywords will be listed in the incidents pane.
-
-
Executing
find-iwith a single id keyword.-
Prerequisites: User must be logged in, and there are incidents in the incident pane, with matching operator names.
Incident pane must be visible in GUI. -
Test case:
find-i id/0420180001
Expected: Message "1 incident listed!", and incidents whereby the ID matches the given keyword exactly will be listed in the incidents pane.
-
-
Executing
find-iwith self-search.-
Prerequisites: User must be logged in, and there are incidents in the incident pane with the operator name matching the name of the logged-in operator.
Incident pane must be visible in GUI. -
Test case:
find-i self
Expected: Message "6 incidents listed!", and incidents whereby the involved operator’s name matches the logged-in operator’s name exactly will be listed in the incidents pane.
-
-
Executing
find-iwith multiple different parameters.-
Prerequisites: User must be logged in, and there are incidents in the incident pane, with all parameters matching the keywords given.
Incident pane must be visible in GUI. -
Test case:
find-i self desc/pmd id/0520140001
Expected: Message "1 incident listed!", and the incidents whereby all the parameters match the given keywords for each parameter will be listed in the incidents pane.
-
-
Executing
find-iwith multiple same parameters.-
Prerequisites: User must be logged in, and there are incidents in the incident pane, with all parameters matching the keywords given.
Incident pane must be visible in GUI. -
Test case:
find-i desc/cats desc crash
Expected: Message "2 incidents listed!", and the incidents whereby all the parameters match the given keywords for the last usage of the same parameter will be listed in the incidents pane.
-
-
Attempting to execute
find-iwith irrelevant parameters.-
Prerequisites: User must be logged in.
Incident pane must be visible in GUI. -
Test case:
find-i test
Expected: Error message "Invalid command format!
find-i: Searches all incidents for which ID matches exactly, or description contains any of the specified description keywords, or operator name matches any of the specified operator keywords or logged-in operator’s name
Parameters:
id/<ID>
op/<OPERATOR KEYWORD [MORE_KEYWORDS]>
desc/<DESCRIPTION KEYWORD [MORE_KEYWORDS]…>
self
Example: find-i op/alex yeoh desc/6 self"
-
-
Attempting to execute
find-iwithout displaying the incident pane.-
Prerequisites: User mut be logged in.
Incident pane must not be visible in GUI. -
Test case:
find-i
Expected: Message "Please swap the interface to access the command from this suite.
See help page for more information."
-
F.10. Listing incidents
-
Attempting to execute
list-iwithout logging in.-
Prerequisites: User not logged in.
-
Test case:
list-i
Expected: Message "Only Register, Login, Exit, and Help commands are available. Please login to access other commands. See help page for more information."
-
-
Attempting to execute
list-iwith irrelevant parameters.-
Prerequisites: User must be logged in.
Incident pane must be visible in GUI. -
Test case:
list-i test message
Expected: Message "Please do not enter irrelevant prefixes/ fields!"
-
-
Executing
list-iwith no parameters.-
Prerequisites: User must be logged in.
Incident pane must be visible in GUI. -
Test case:
list-i
Expected: Message "Listed all incidents", and all incidents in database will be listed in the incident pane
-
-
Attempting to execute
list-iwithout displaying the incident pane.-
Prerequisites: User mut be logged in.
Incident pane must not be visible in GUI. -
Test case:
list-i
Expected: Message "Please swap the interface to access the command from this suite.
See help page for more information."
-
F.11. Editing submitted incidents
-
Attempting to execute
edit-iwithout logging in-
Prerequisites: User not logged in.
-
Test case:
edit-i
Expected: Message "Only Register, Login, Exit and Help commands are availble. Please login to access other commands. See help page for more information."
-
-
Executing
edit-iwithout any keywords-
Test case:
edit-i
Expected: Message "Listed all submitted incident reports that can be edited."
-
-
Executing
edit-iwith some keywords when logged into admin account-
Test case:
edit-i 1 dist/21
Expected: Message "Edited Incident: Incident #[ID]"
-
-
Executing
edit-iwith all keywords when logged into admin account-
Test case:
edit-i 1 dist/22 p/91234567 desc/This is an incident description.
Expected: Message "Edited Incident: Incident #[ID]"
-
-
Executing
edit-ion incident not created by logged in non admin account. ..Test caseedit-i 1
Expected: Message "Only the admin and the operator who filled in this report can edit the report."
F.12. Adding vehicles
-
Attempting to execute
add-vwithout logging in.-
Prerequisites: User not logged in.
-
Test case:
add-v
Expected: Message "Only Register, Login, Exit, and Help commands are available. Please login to access other commands. See help page for more information."
-
-
Executing 'add-v' with all valid inputs
-
Test case :
add-v dist/2 vnum/SFD1356S vtype/Ambulance a/available
Expected: Message "New vehicle added: Ambulance Vehicle Number: SFD1356S District: 2 Availability: AVAILABLE"
-
-
Executing
add-vwith invalid vnum-
Test case:
add-v dist/2 vnum/1234 vtype/Patrol Car a/available
Expected: Message "Invalid vehicle number! All vehicle numbers must follow the format: ABC1234D"
-
F.13. Finding vehicles
-
Attempting to execute
find-vwithout logging in.-
Prerequisites: User not logged in.
-
Test case:
find-v dist/1
Expected: Message "Only Register, Login, Exit, and Help commands are available. Please login to access other commands. See help page for more information."
-
-
Executing
find-vwith a single district keyword.-
Prerequisites: User must be logged in, and there are vehicles in the district specified.
-
Test case:
find-v dist/1
Expected: Message "3 vehicles listed!", and vehicles in the given district will be listed in the vehicle pane.
-
-
Executing
find-vwith multiple district keywords.-
Prerequisites: User must be logged in, and there are vehicles in the districts specified.
-
Test case:
find-v dist/1 2 3
Expected: Message "10 vehicles listed!", and vehicles in the given districts will be listed in the vehicle pane.
-
-
Executing
find-vwith a single vehicle type keyword.-
Prerequisites: User must be logged in, the vehicle type must match exactly, and must be either "Ambulance" or "Patrol car", though case insensitive.
-
Test case:
find-v vtype/ambuLANce
Expected: Message "15 vehicles listed!", and vehicles ofAmbulancetype will be listed in the vehicle pane.
-
-
Executing
find-vwith a single character/ number of a vehicle number as keyword.-
Prerequisites: User must be logged in, and there must be at least one vehicle with vehicle number containing this keyword.
-
Test case:
find-v vnum/2
Expected: Message "27 vehicles listed!", and vehicles with vehicle numbers containing "2" will be listed in the vehicle pane.
-
F.14. Listing vehicles
-
Attempting to execute
list-vwithout logging in.-
Prerequisites: User not logged in.
-
Test case:
list-v
Expected: Message "Only Register, Login, Exit, and Help commands are available. Please login to access other commands. See help page for more information."
-
-
Executing
list-v.-
Prerequisites: User must be logged in.
-
Test case:
list-v
Expected: Message "Listed all vehicles", and all vehicles in database will be listed in the vehicle pane.
-
F.15. Deleting vehicles
-
Attempting to execute
delete-vwithout logging in-
Prerequisites: User not logged in.
-
Test case:
delete-v
Expected: Message "Only Register, Login, Exit, and Help commands are available. Please login to access other commands. See help page for more information."
-
-
Executing
delete-vwith an admin account and dispatched vehicle-
Test case:
delete-v 1
Expected: Message "You cannot delete a vehicle that is currently dispatched."
-
-
Executing
delete-vwith an admin account and non dispatched vehicle-
Test case:
-
edit-v 1 available -
delete-v 1
Expected: Message "Deleted Vehicle Patrol Car Vehicle Number: SFD3204V District: 1 Availability: AVAILABLE"
-
-
-
Executing
delete-vwith a non admin account-
Test case:
delete-v 1
Expected: Message "You must be an admin to perform this operation. Please see help page for more info."
-