By: Team CS2103-T11-1 Since: October 2019 Licence: MIT
- 1. Introduction
- 2. Quick Start
- 3. Features
- 3.1. Viewing help :
help - 3.2. Logging in:
login - 3.3. Logging out:
logout - 3.4. Swapping interfaces:
swap - 3.5. Registering an account:
register - 3.6. Updating an account :
update - 3.7. Listing accounts :
list-a - 3.8. Locating accounts by name or username:
find-a - 3.9. Deleting an account :
delete-a - 3.10. Create New Incident:
new - 3.11. Filling a draft incident report:
fill - 3.12. Submitting a completed draft report:
submit - 3.13. Admins can fill and submit drafts
[coming in v2.0] - 3.14. Tracking incident history
[coming in v2.0] - 3.15. Listing all incidents:
list-i - 3.16. Locating an incident report using incident ID, operator name or description keyword:
find-i - 3.17. Editing an Incident:
edit-i - 3.18. Adding a Vehicle:
add-v - 3.19. Editing a Vehicle:
edit-v - 3.20. Listing vehicles
- 3.21. Finding a Vehicle:
find-v - 3.22. Deleting a Vehicle:
delete-v - 3.23. Exiting the program :
exit - 3.24. Saving the data
- 3.25. Decrypting data files
[coming in v2.0] - 3.26. Creating new incidents even when no vehicle is available in the given district.
[coming in v2.0]
- 3.1. Viewing help :
- 4. FAQ
- 5. Command Summary
1. Introduction
The Incident Management System (IMS) is a desktop app made for emergency call operators for coordinating emergency vehicle dispatch and incident report generation. IMS is optimized for those who prefer to work with a Command Line Interface (CLI) while still having the benefits of a Graphical User Interface (GUI). The streamlined workflow of the IMS is designed to enable call operators to dispatch vehicles and prepare reports without wasting any precious time. That’s because, in an emergency, every second counts.
2. Quick Start
-
Ensure you have Java
11or above installed in your Computer. -
Download the latest
ims.jarhere. -
Copy the file to the folder you want to use as the home folder for your Incident Manager.
-
Double-click the file to start the app. The GUI should appear in a few seconds.
-
You will first need to
registeran account, orloginwith one of the pre-made accounts. -
Logging in with an account that has the
Admintag (e.g. Agent01) gives you admin access to the system. The default password is 'password'.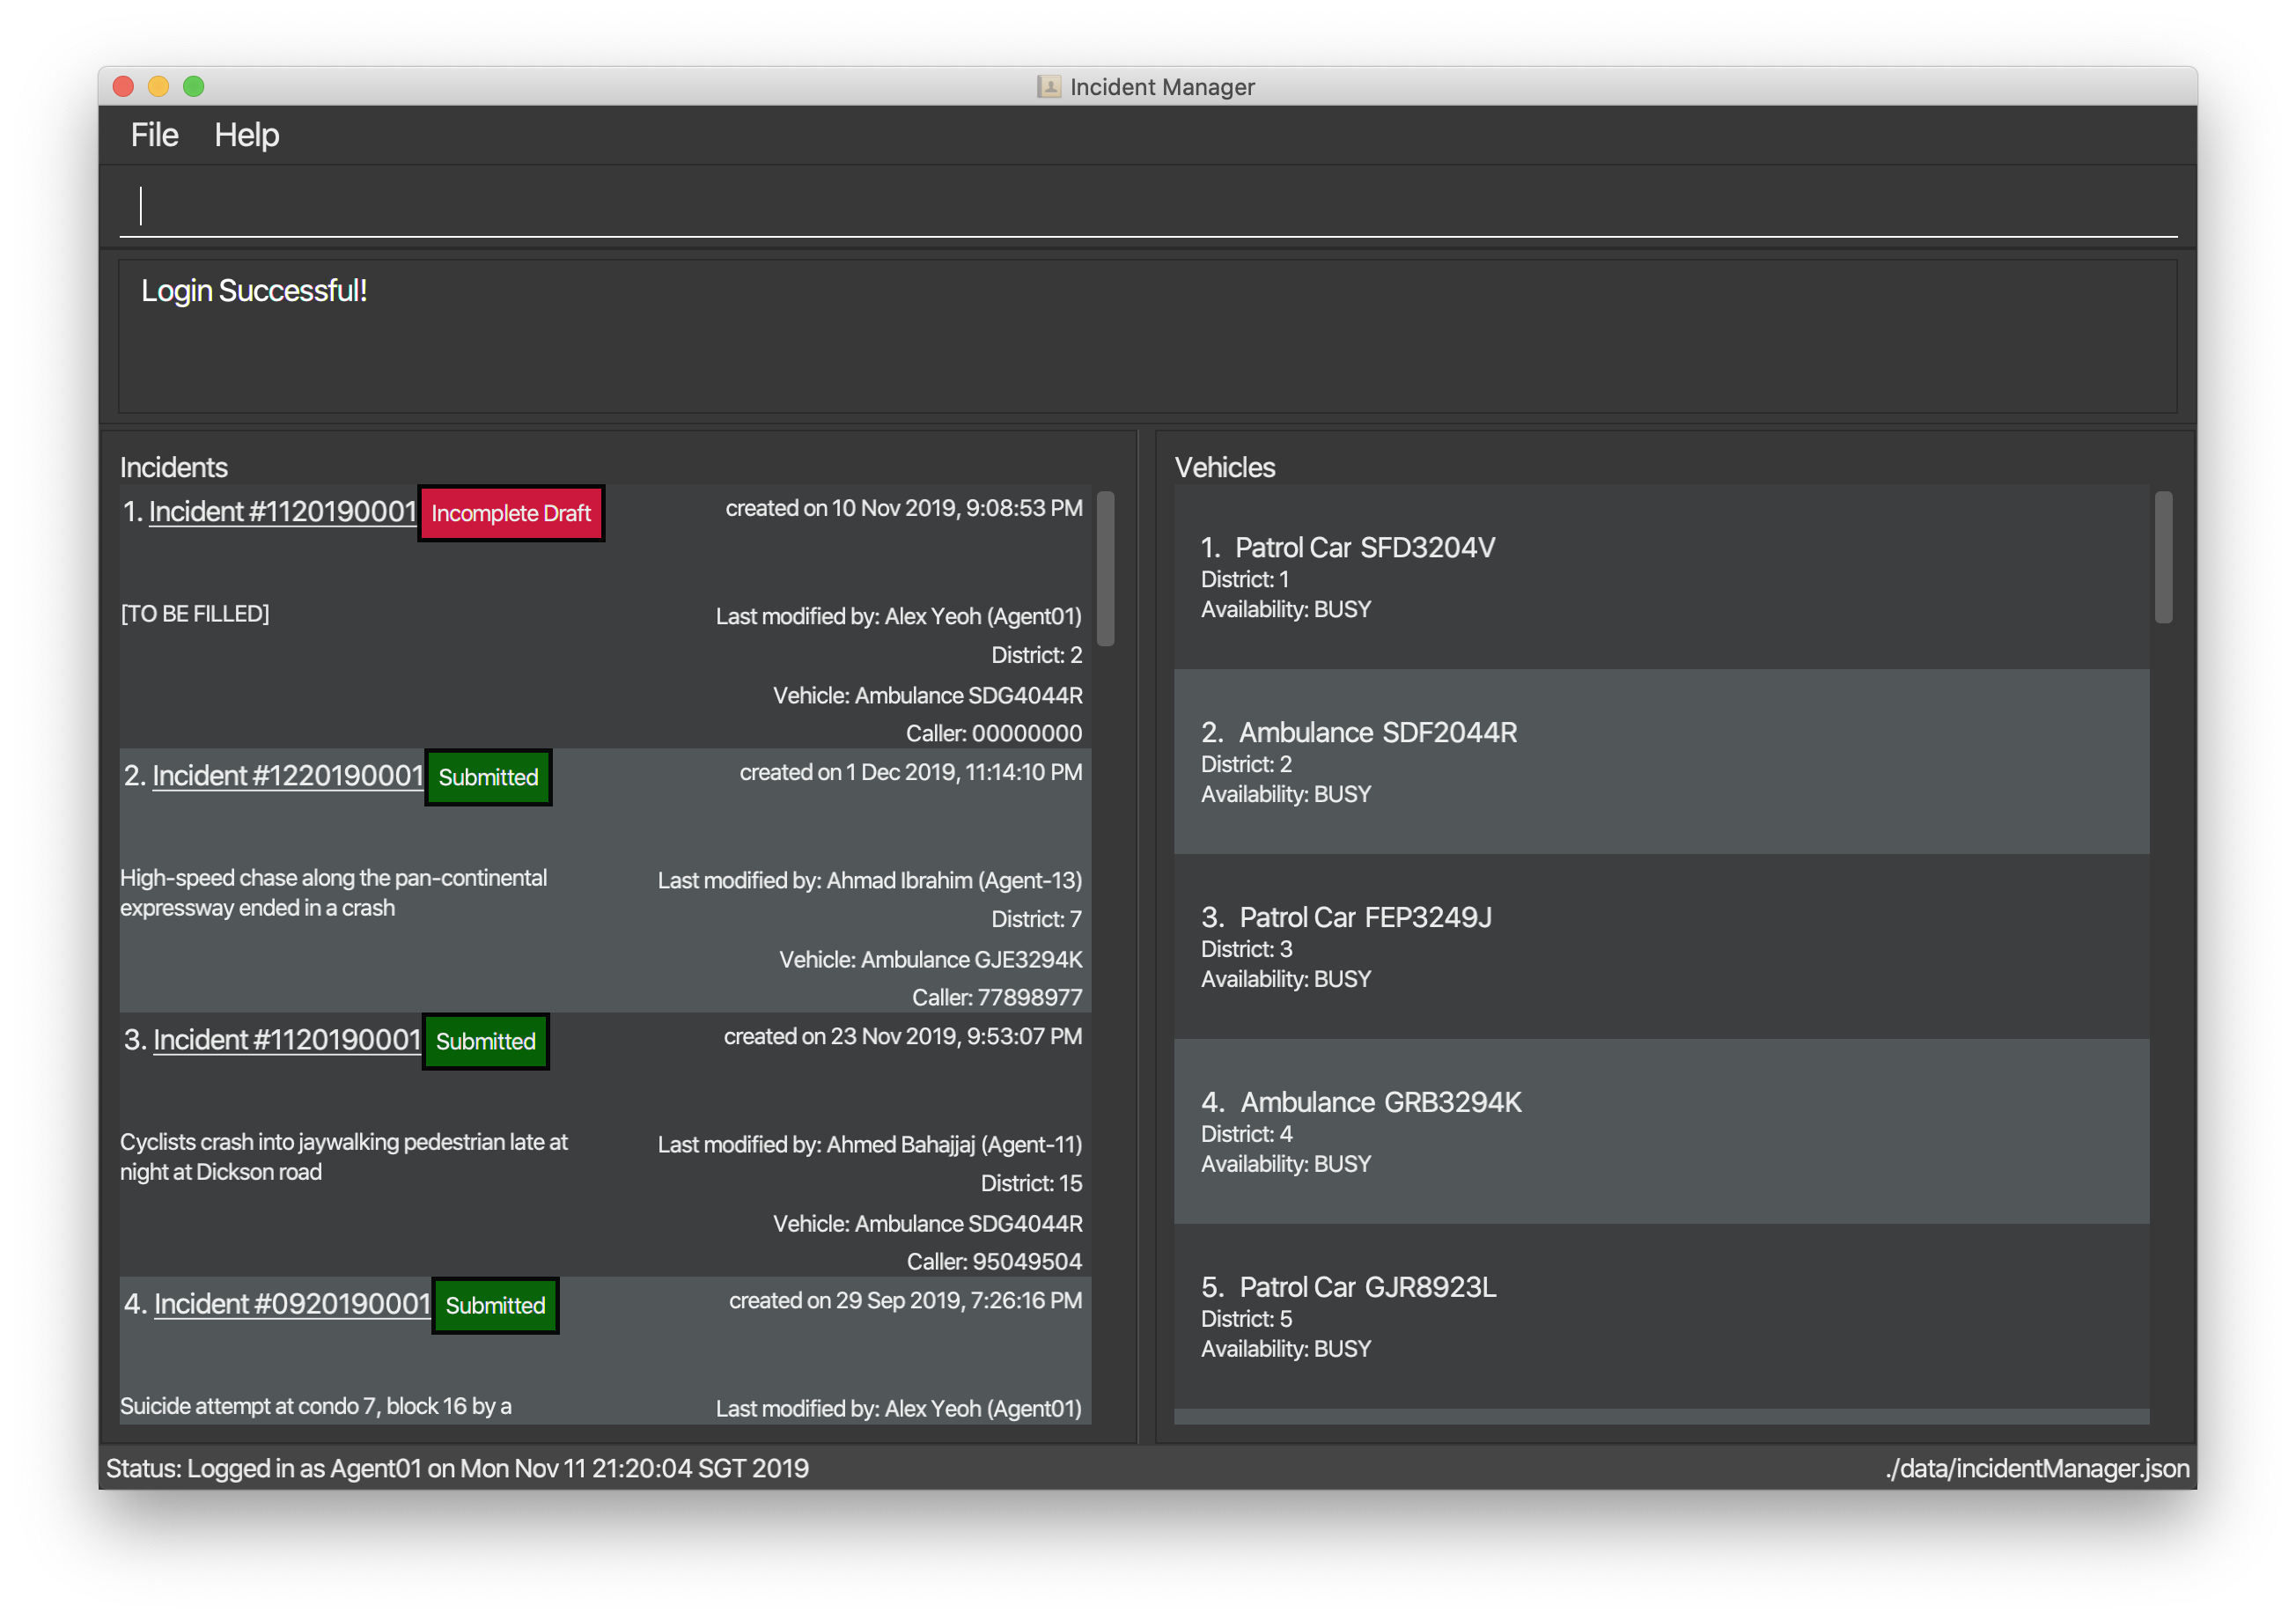
-
Type the command in the command box and press Enter to execute it.
e.g. typinghelpand pressing Enter will open the help window. -
Some example commands you can try: (TODO)
-
exit: exits the app
-
-
Refer to Section 3, “Features” for details of each command.
3. Features
Command Format
-
Words in
UPPER_CASEare the parameters to be supplied by the user e.g. inadd n/NAME,NAMEis a parameter which can be used asadd n/John Doe. -
Items in square brackets are optional e.g
n/NAME [t/TAG]can be used asn/John Doe t/friendor asn/John Doe. -
Items with
… after them can be used multiple times including zero times e.g.[t/TAG]…can be used ast/friend,t/friend t/familyetc. -
Parameters can be in any order e.g. if the command specifies
n/NAME p/PHONE_NUMBER,p/PHONE_NUMBER n/NAMEis also acceptable. -
Some commands have admin restrictions. Admins accounts are identified by the
Admintag.
An account with admin privileges is included in the sample data with Username Agent01 and Password password
|
3.1. Viewing help : help
Format: help
3.2. Logging in: login
Logs the user into the IMS and registers the active session.
Format: login u/USERNAME w/PASSWORD
The only commands available prior to login are register, login, help, and exit.
|
Example:
-
login u/Agent01 w/password
3.3. Logging out: logout
Logs the user out of the IMS and closes the user’s session.
Format: logout
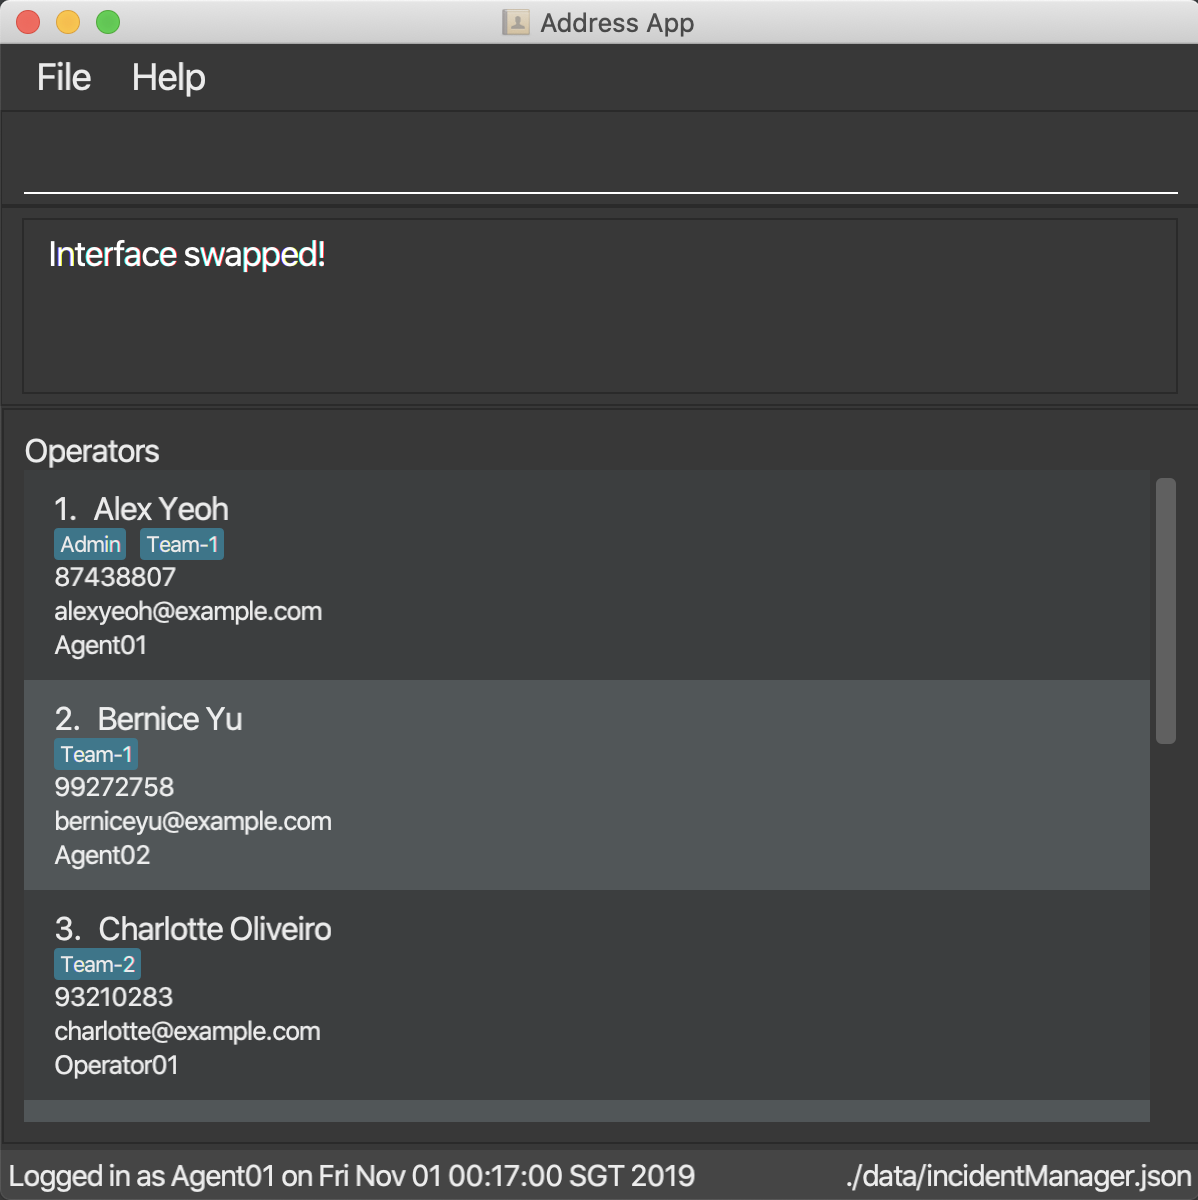
3.4. Swapping interfaces: swap
Swaps the user interface between account view and incidents/vehicle view.
Format: swap
| A user cannot access commands affecting entities not displayed in their current interface view. |
Account Management Interface:
3.5. Registering an account: register
Registers an account into the Incident Management System
Format: register n/NAME p/PHONE_NUMBER e/EMAIL u/USERNAME w/PASSWORD [t/TAG]…
| A account can have any number of tags (including 0). Only logged-in admins can add tags. |
Examples:
-
register n/John Doe p/98765432 e/johnd@example.com u/op1 w/password -
If logged in with an admin account:
register n/Betsy Crowe e/betsycrowe@example.com u/oc1 w/password p/1234567 t/Team-1-OC
3.6. Updating an account : update
Updates an existing account in the incident Manager or the own account of the user logged in if the index is left empty.
Format: update [INDEX] [n/NAME] [p/PHONE] [e/EMAIL] [u/USERNAME] [w/PASSWORD] [t/TAG]…
| Only admins can update other user accounts. Non-admins cannot specify an index when executing the update command. |
Examples:
-
update p/91234567 e/johndoe@example.com
updates the phone number and email address of the logged in account to be91234567andjohndoe@example.comrespectively. -
update 2 n/Betsy Crower t/
updates the name of the 2nd account to beBetsy Crowerand clears all existing tags.
3.6.1. Incident Auto Update [coming in v2.0]
Any updates to user account details will search for all incidents created by the account and update those references as well.
3.7. Listing accounts : list-a
Shows a list of all accounts registered in the incident Manager or those whose tags match any of the keywords if a keyword is specified.
Format: list-a [KEYWORD] [MORE_KEYWORDS]
Examples:
-
list-a
Displays the entire list of accounts -
list-a team-1 admin
Returns a list of all accounts that have both theadminandteam-1tag
3.8. Locating accounts by name or username: find-a
Finds accounts whose name or username contains any of the given keywords.
Format: find-a KEYWORD [MORE_KEYWORDS]
Examples:
-
find-a John
ReturnsjohnandJohn Doe -
find-a Agent01 BettyReturns all accounts with username or name matching eitheragent01orbetty
3.9. Deleting an account : delete-a
Deletes the specified account from the incident Manager.
Format: delete-a INDEX
| Only admins can access the delete command. You cannot delete your own account. |
Examples:
-
list-a
delete-a 2
Deletes the 2nd account in the Incident Manager. -
find-a Agent01
delete-a 1
Deletes the 1st account in the results of thefindcommand.
3.9.1. Incident Auto Update [coming in v2.0]
Deleting a user will search for all incidents created by the user and place a deleted flag next to the account details.
3.10. Create New Incident: new
When new incidents are reported, vehicles are to be dispatched to the incident site. As of now, when there is no vehicle available in the district of incident, a new report cannot be generated.
This command works in two ways:
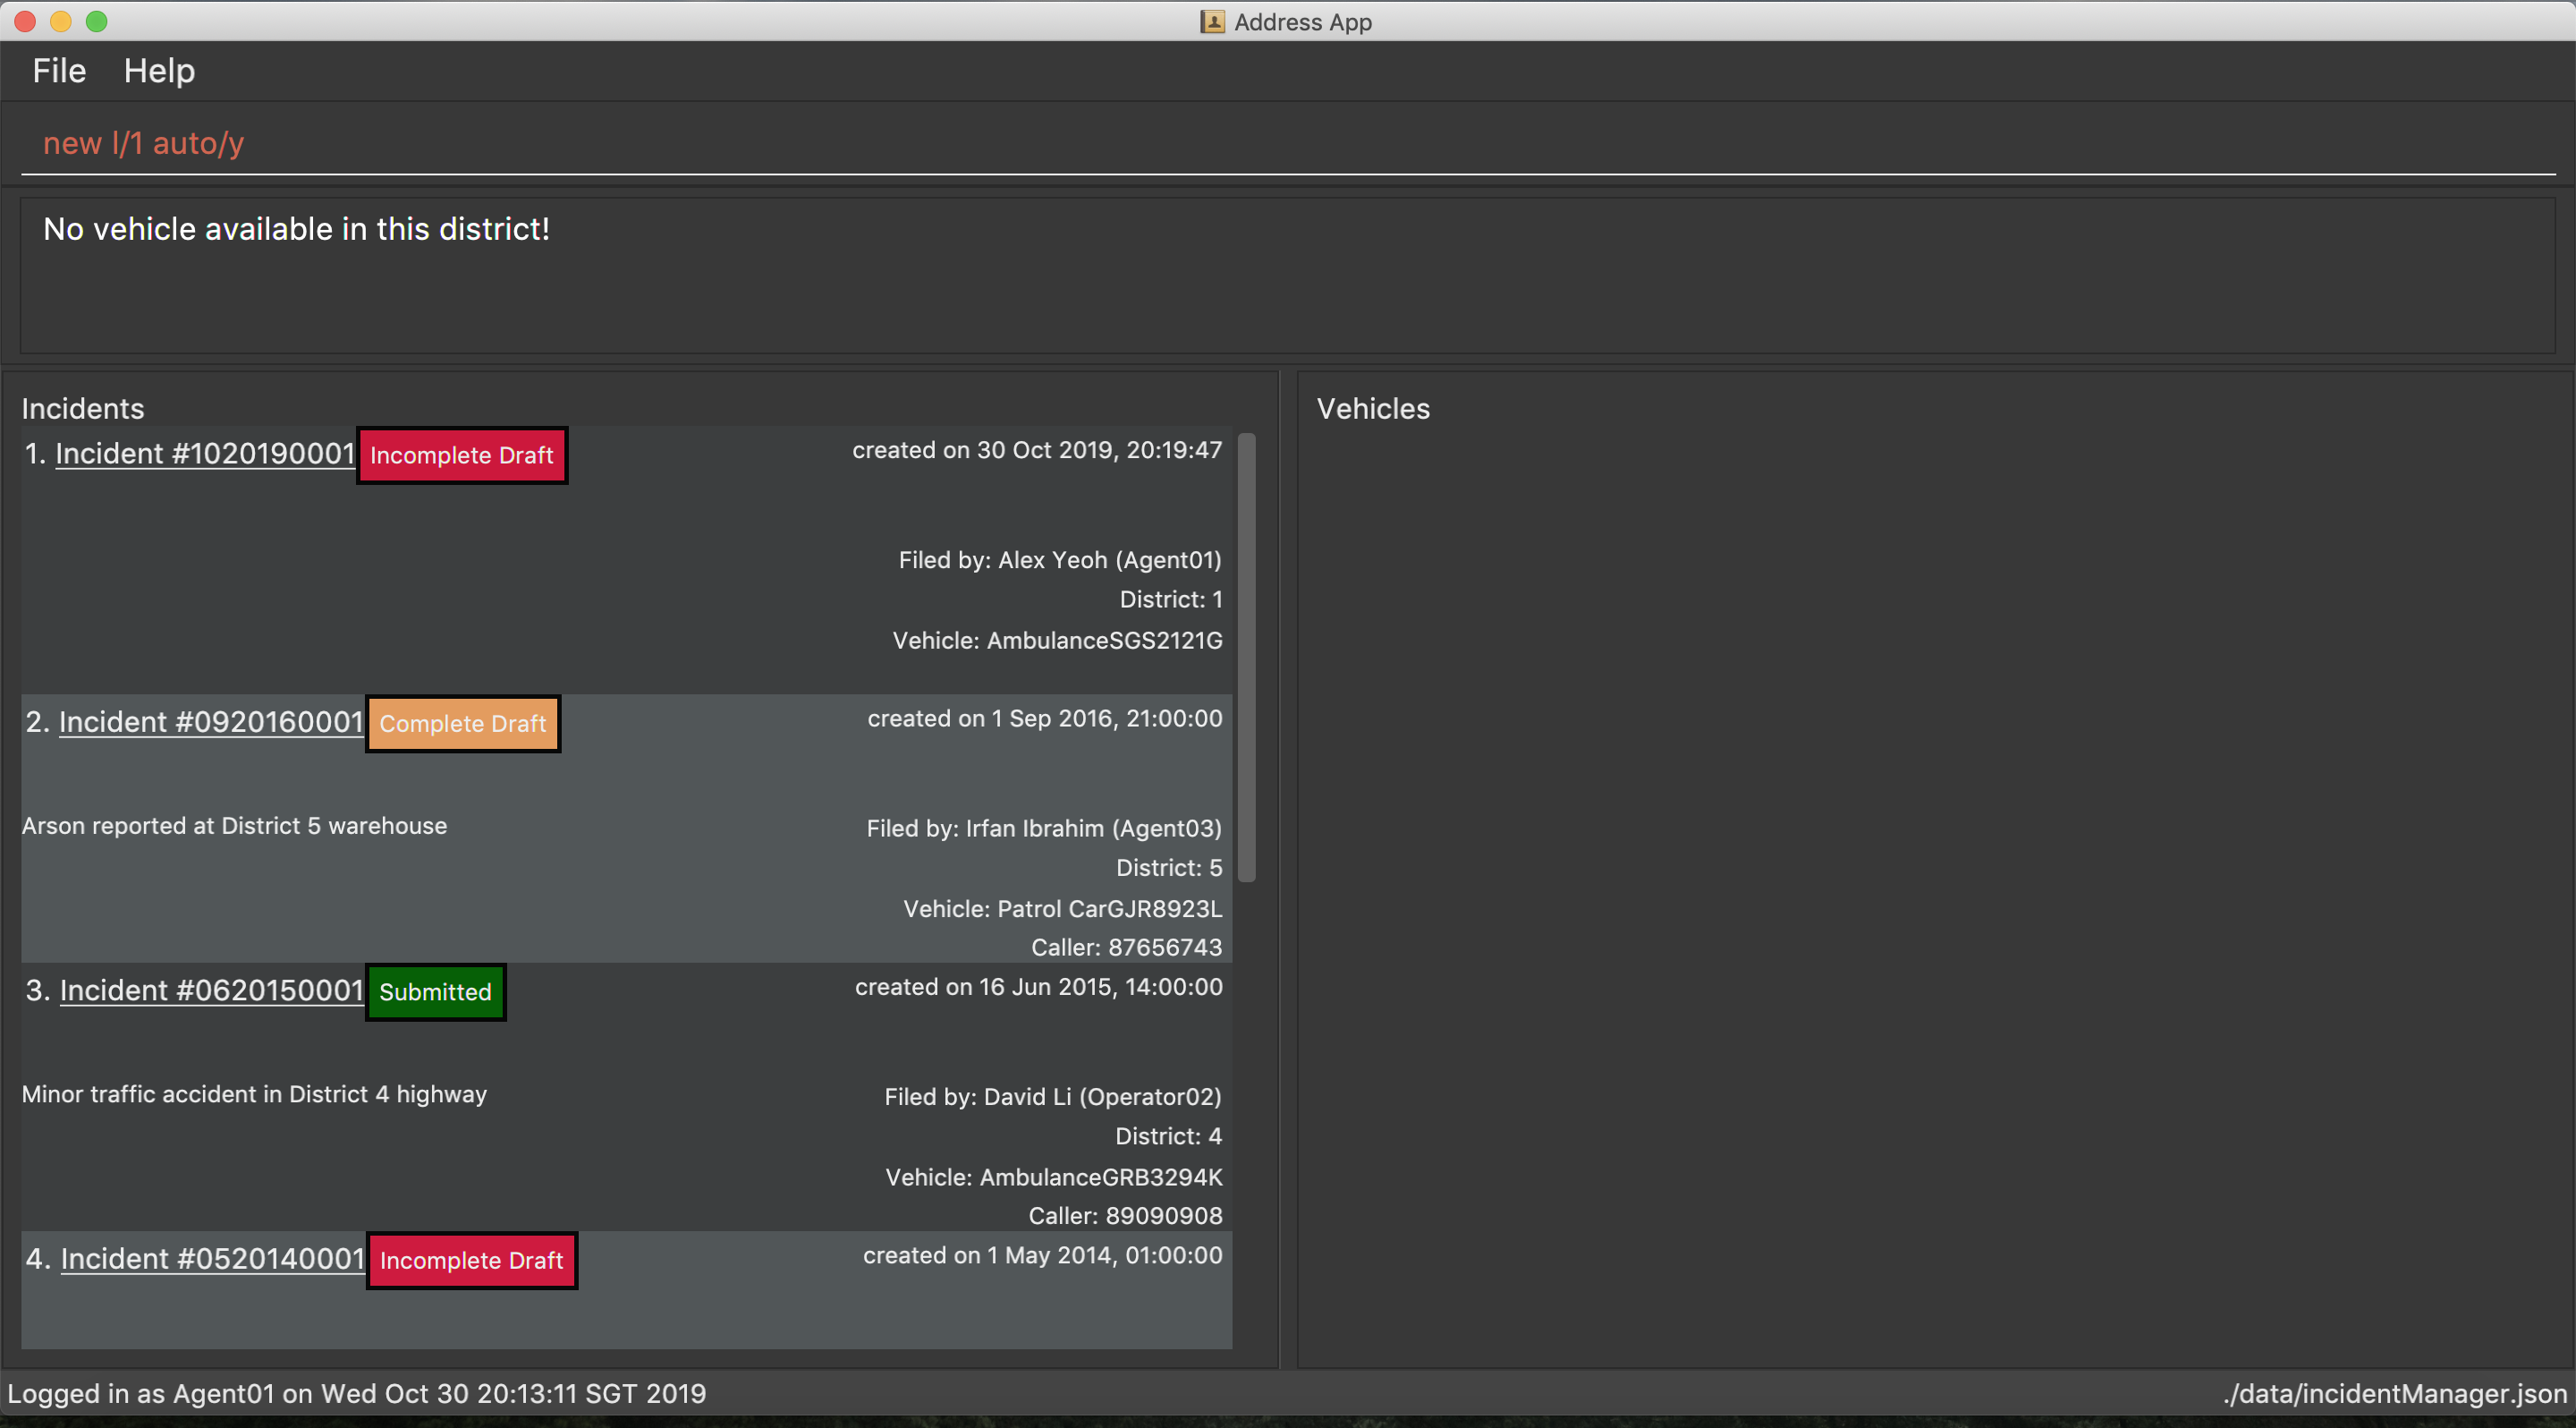
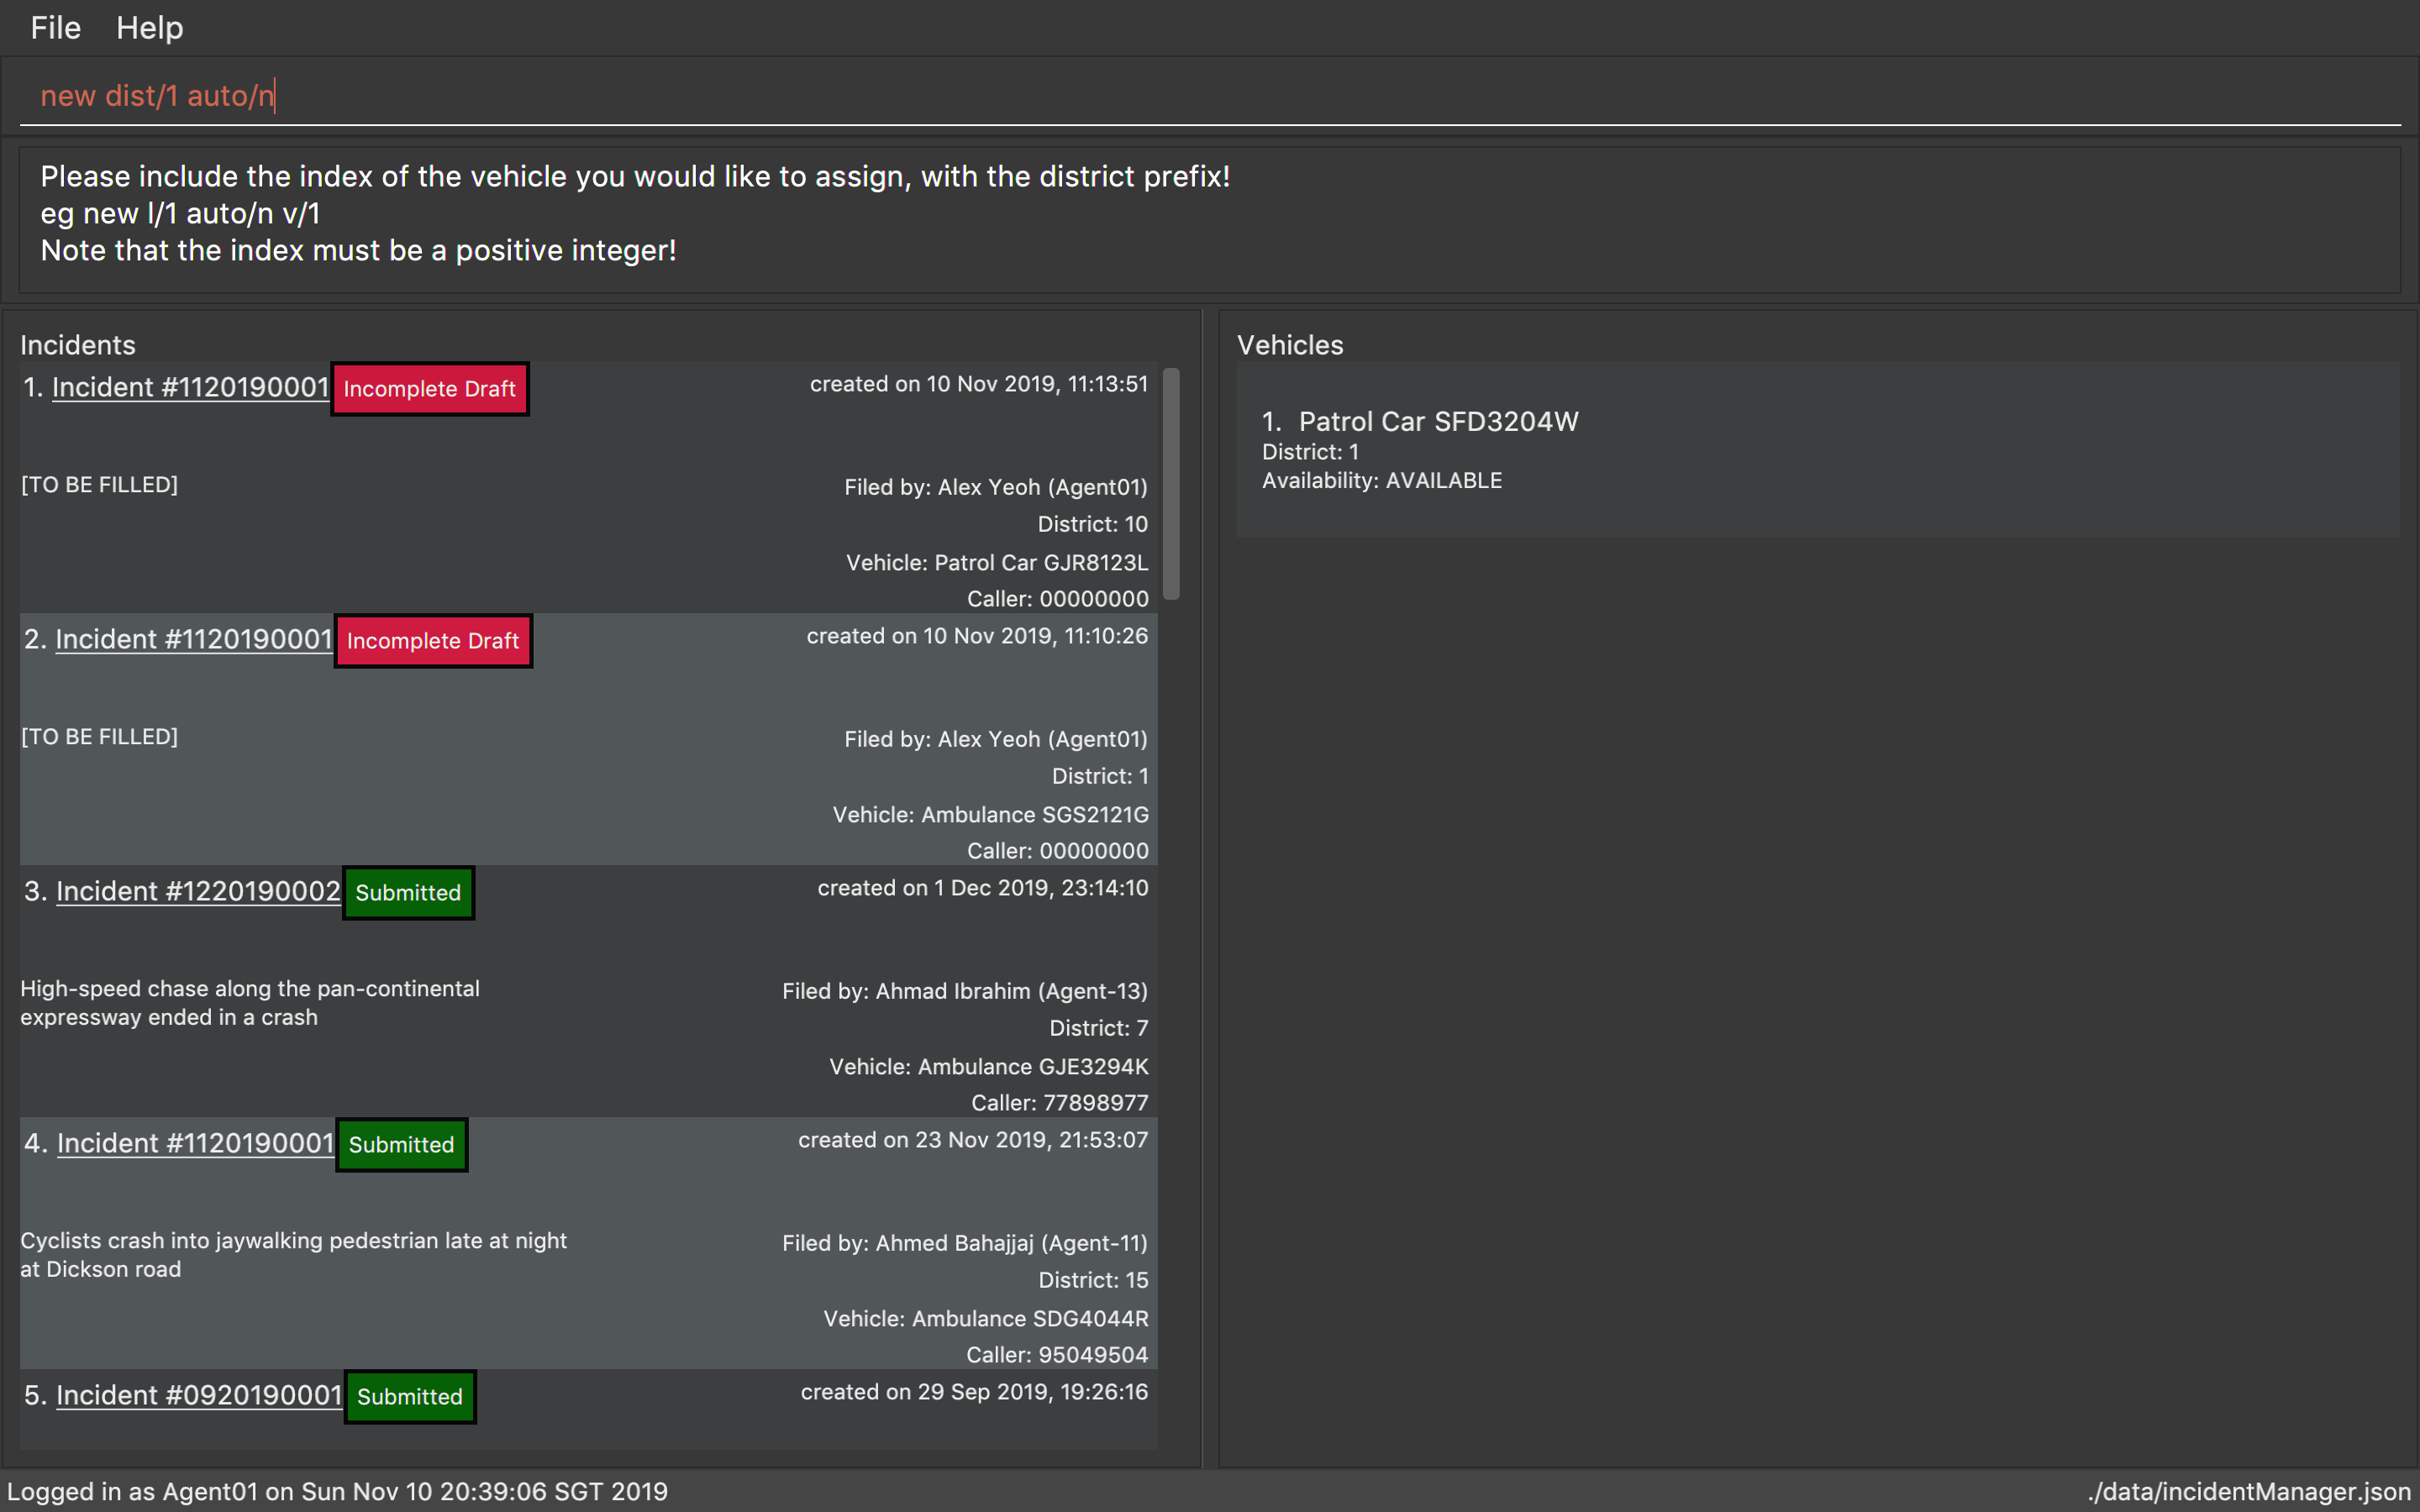
1. auto/Y
Format: new dist/DISTRICT auto/Y
| Valid district numbers are from 1 to 28! |
-
Example usage:
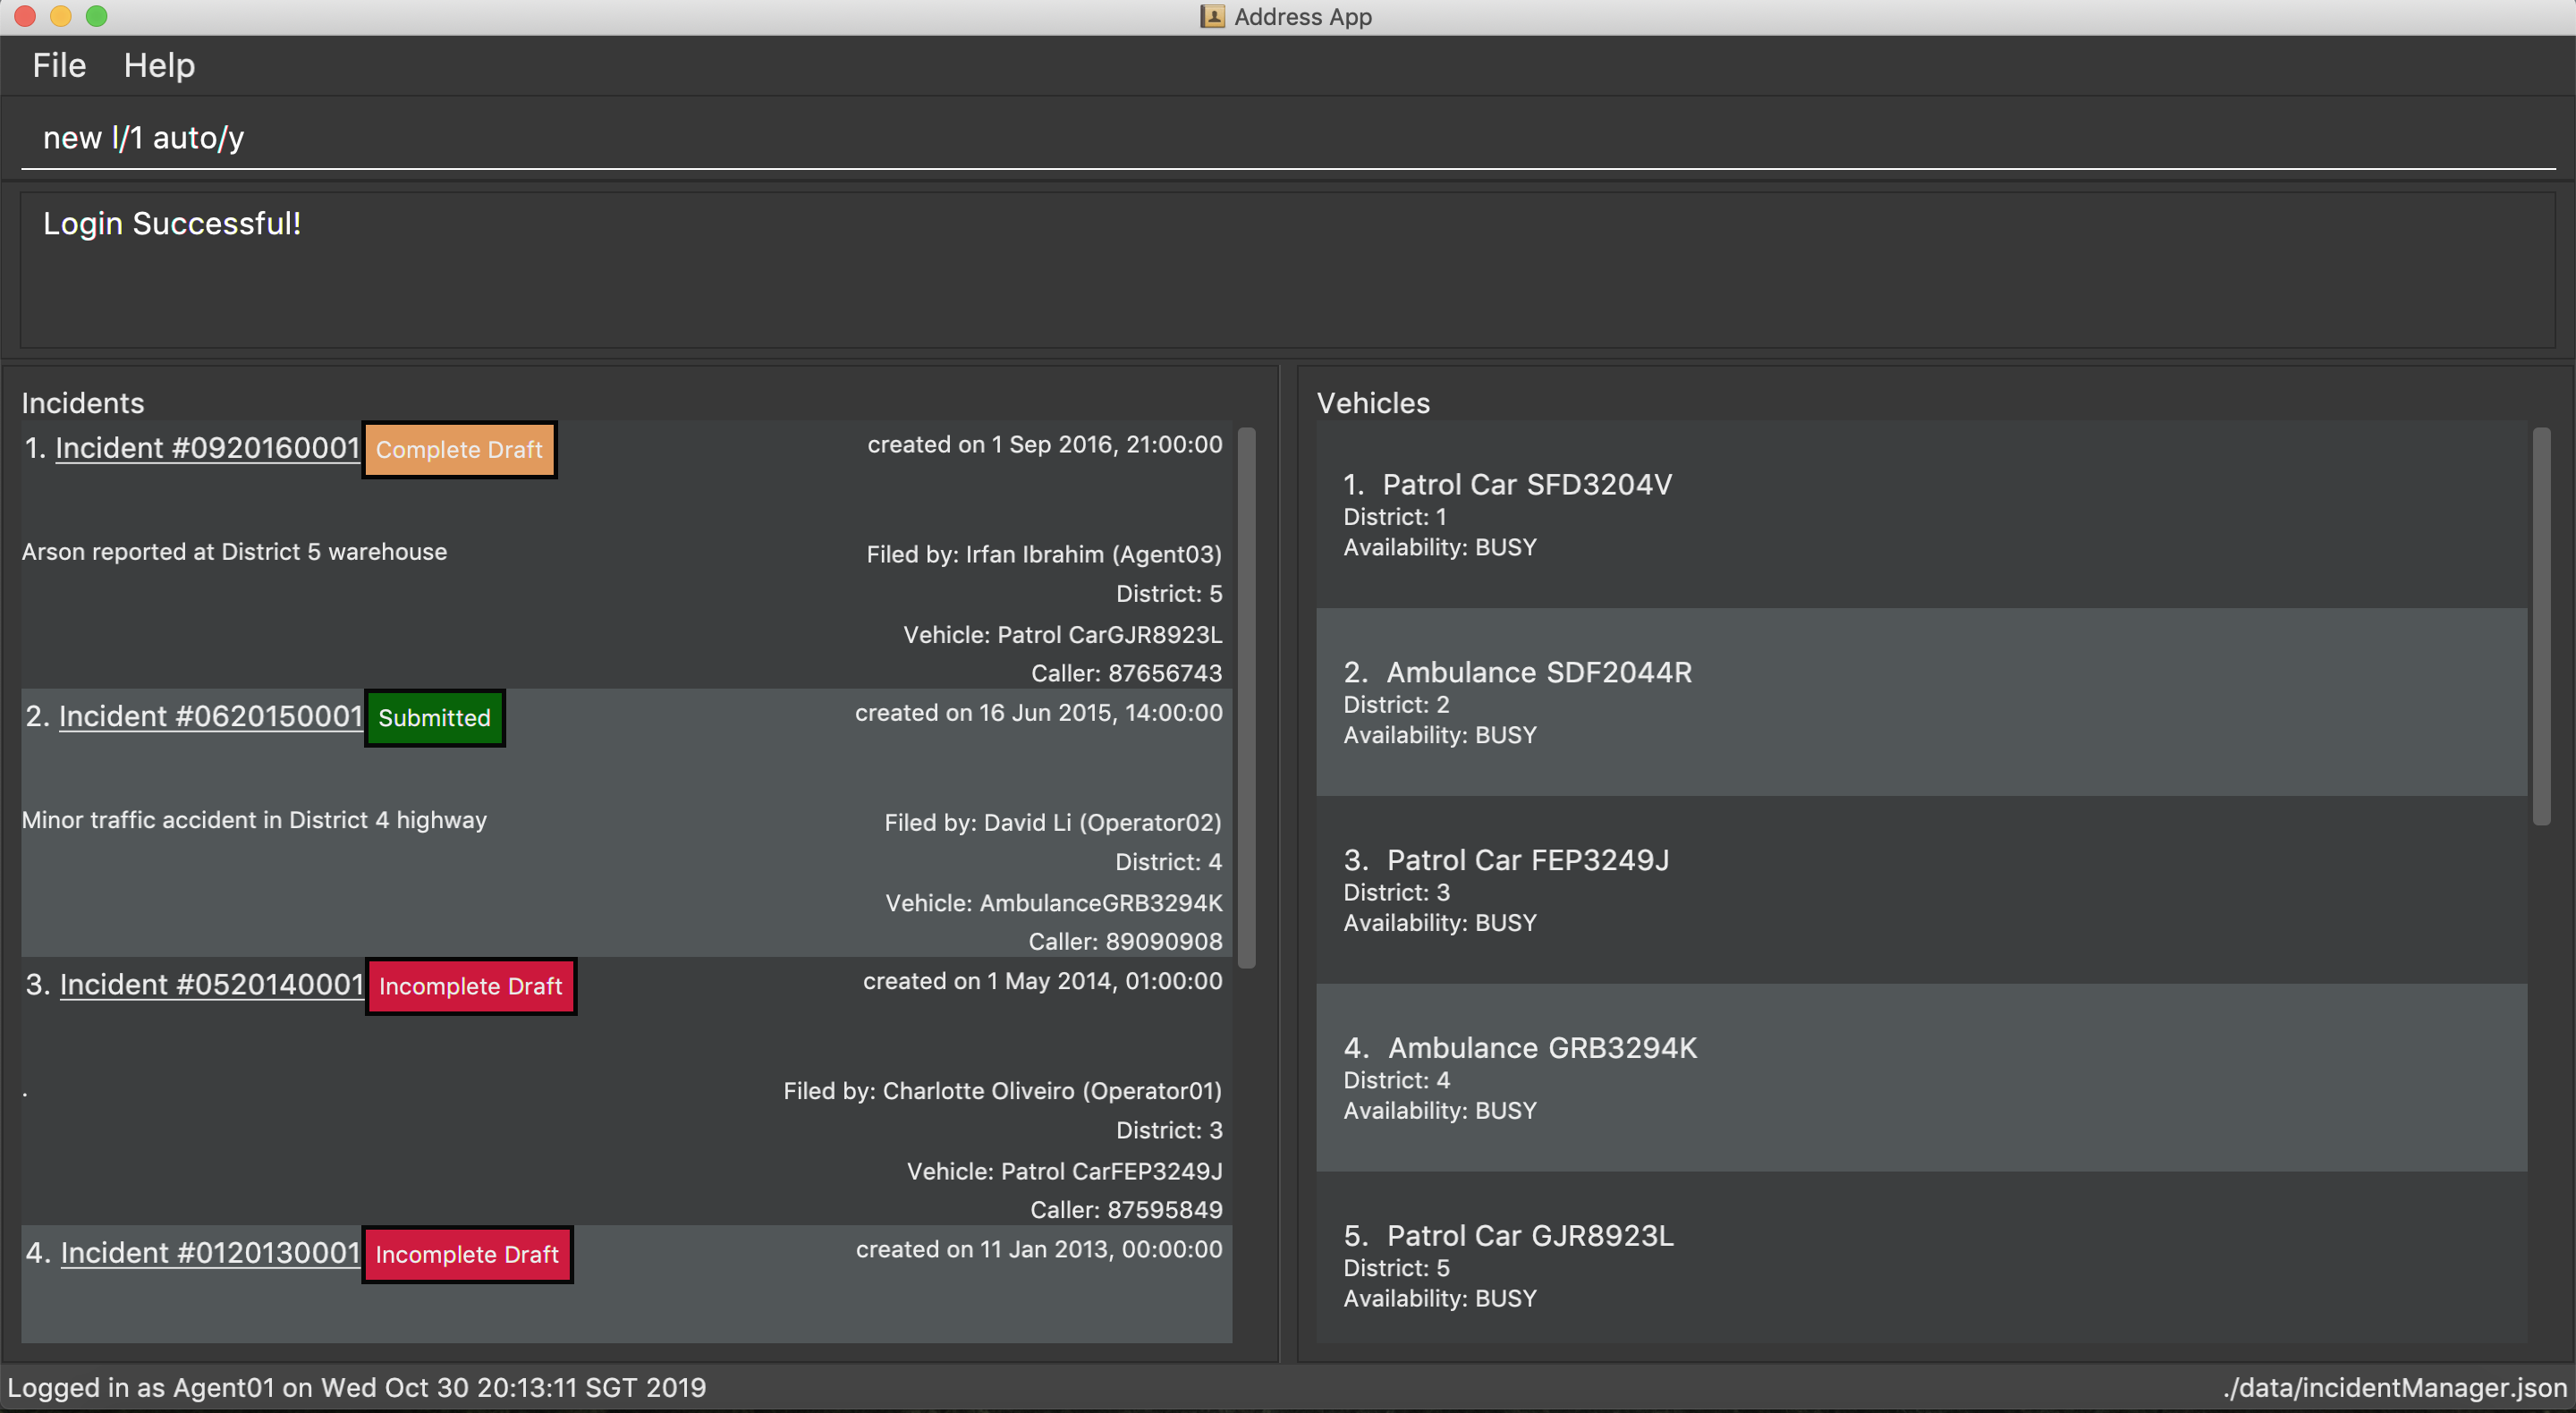
-
Expected outcome: In this case, there is no vehicle available in district 1.
2. auto/N
Format: new dist/DISTRICT auto/N v/INDEX
For manual dispatchment of vehicle, the index of the chosen vehicle must be from the list of vehicles available in the given district, which is only displayed when new dist/DISTRICT auto/N is used.
|
-
Example usage:
Once user adds v/1, a new incident will be drafted.
|
If multiple flags of the same prefix is provided by user, the command will take the last valid parameter of each prefix. For example new dist/1 dist/2 dist/3 auto/Y auto/N is equivalent to new dist/3 auto/N.Rationale: user need not waste time backspacing if an input was keyed in wrongly. |
3.11. Filling a draft incident report: fill
Fills a draft incident report if relevant parameters are specified, otherwise lists all draft reports ready for filling.
This command works in two modes:
-
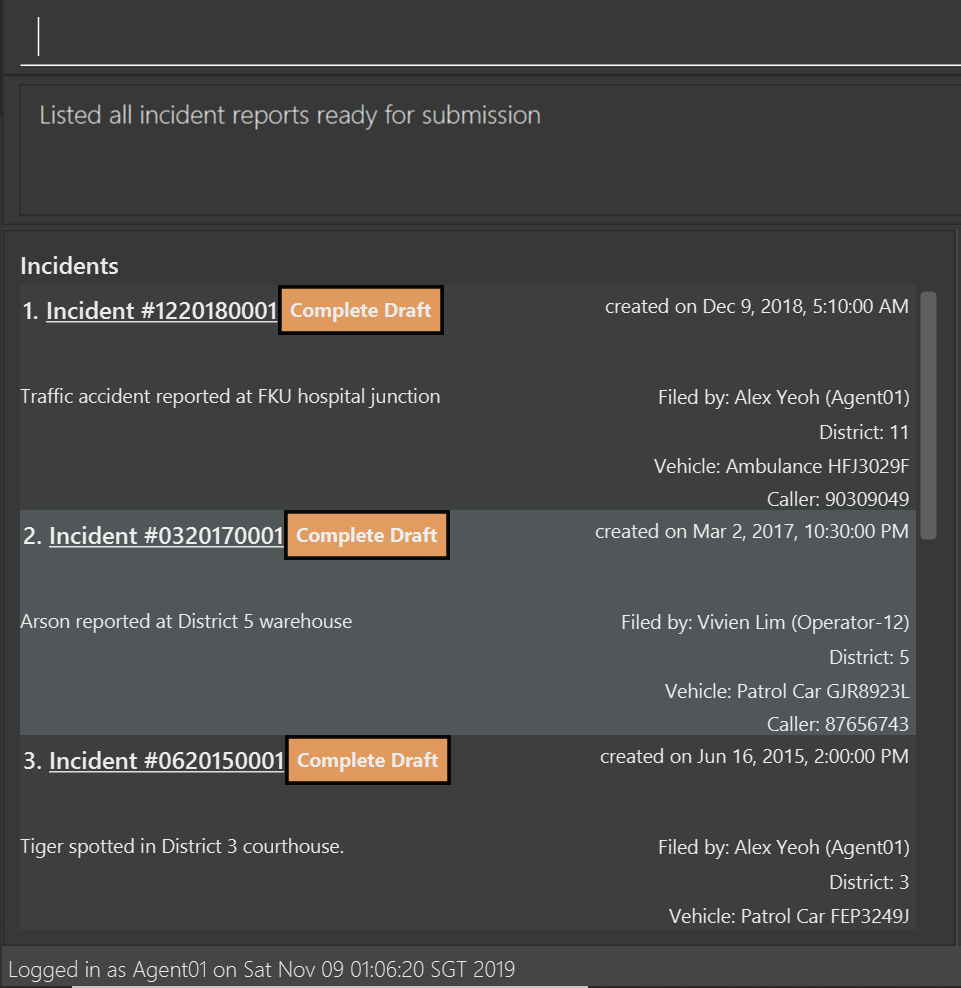
Outcome of
fill:

-
Outcome of
fill 1 p/90309049 desc/Traffic accident reported at FKU hospital junction:
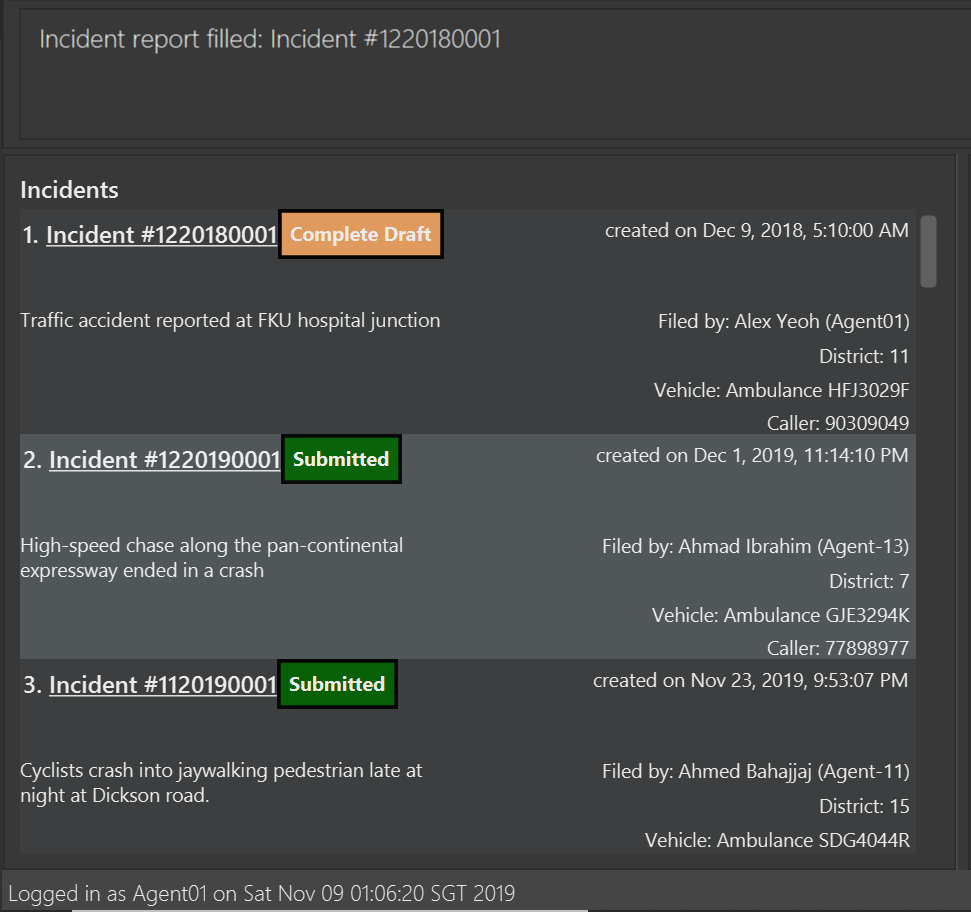
Using fill in both modes one after the other thus enables convenient listing and filling of target incident reports.
3.12. Submitting a completed draft report: submit
Submits a completed draft incident report if relevant parameters are specified, otherwise lists all completed drafts ready for submission.
Similar to fill, this command also works in two modes:
-
Outcome of
submit
-
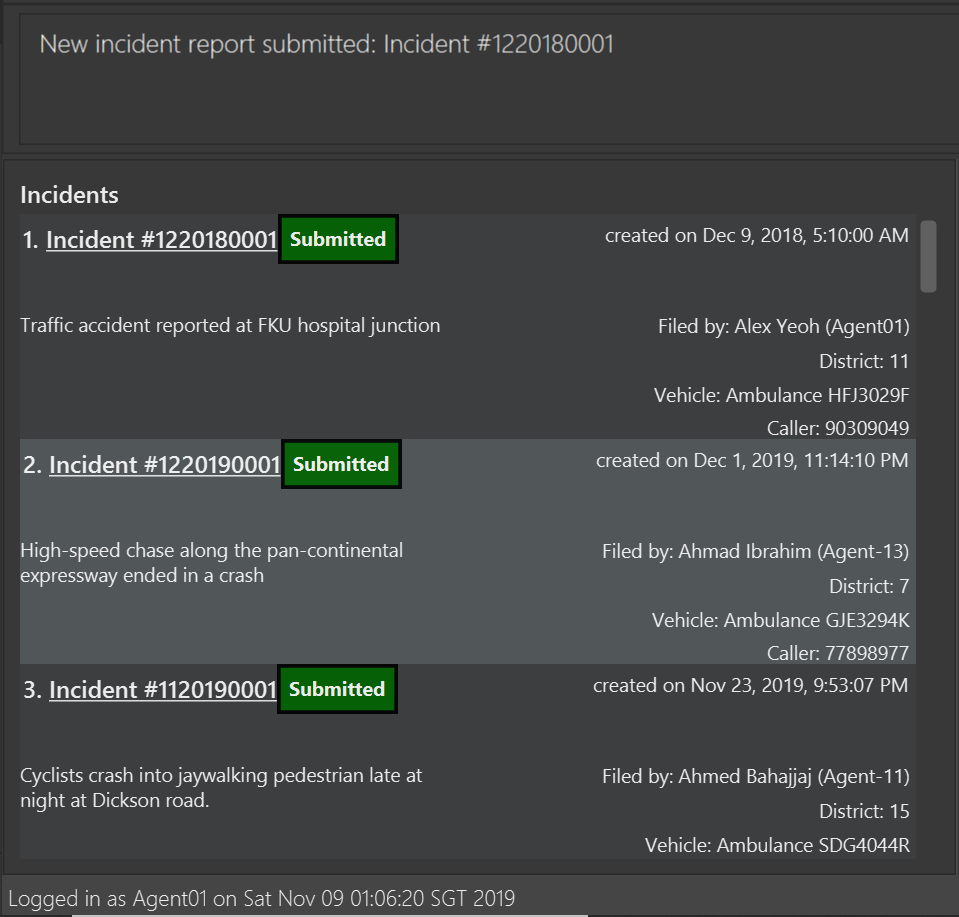
Outcome of
submit 1:
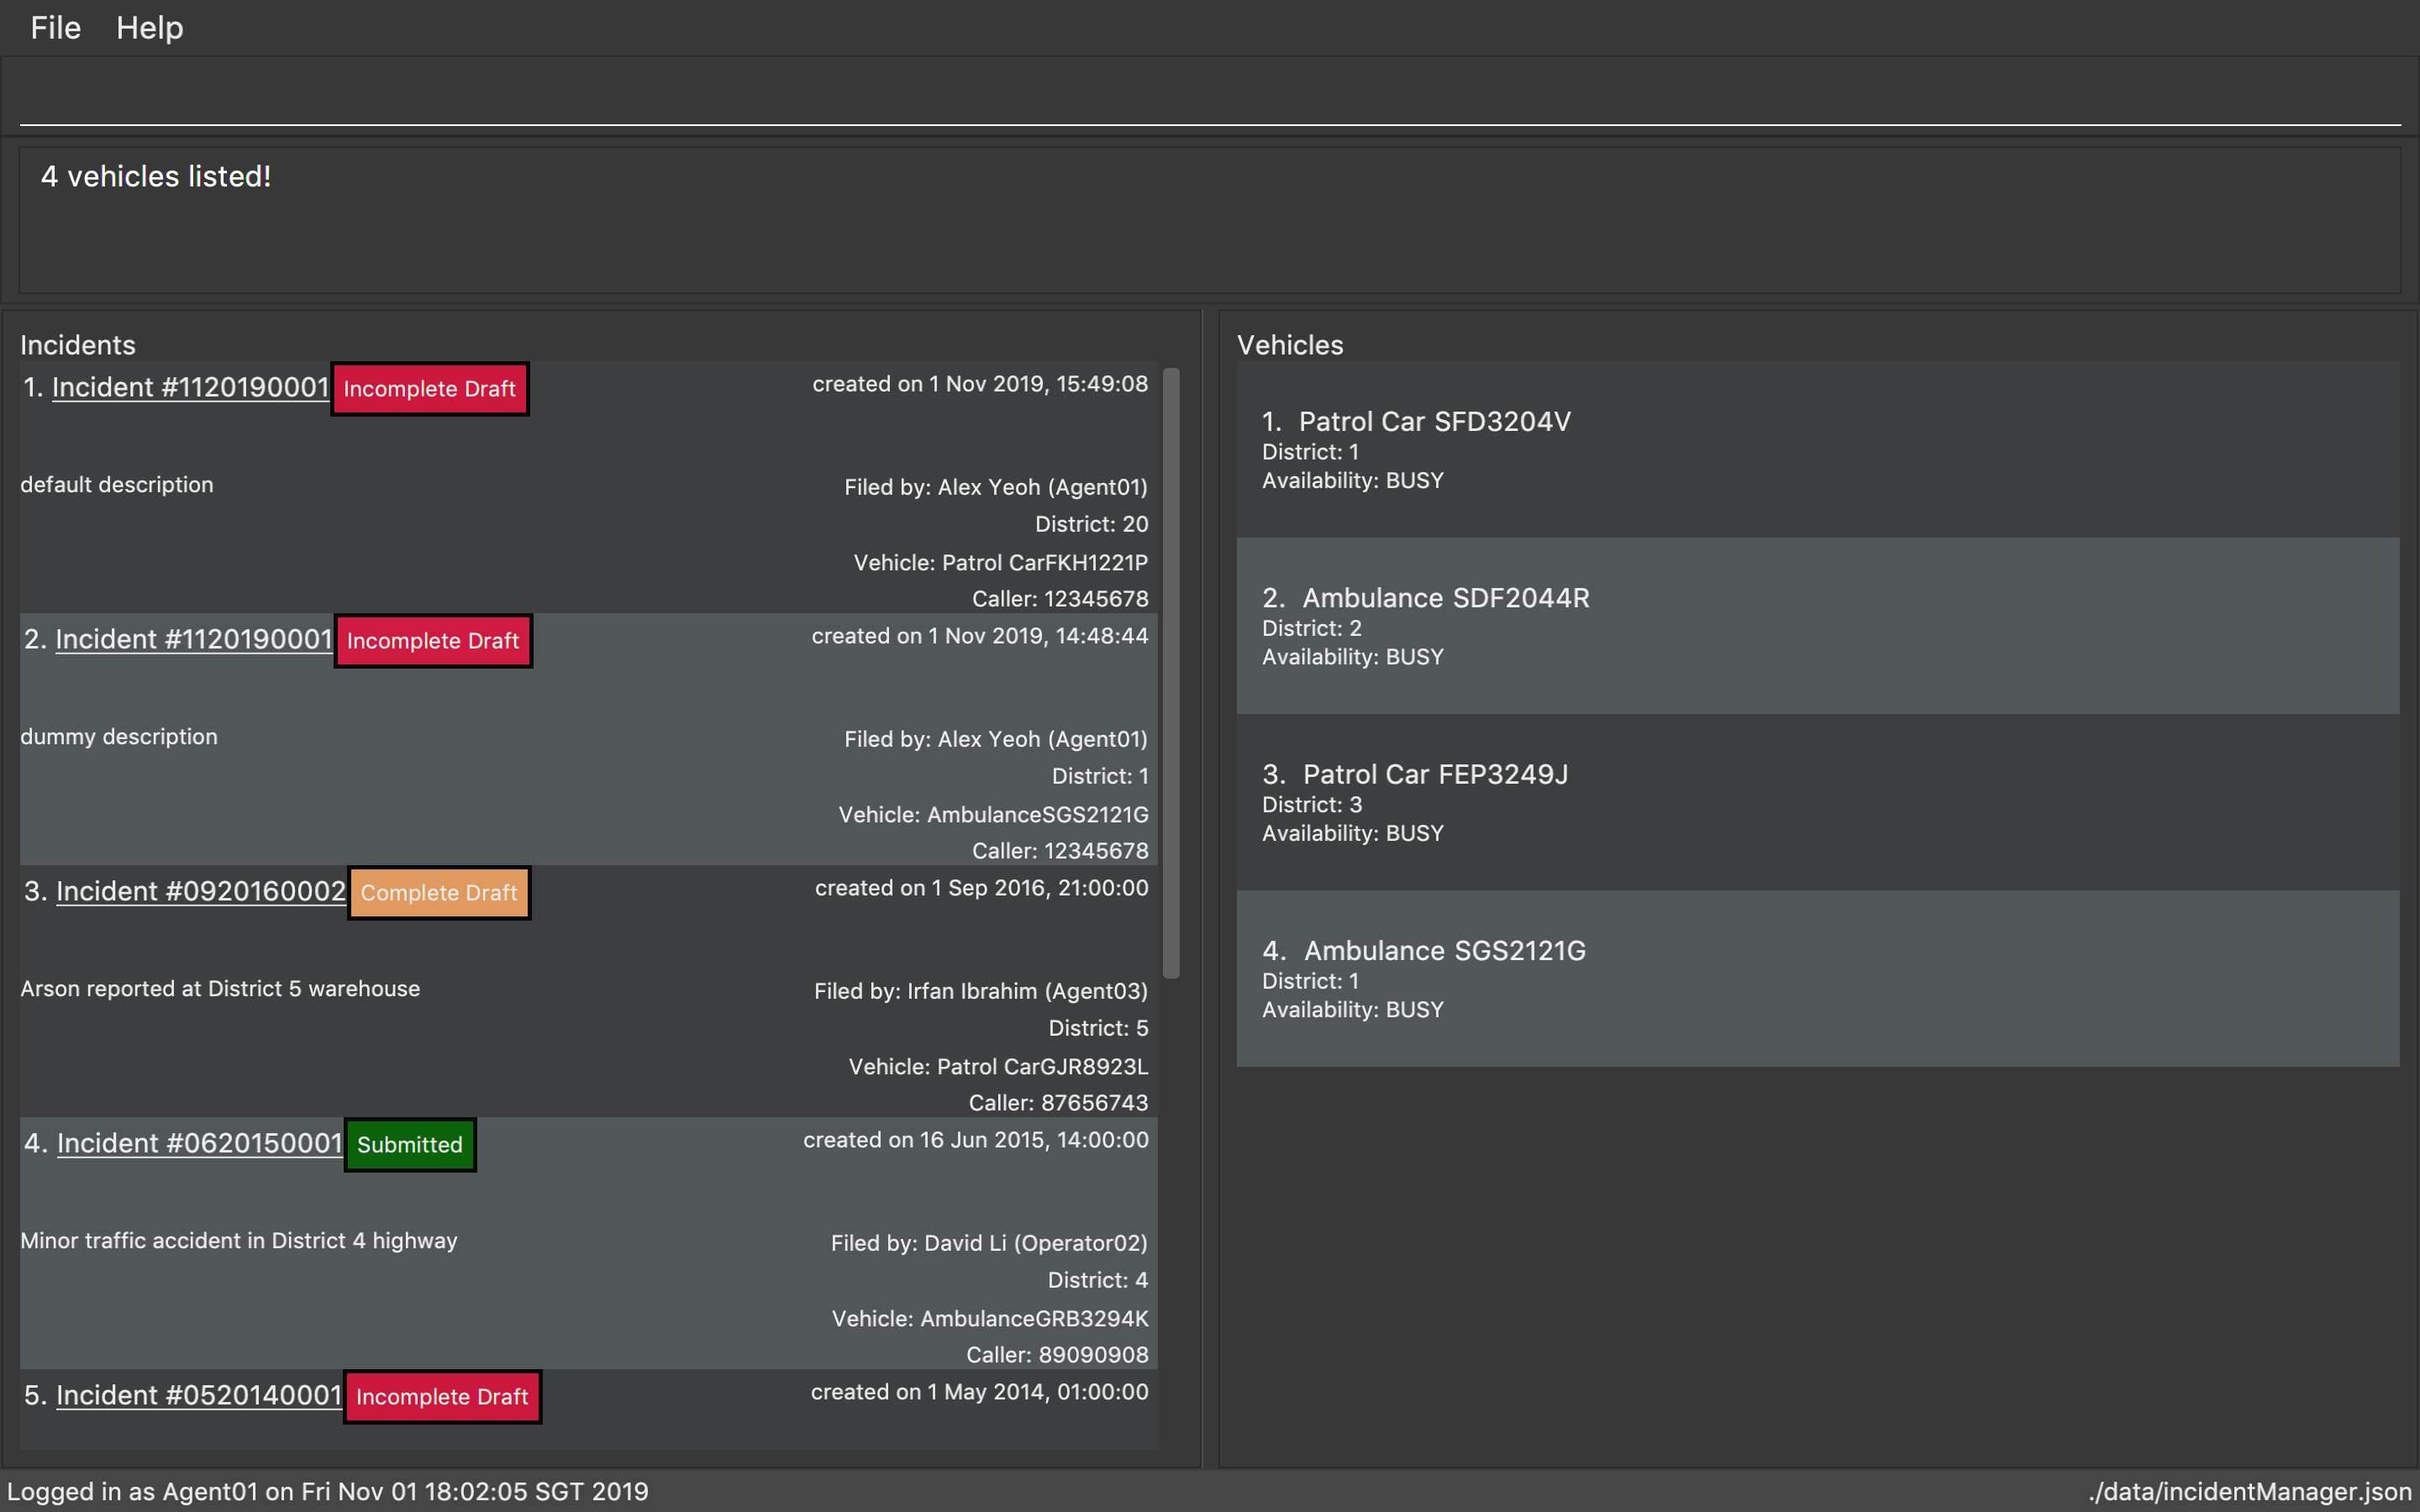
3.15. Listing all incidents: list-i
Shows a list of all incidents in the Incident Manager
Format: list-i
Example usage of the list-i command returning all incidents within the system:
image::listIncidentsCommand.png[width="500"]
-
The listing returns all incidents, inclusive of all incomplete drafts and complete drafts and submitted incident reports
-
Adding any keywords or parameters will result in an error. Only
list-iis allowed.
3.16. Locating an incident report using incident ID, operator name or description keyword: find-i
Finds incidents containing the relevant specified parameters.
Possible Parameters: id/, op/, desc/, self
Different Parameters
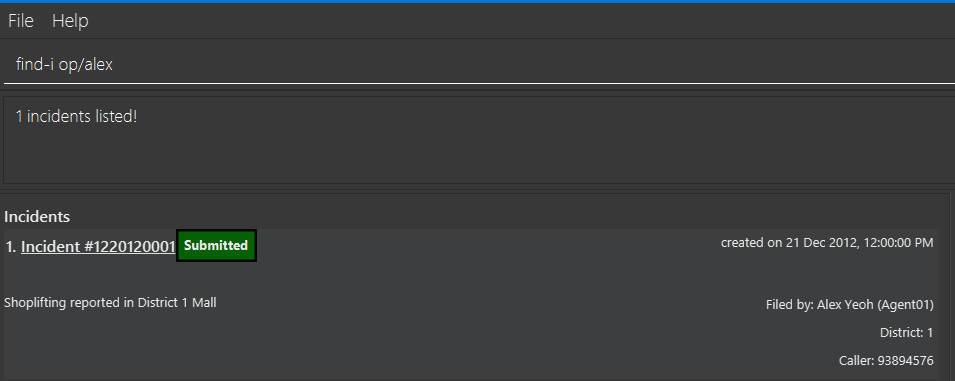
By Operator Name
Format: find-i op/<OPERATOR KEYWORD [MORE_KEYWORDS]>
Lists all incidents whereby the operator name contains any of the given keywords
-
Accepts multiple search terms for the parameter, searching for any match with any search term
-
Example of the
find-icommand with one word under parameterop/, returning all incidents whereby the operator name matchesalex(case-insensitive):
-
Example of the
find-icommand with multiple words under parameterop/, returning all incidents whereby the operator name matchesirfanorbernice(case-insensitive):

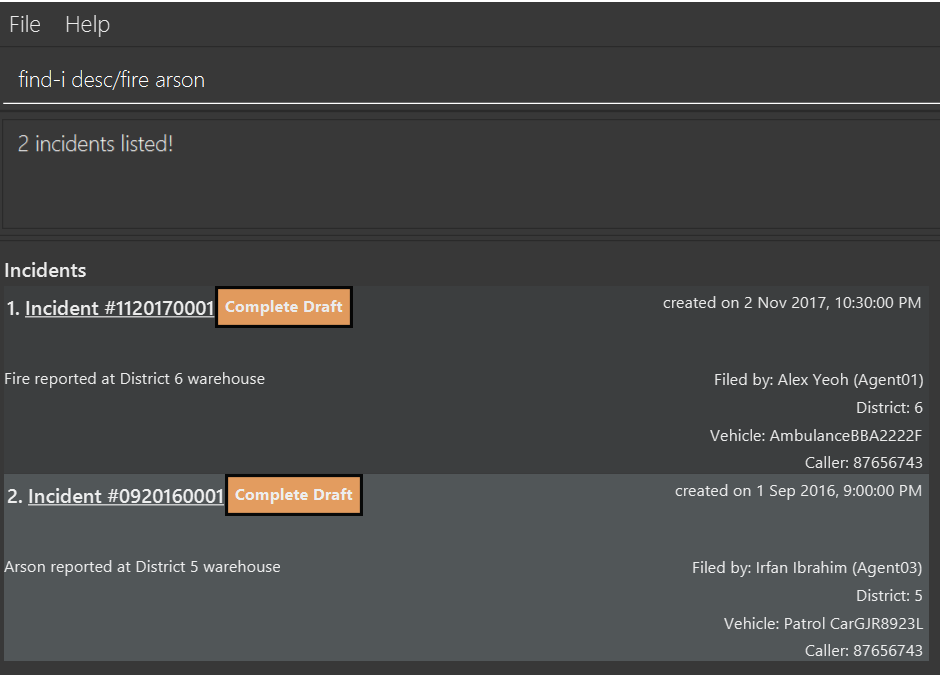
By Description
Format: find-i desc/<DESCRIPTION KEYWORD [MORE_KEYWORDS]…>
Lists all incidents whereby the incident description contains any the given keywords
-
Example of the
find-icommand with parameterdesc/, returning all incidents whereby the description contains either keywordfireorarson:
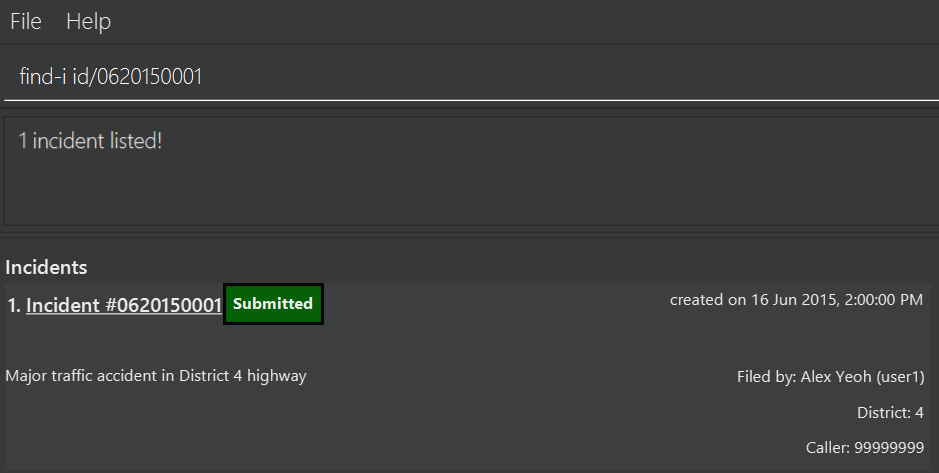
By ID
Format: find-i id/KEYWORD
Lists all incidents whereby the incident ID is an exact match with the given keyword
-
Requires an exact ID match, only accepts one ID
-
Example of
find-icommand with parameterid/returning all incidents whereby the ID matches0620150001exactly:
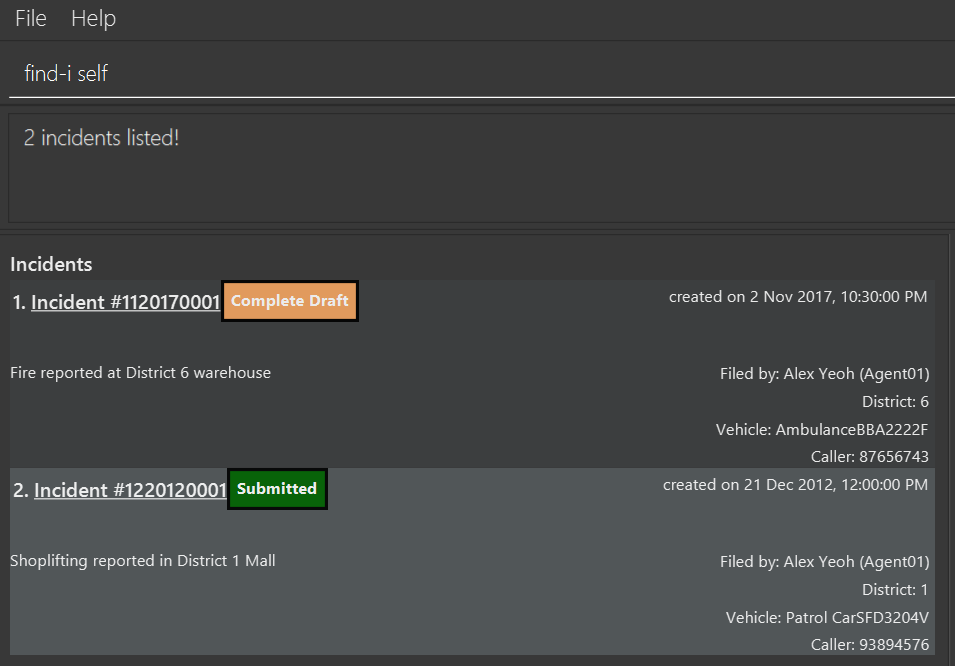
Self-Search
Format: find-i self
Lists all incidents whereby the operator name matches the logged-in user’s name.
-
Example of executing
find-i selfto list all incidents:
-
Requires an exact name match with the logged-in user’s name
Examples:
-
ID Match:
find-i id/0920160001
Returns Incident #0920160001 -
Multiple Parameters:
find-i op/Dave desc/fire
Returns any incidents whereby the operator’s name contains 'Dave' and the description contains 'fire' -
Multi-word Parameter Search:
find-i op/Alex Bernice
Returns any incidents whereby the operator’s name contains either 'Alex' or 'Bernice' -
Self-Search:
find-i self
Returns any incidents whereby the operator’s name matches the logged-in operator’s name
|
If multiple keywords of the same prefix are provided by user, the command will take the last valid parameter of each prefix. For example find-i desc/arson desc/fire op/alex op/charlotte is equivalent to find-i desc/fire op/charlotte.Rationale: user need not waste time backspacing if an input was keyed in wrongly. |
3.16.1. Future Extensions
-
Find Command filters search results by the following:
-
Incident status
-
DateTime
-
District number of Incident
-
Vehicle Type of Vehicle involved
-
Vehicle Number of Vehicle involved
-
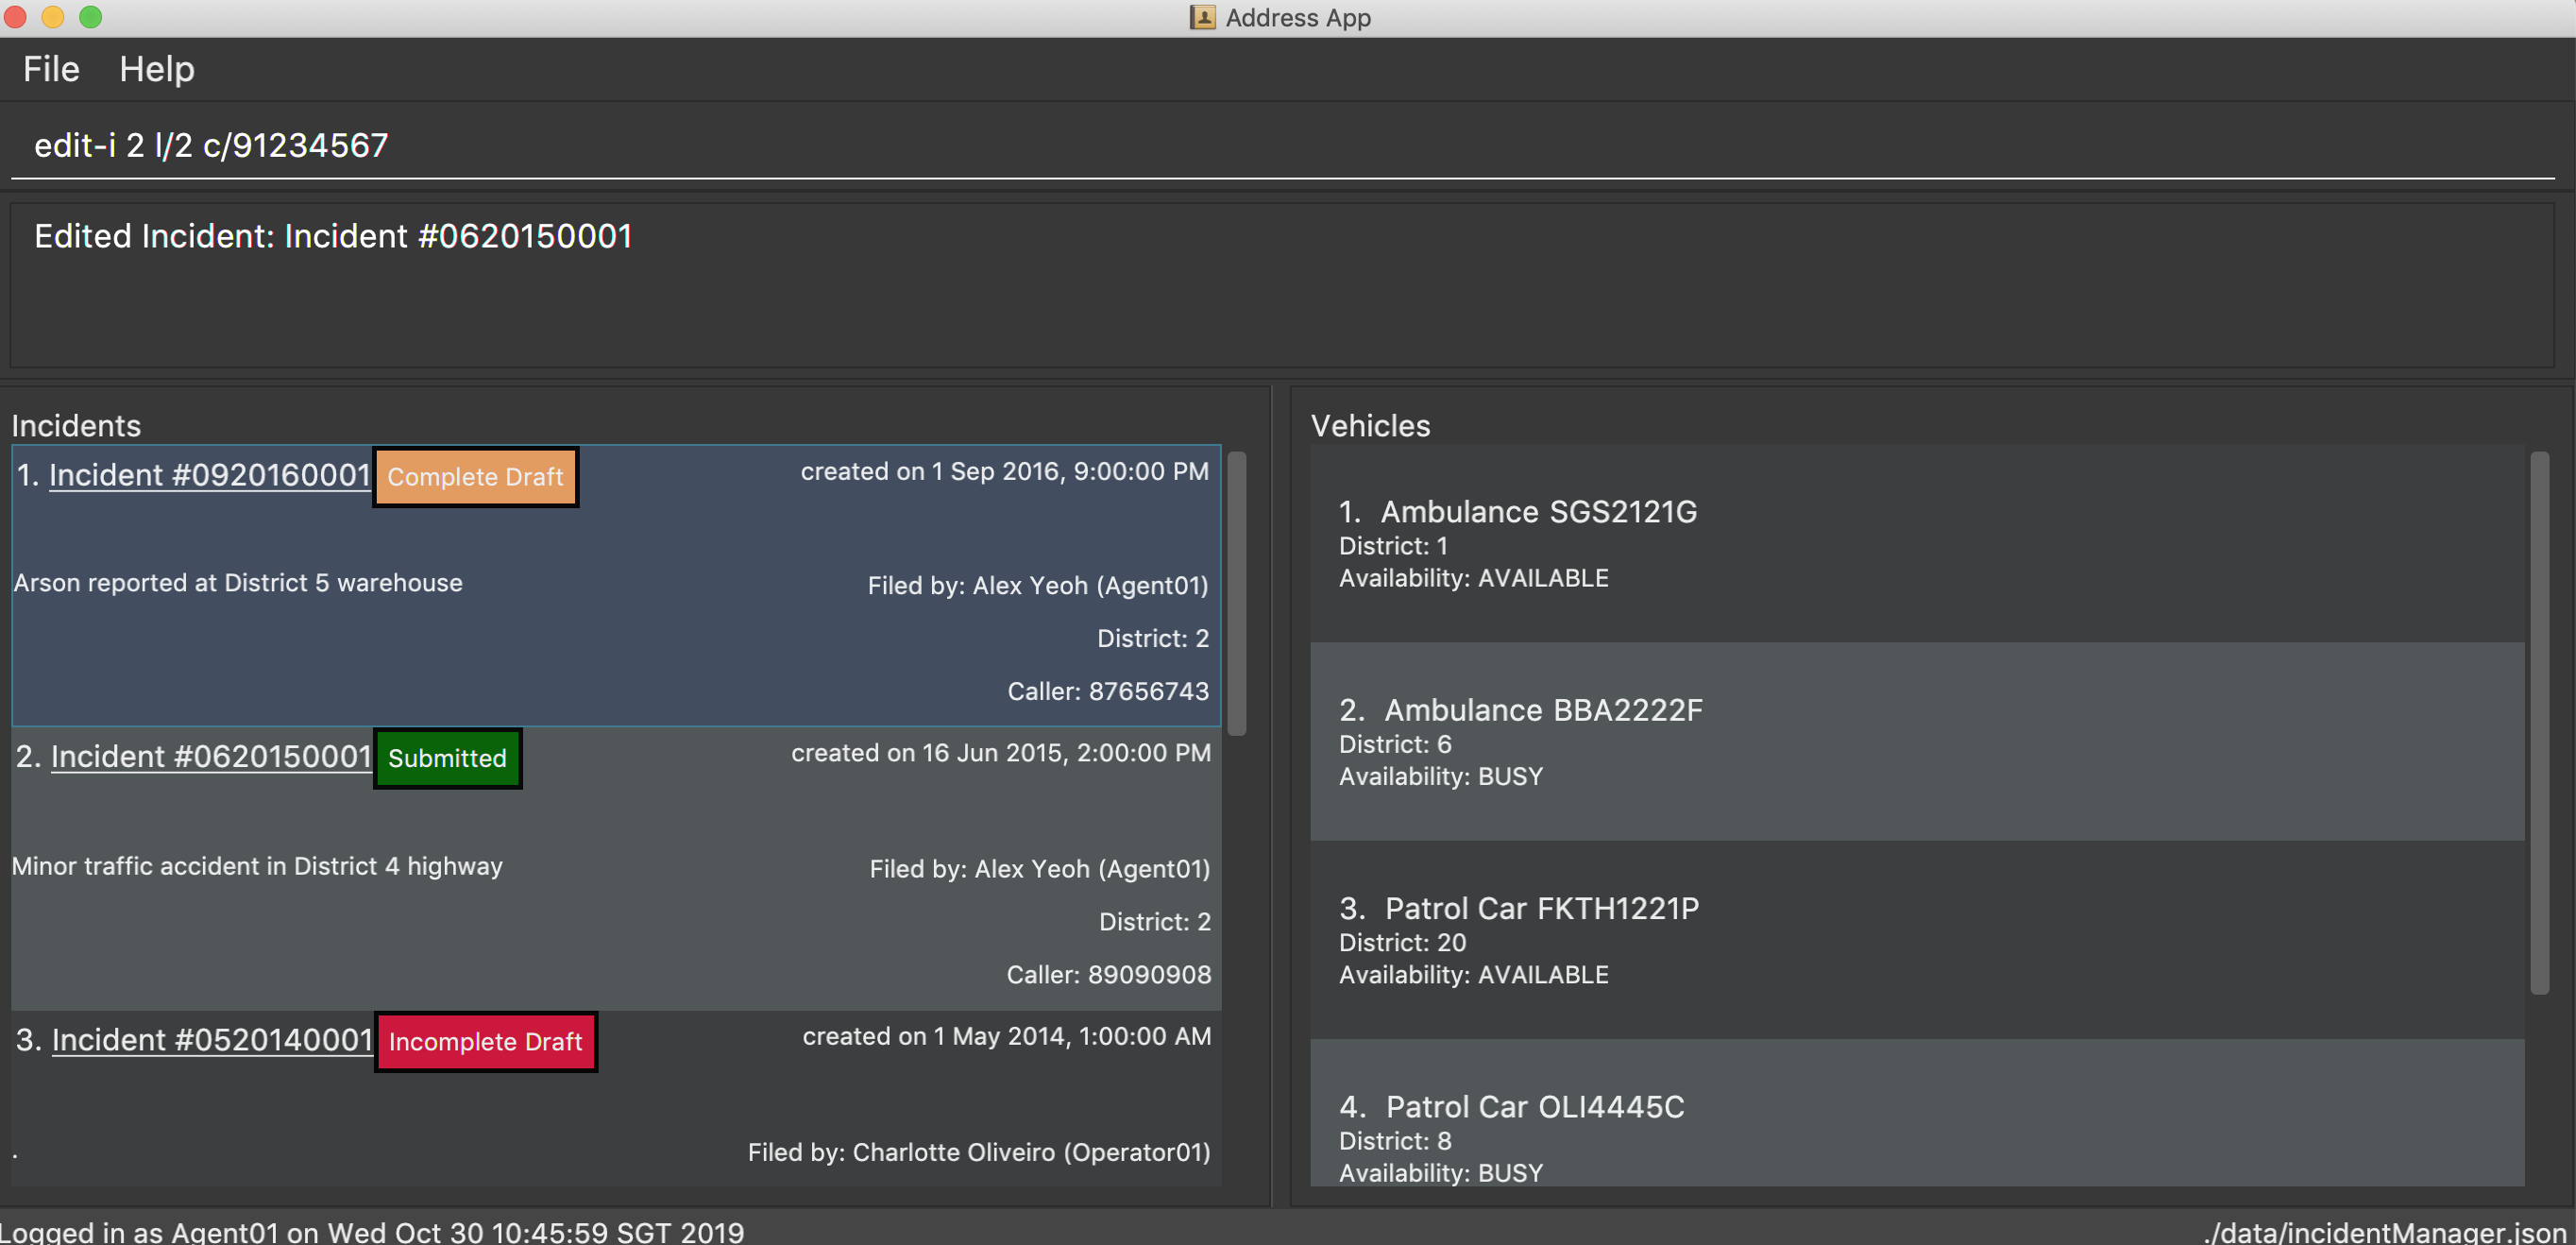
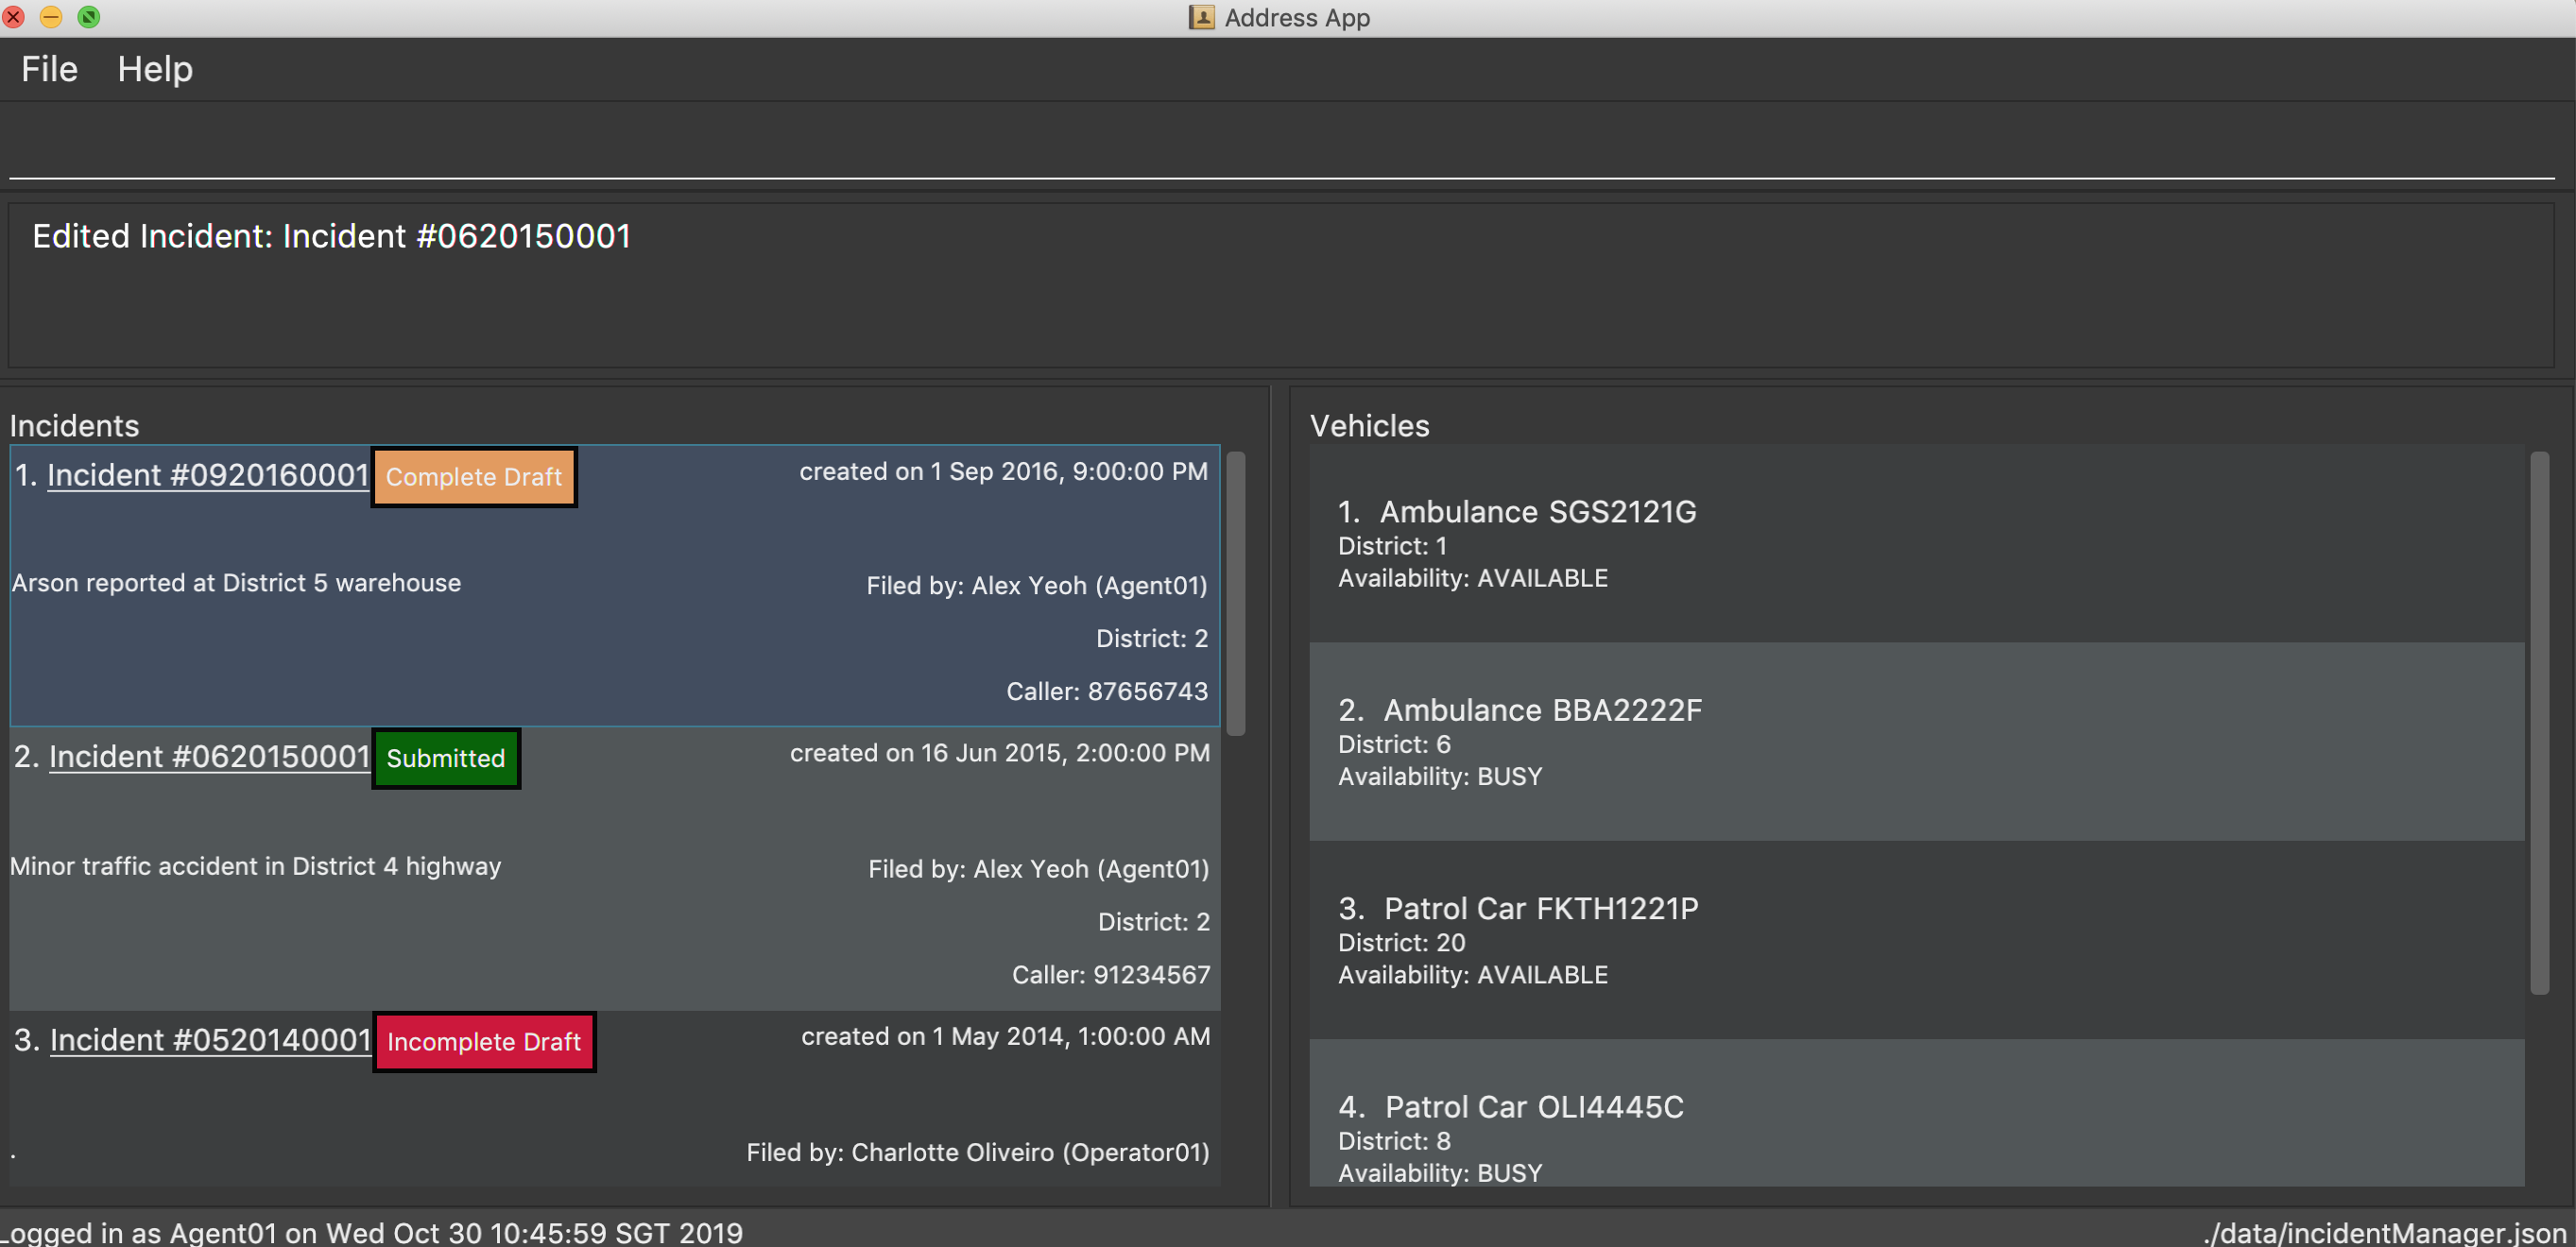
3.17. Editing an Incident: edit-i
Edits an existing incident in the Incident Manager as identified by the index in the display.
Format: edit-i [INDEX] [dist/DISTRICT] [p/CALLER NUMBER] [desc/DESCRIPTION]
Example of input:
-
edit-i 1 dist/2 desc/This is an incident description.-
result: only district and description is changed.
-
-
edit-i 1-
result:
No new fields were provided, incident is not edited.
-
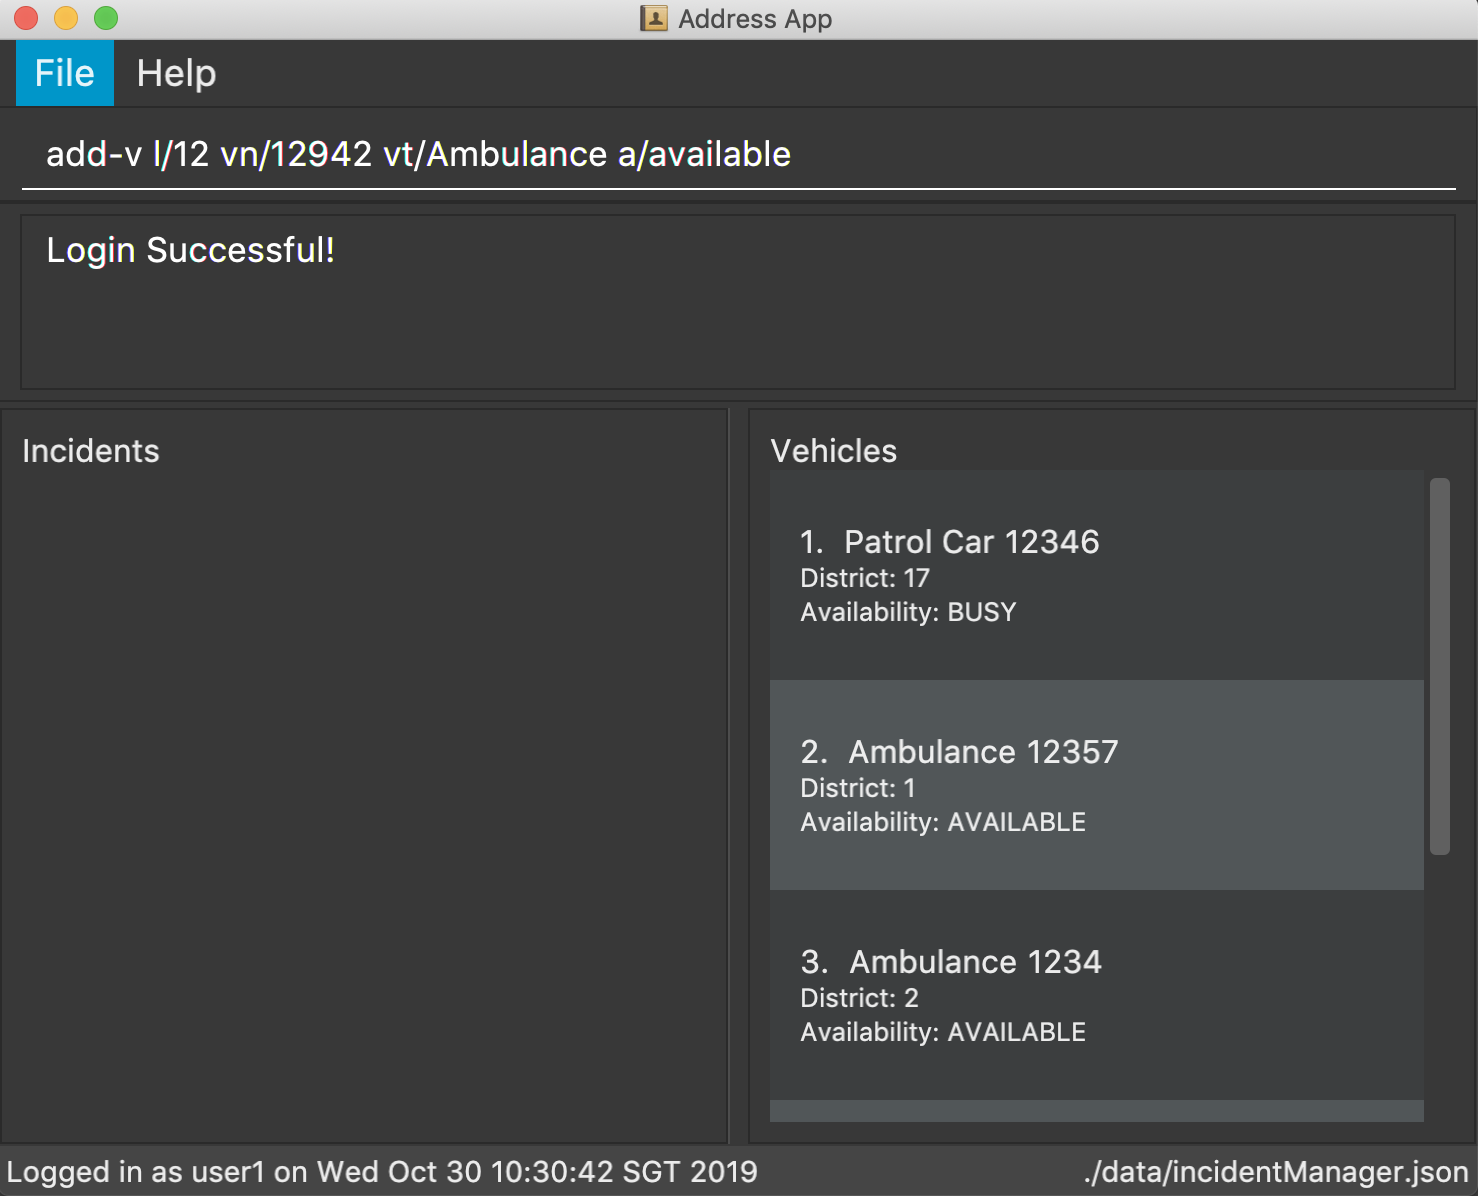
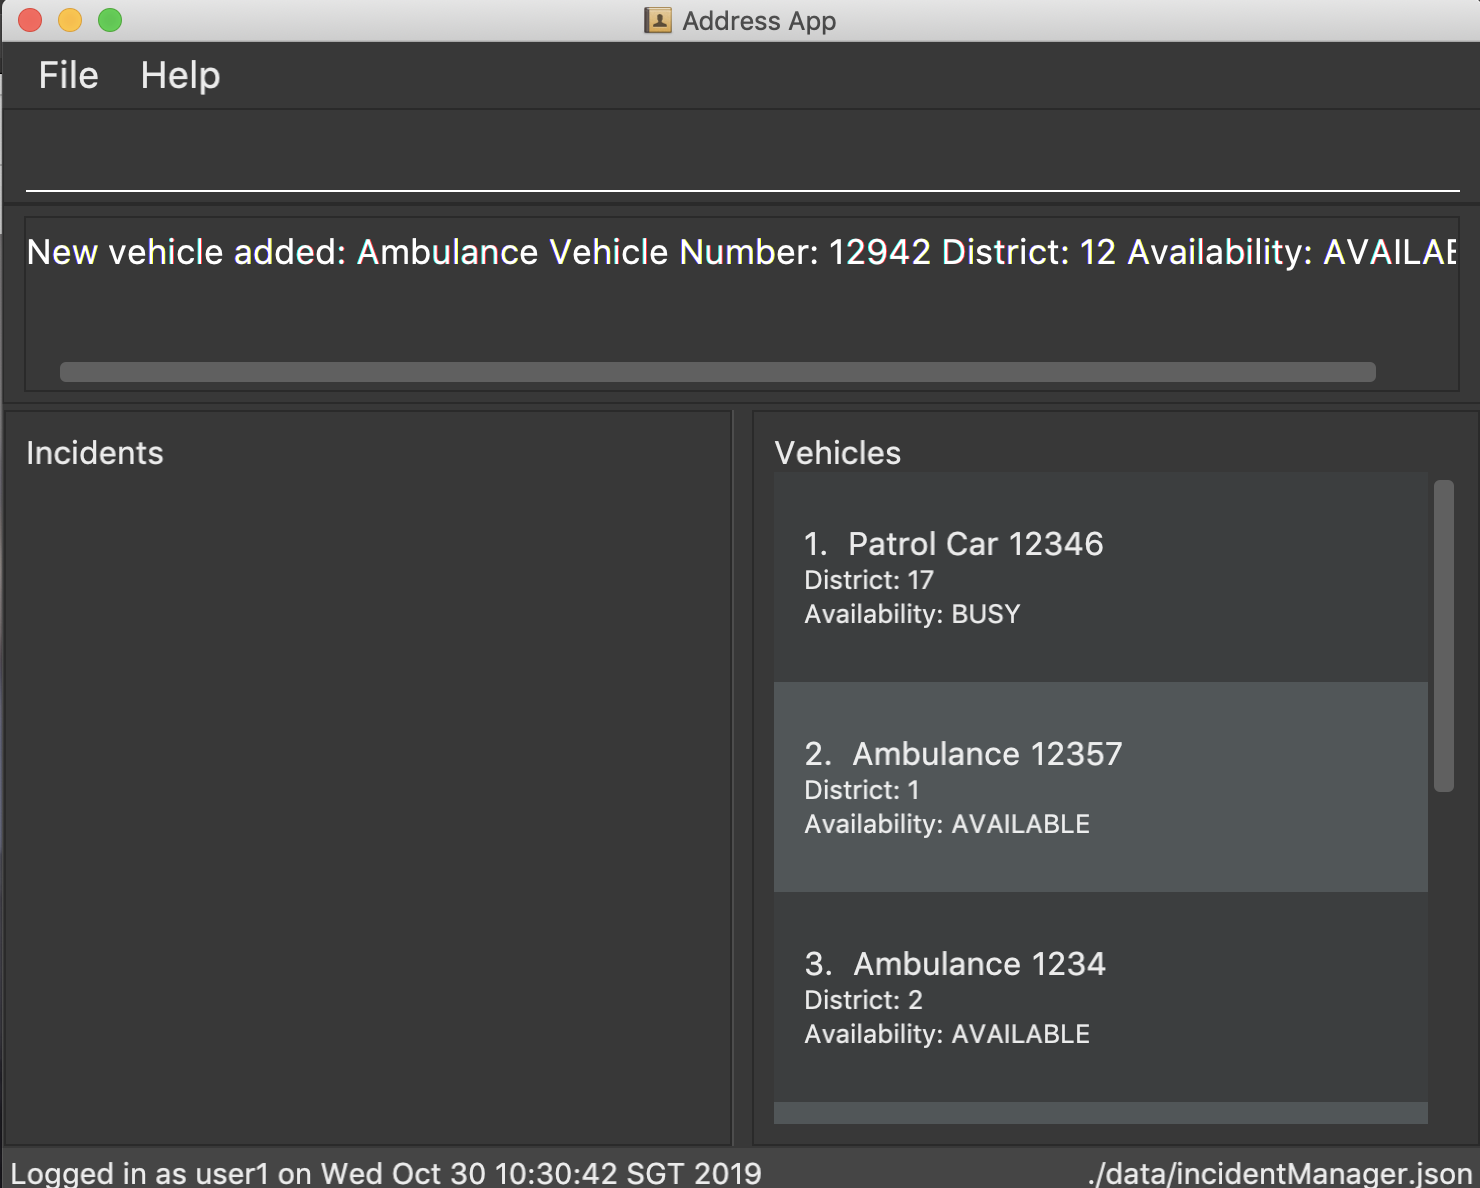
3.18. Adding a Vehicle: add-v
Adds a vehicle into the Incident Management System.
Format: add-v [dist/DISTRICT] & [vnum/VEHICLE NUMBER] & [vtype/VEHICLE TYPE] & [a/AVAILABILITY]
| All fields must be provided in order to make a valid addition to the Incident Management System. If any of the fields are missing, vehicle will not be added. |
Examples:
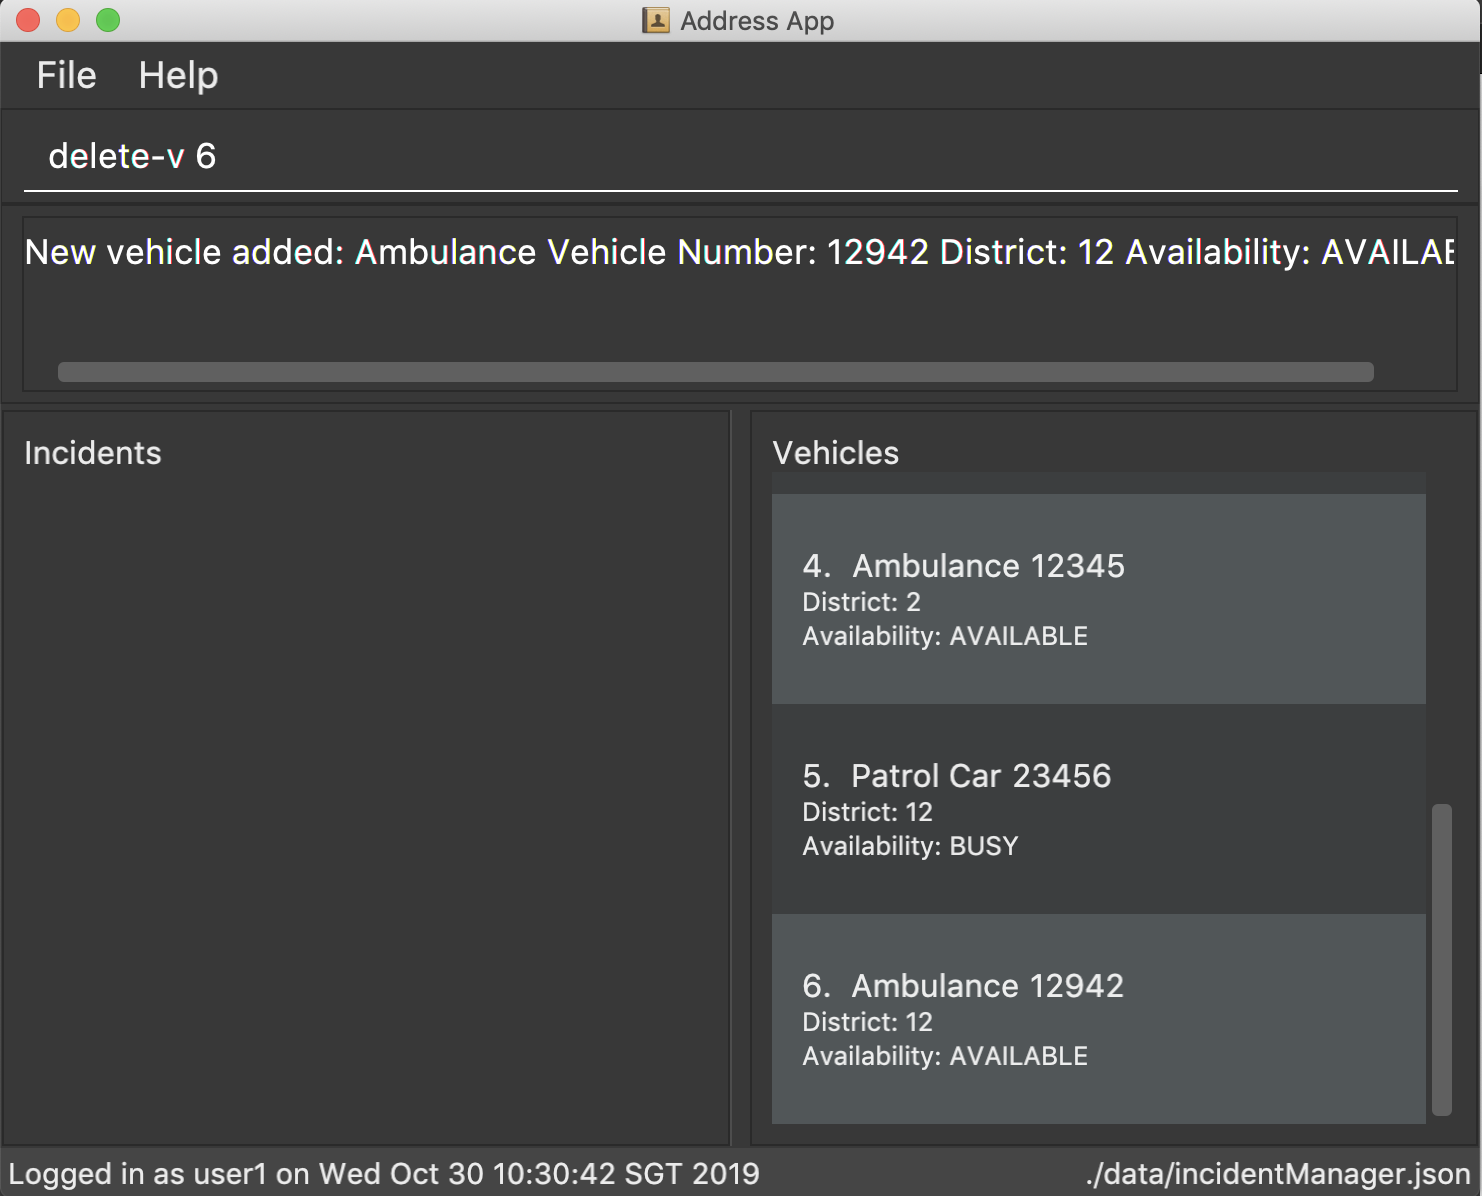
-
add-v dist/2 vnum/SFD1234A vtype/Ambulance a/available-
result:
New vehicle added: Ambulance Vehicle Number: 12345 District: 2 Availability: AVAILABLE
-
-
add-v dist/12 vnum/SFD1234A vtype/Patrol Car a/busy-
result:
New vehicle added: Patrol Car Vehicle Number: 23456 District: 12 Availability: BUSY
-
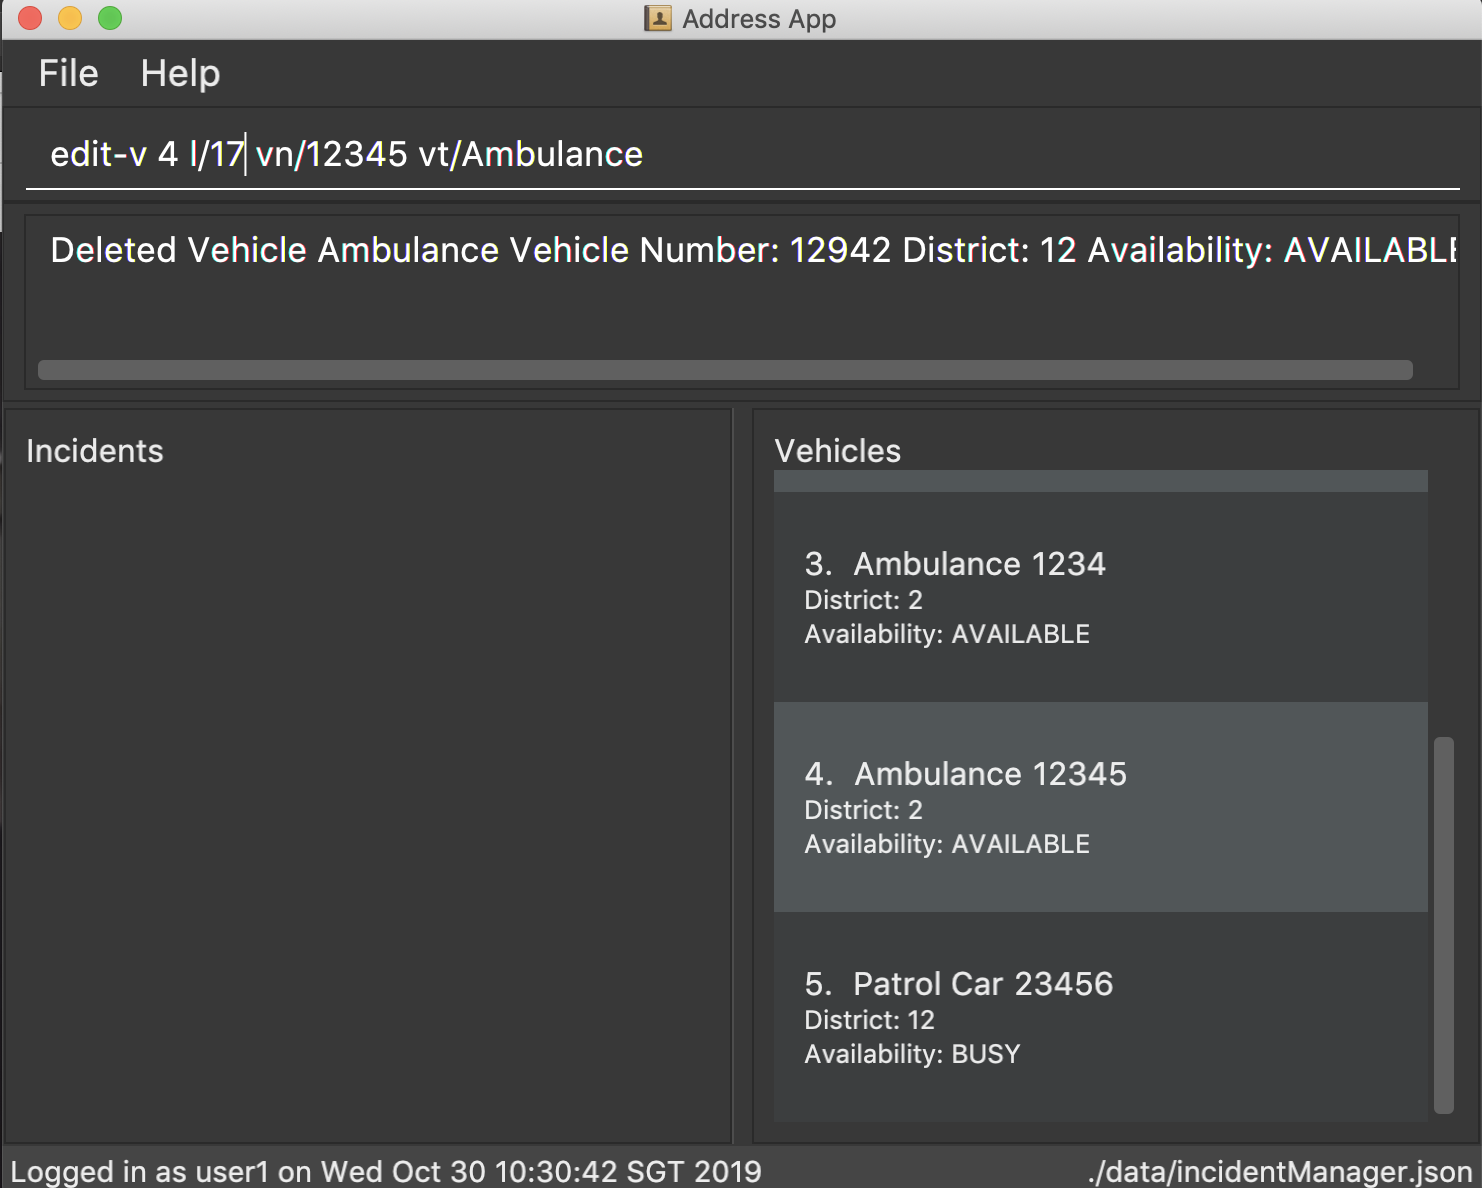
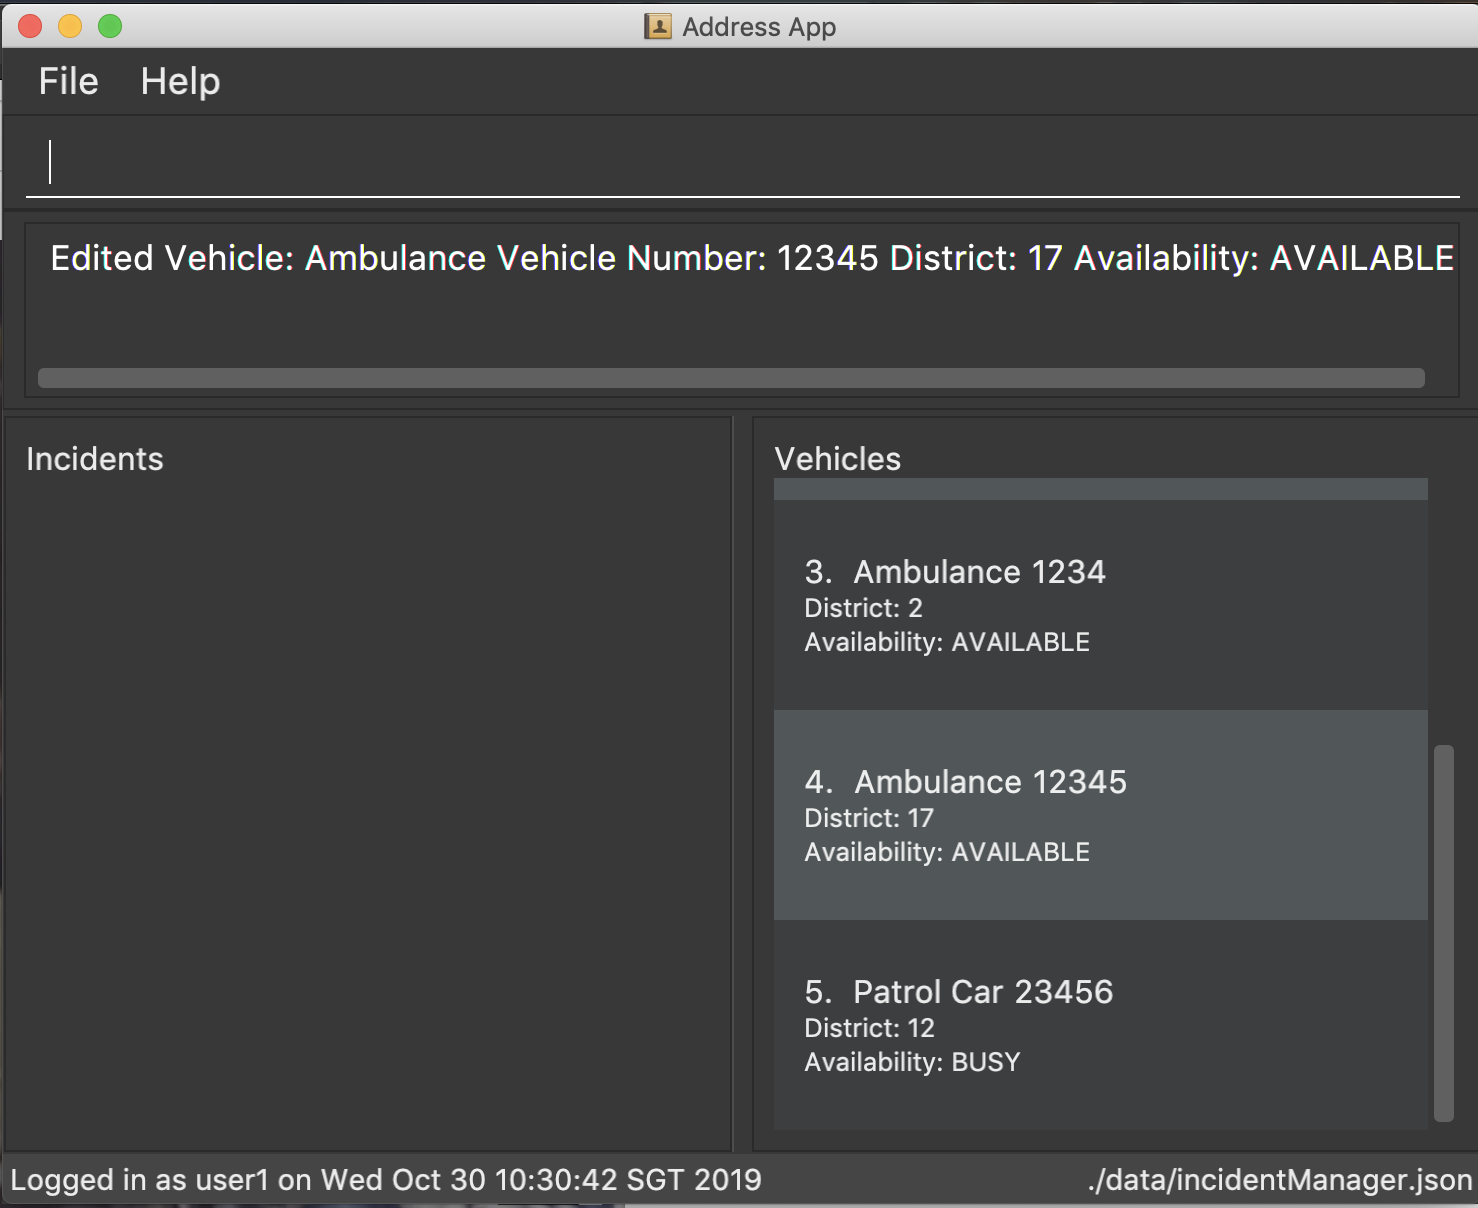
3.19. Editing a Vehicle: edit-v
Edits a vehicle identified by the index displayed in the Incident Management System.
Format: edit-v [INDEX] [dist/DISTRICT] [vtype/VEHICLE TYPE] [a/AVAILABILITY]
| Number of fields provided for edit may vary. If no fields are provided, the vehicle will not be edited. |
Example:
-
edit-v 1 dist/13 vtype/Ambulance-
result: district will be changed to 13 and vehicle type will be changed to Ambulance
-
Edit vehicle:
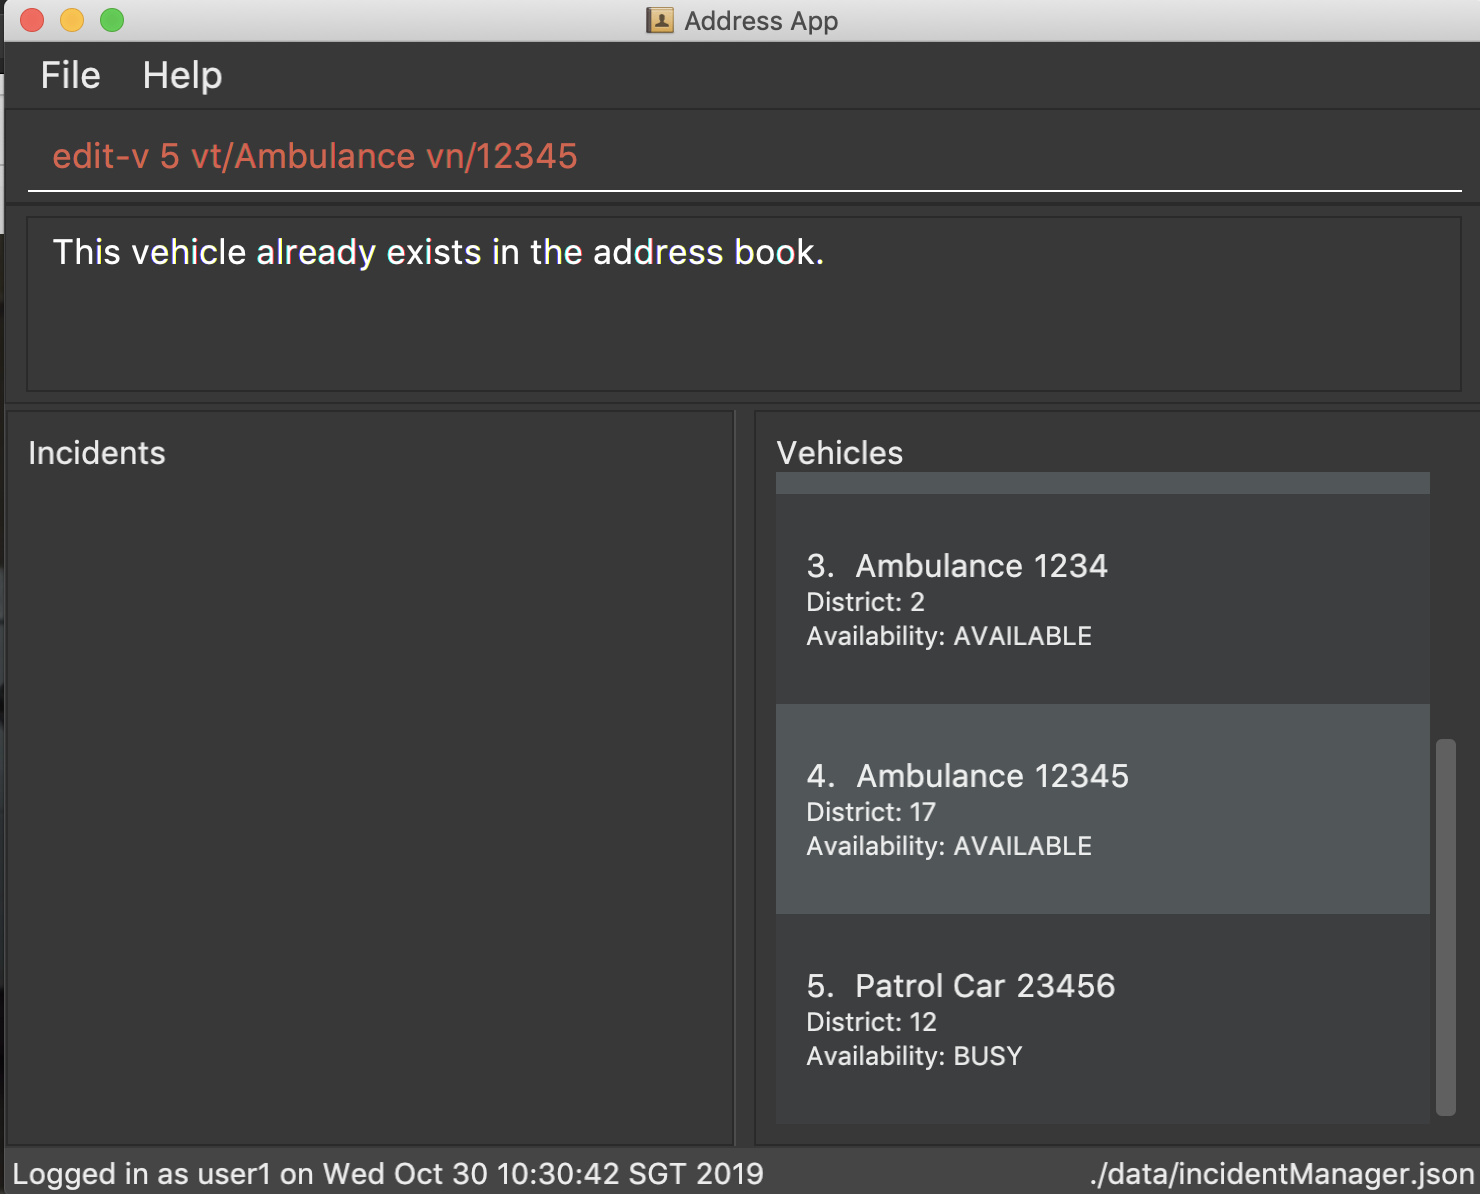
Edit Vehicle that results in duplicates:

3.20. Listing vehicles
Shows a list of all vehicles registered in the incident Manager.
Format: list-v
3.21. Finding a Vehicle: find-v
Finds a vehicle by its district number, vehicle number or vehicle type.
The command works in three ways:
1. Find by district
Format: find-v dist/DISTRICT [MORE DISTRICTS]
Example usage:

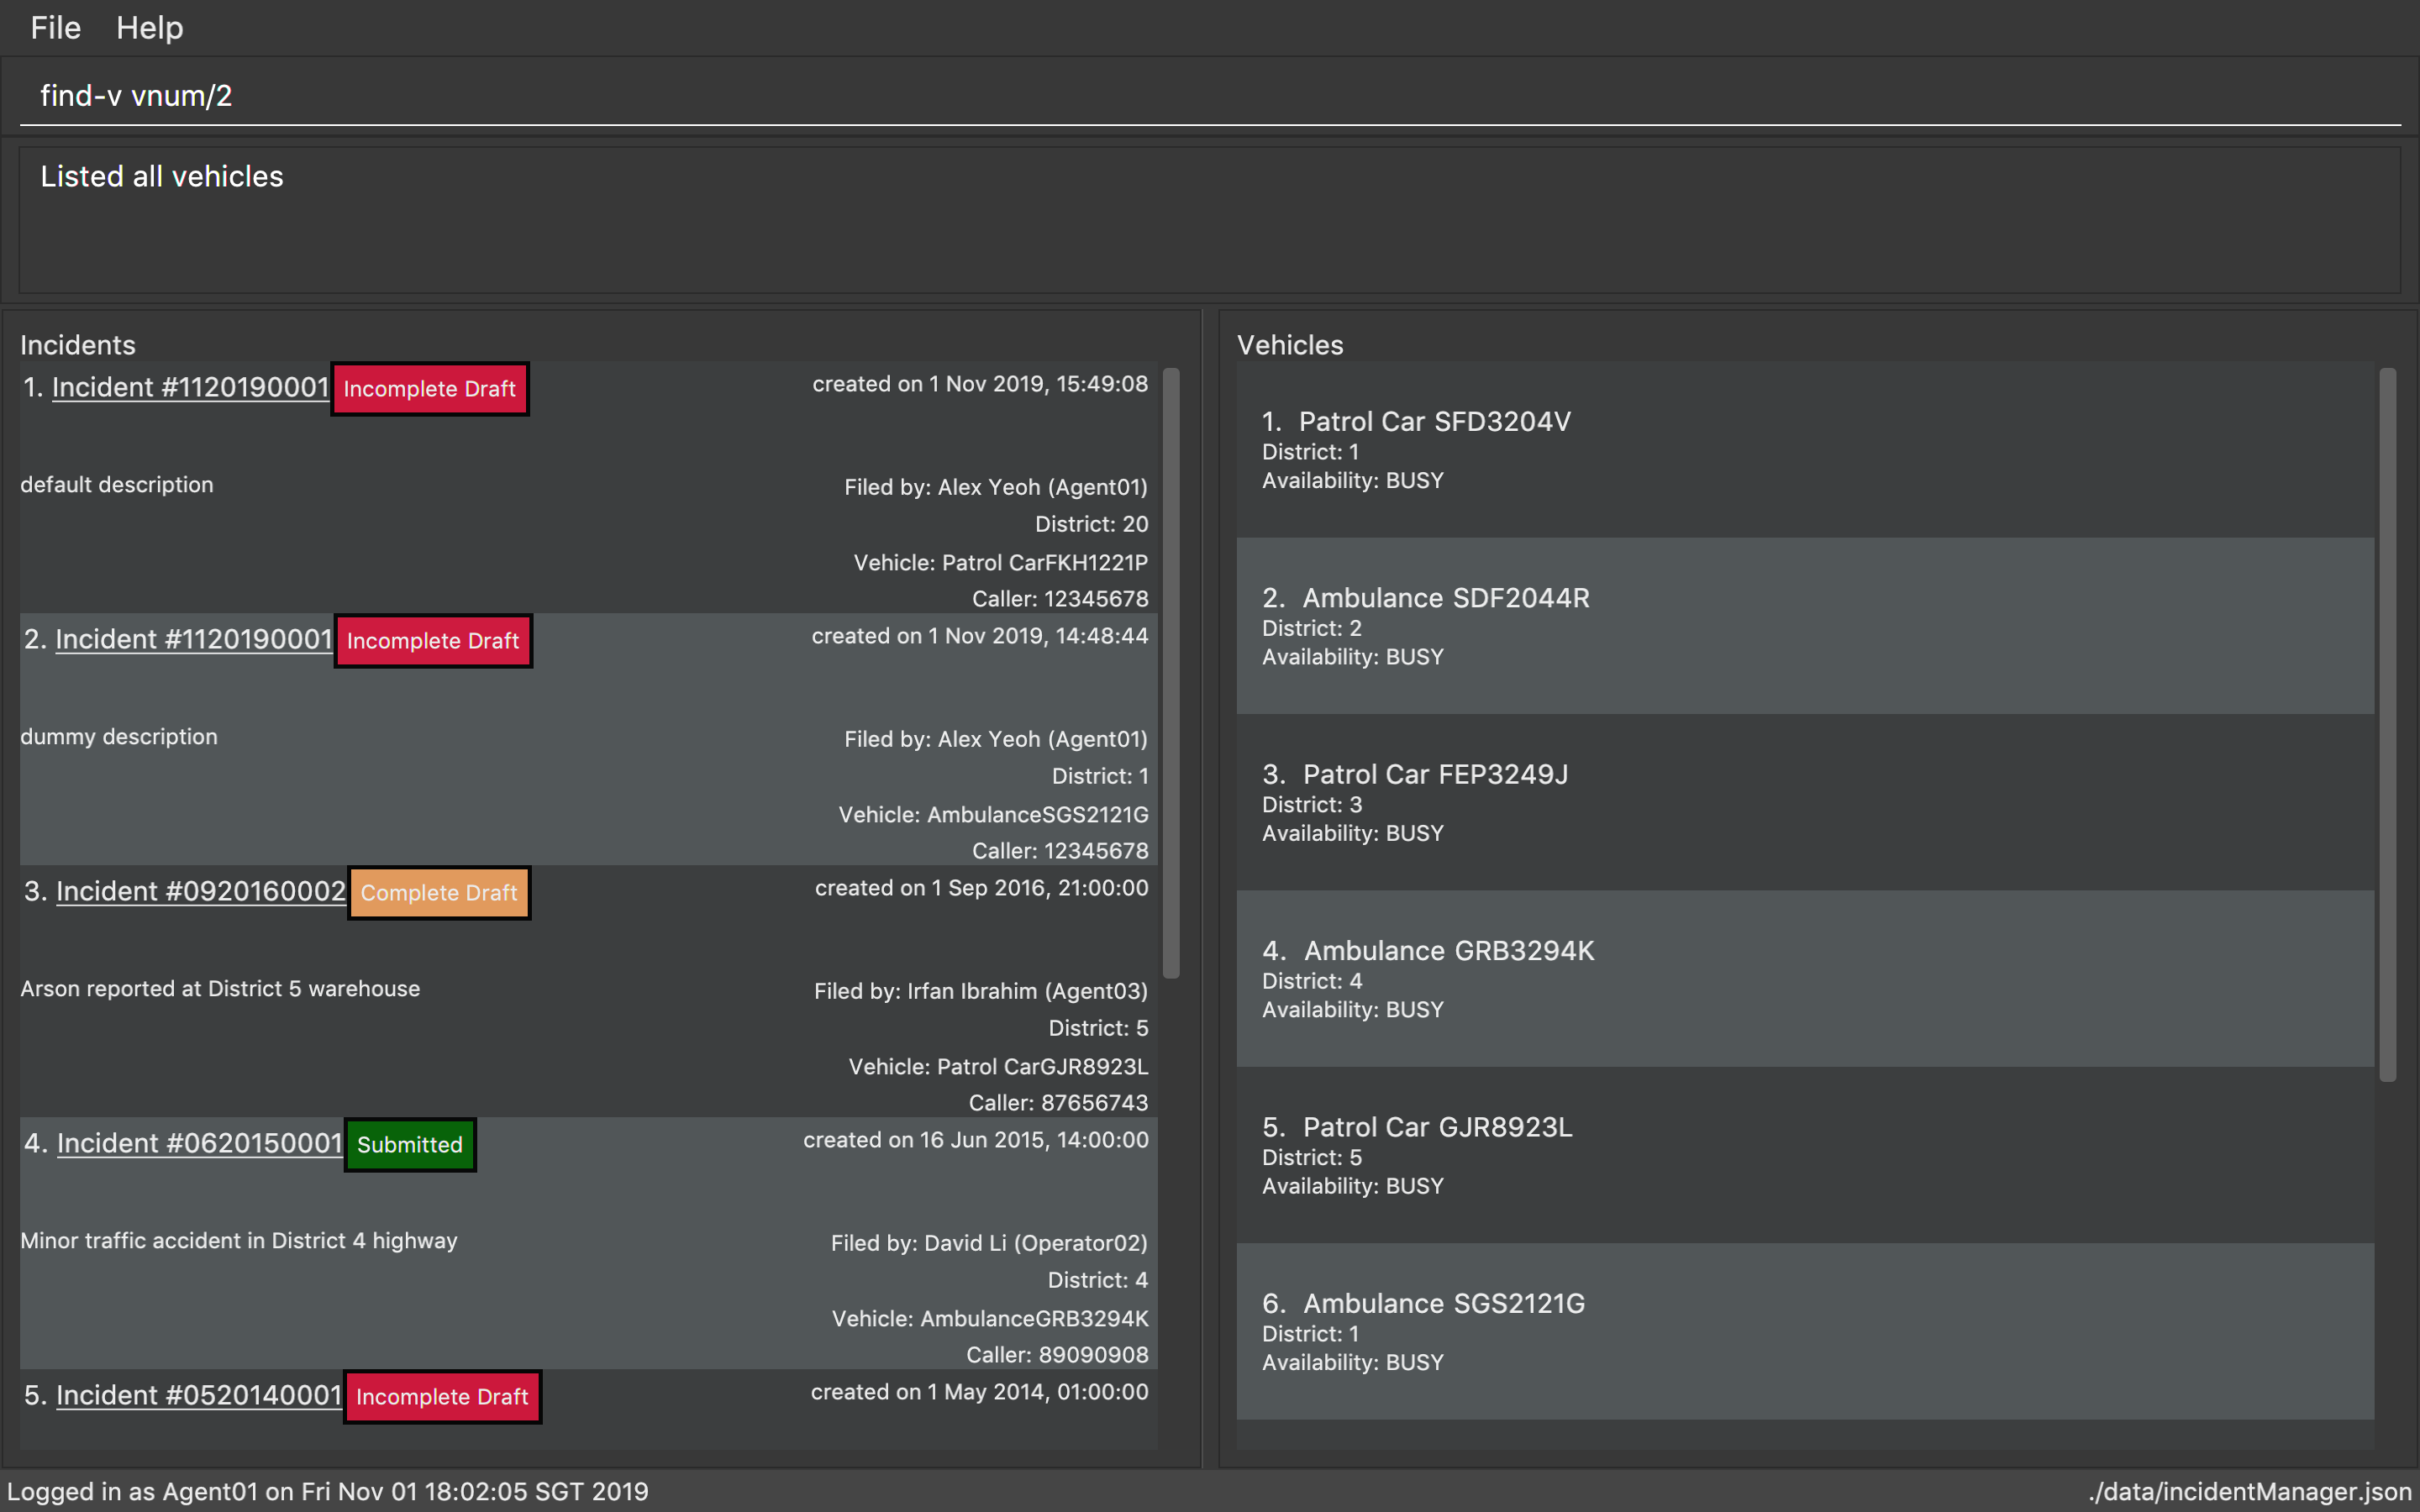
2. Find by vehicle number
Format: find-v vnum/NUMBER
Example usage:

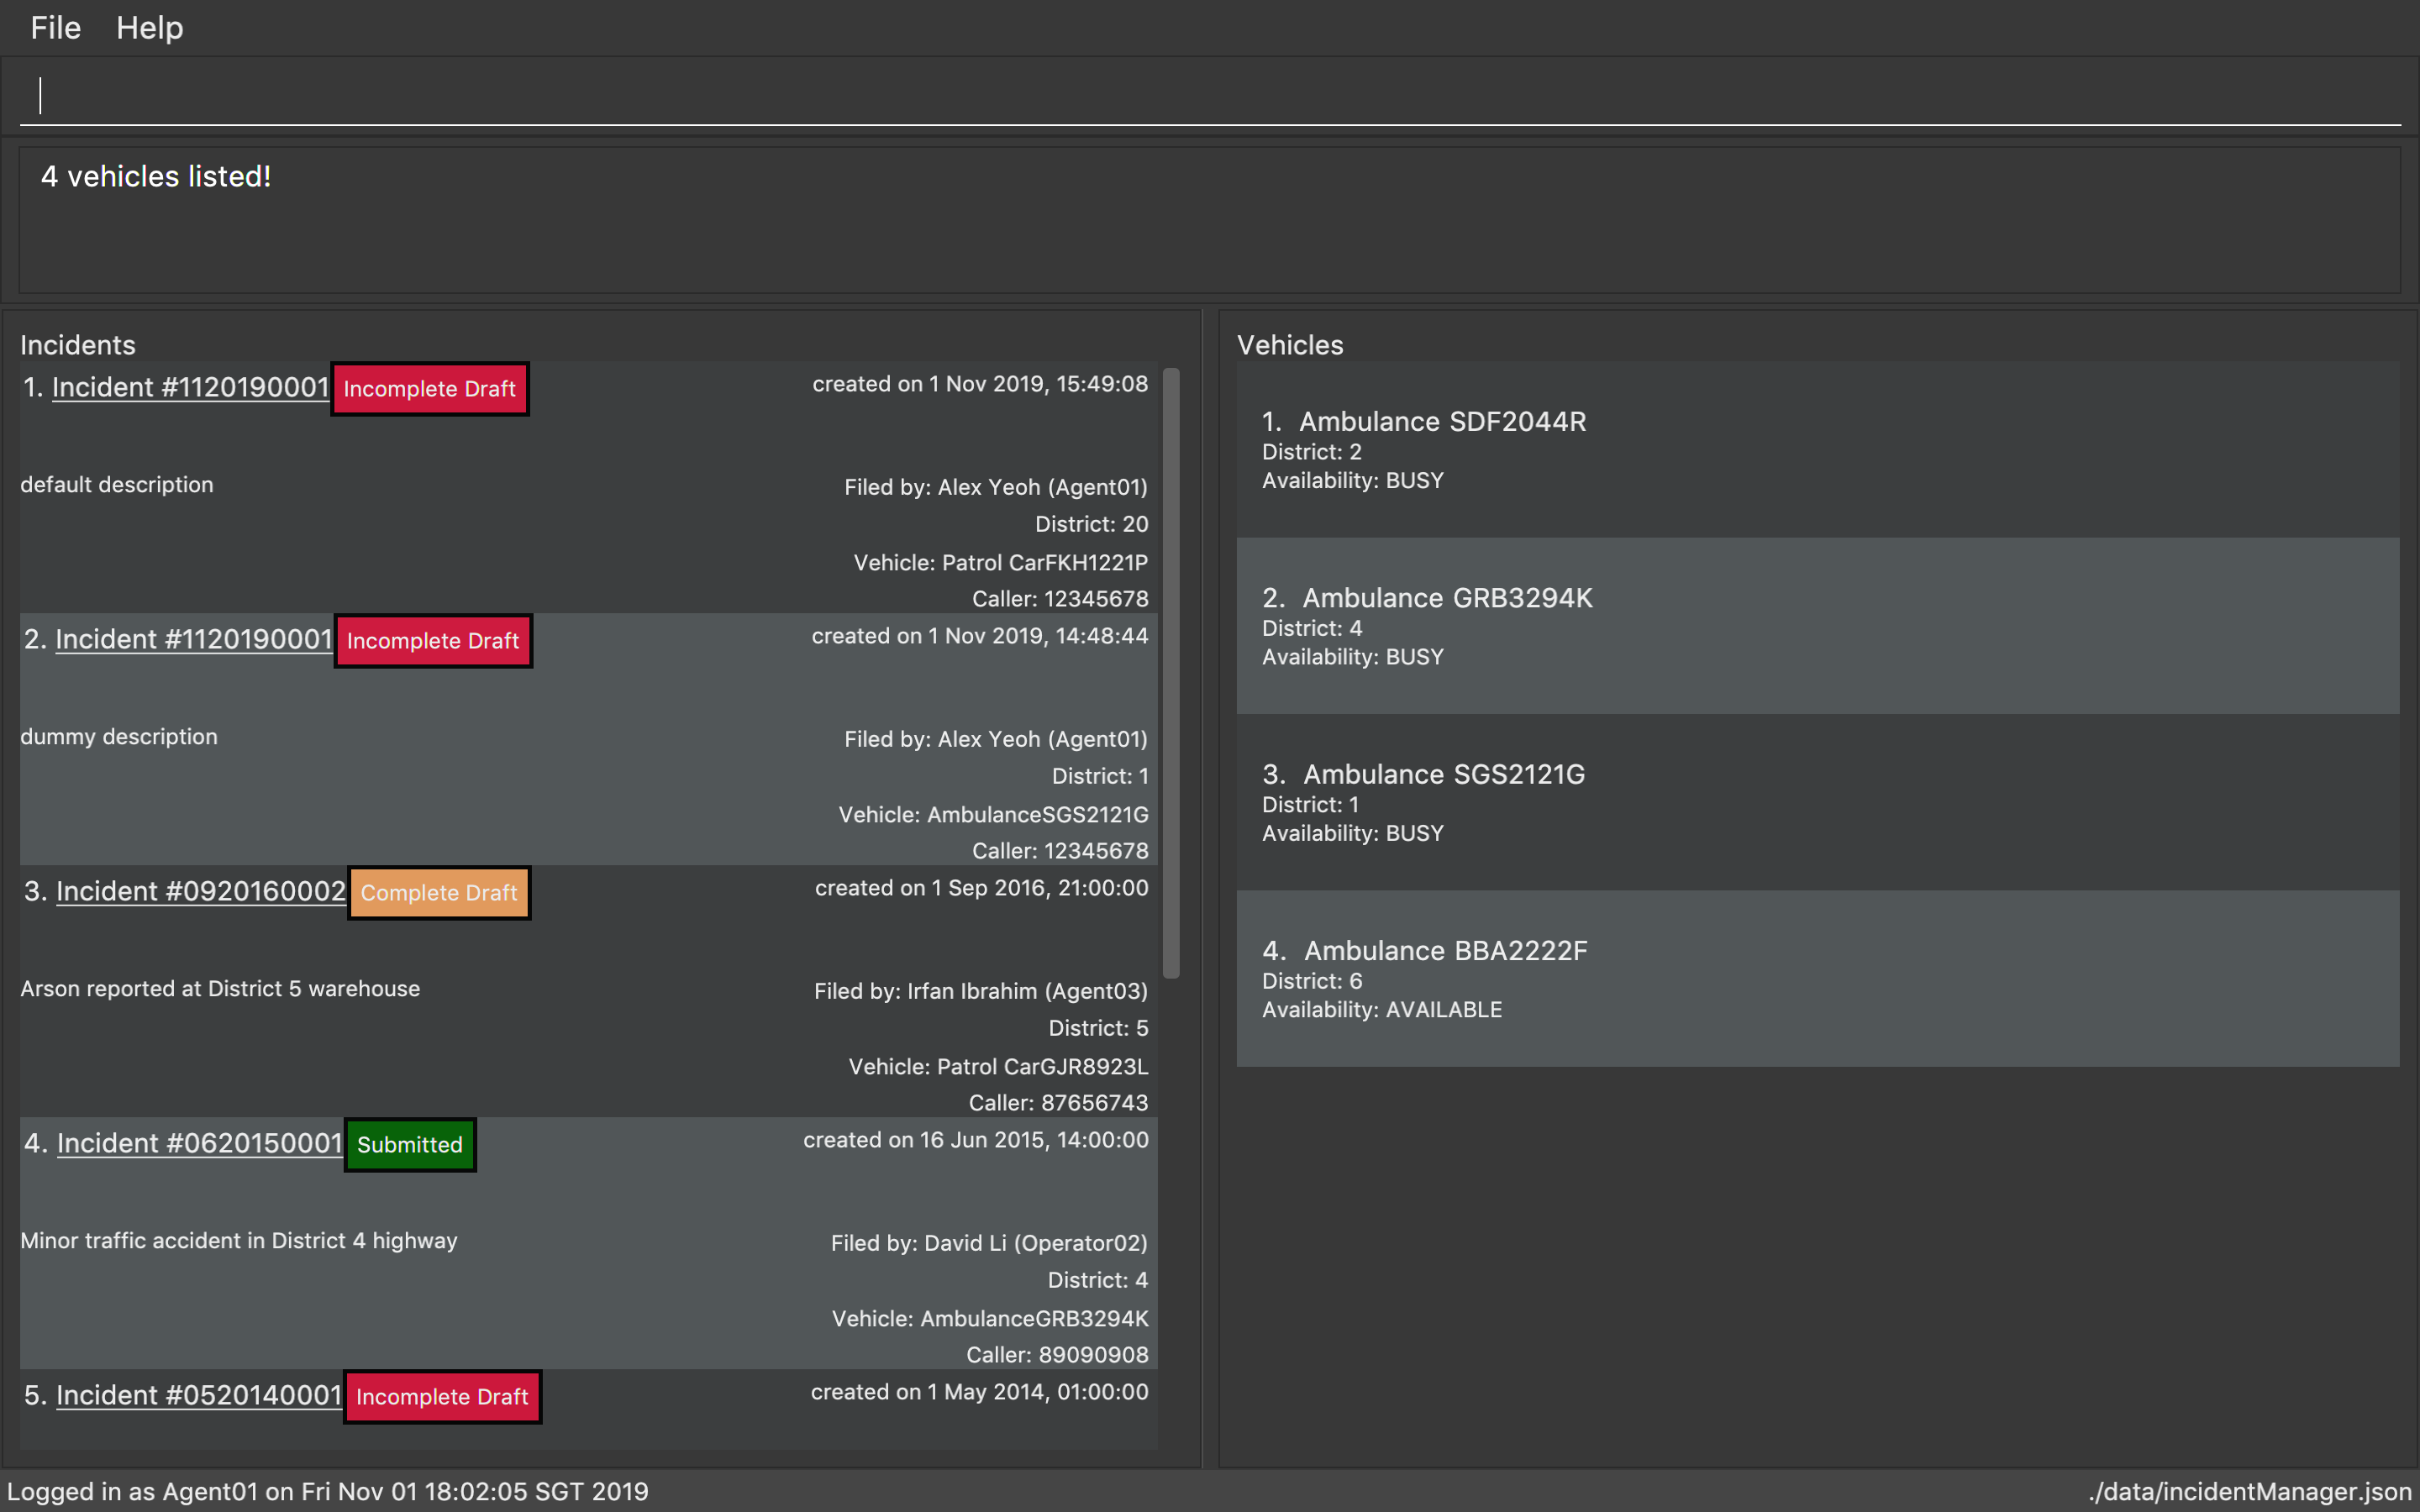
3. Find by vehicle type
Format: find-v vtype/VEHICLE TYPE
Example usage:

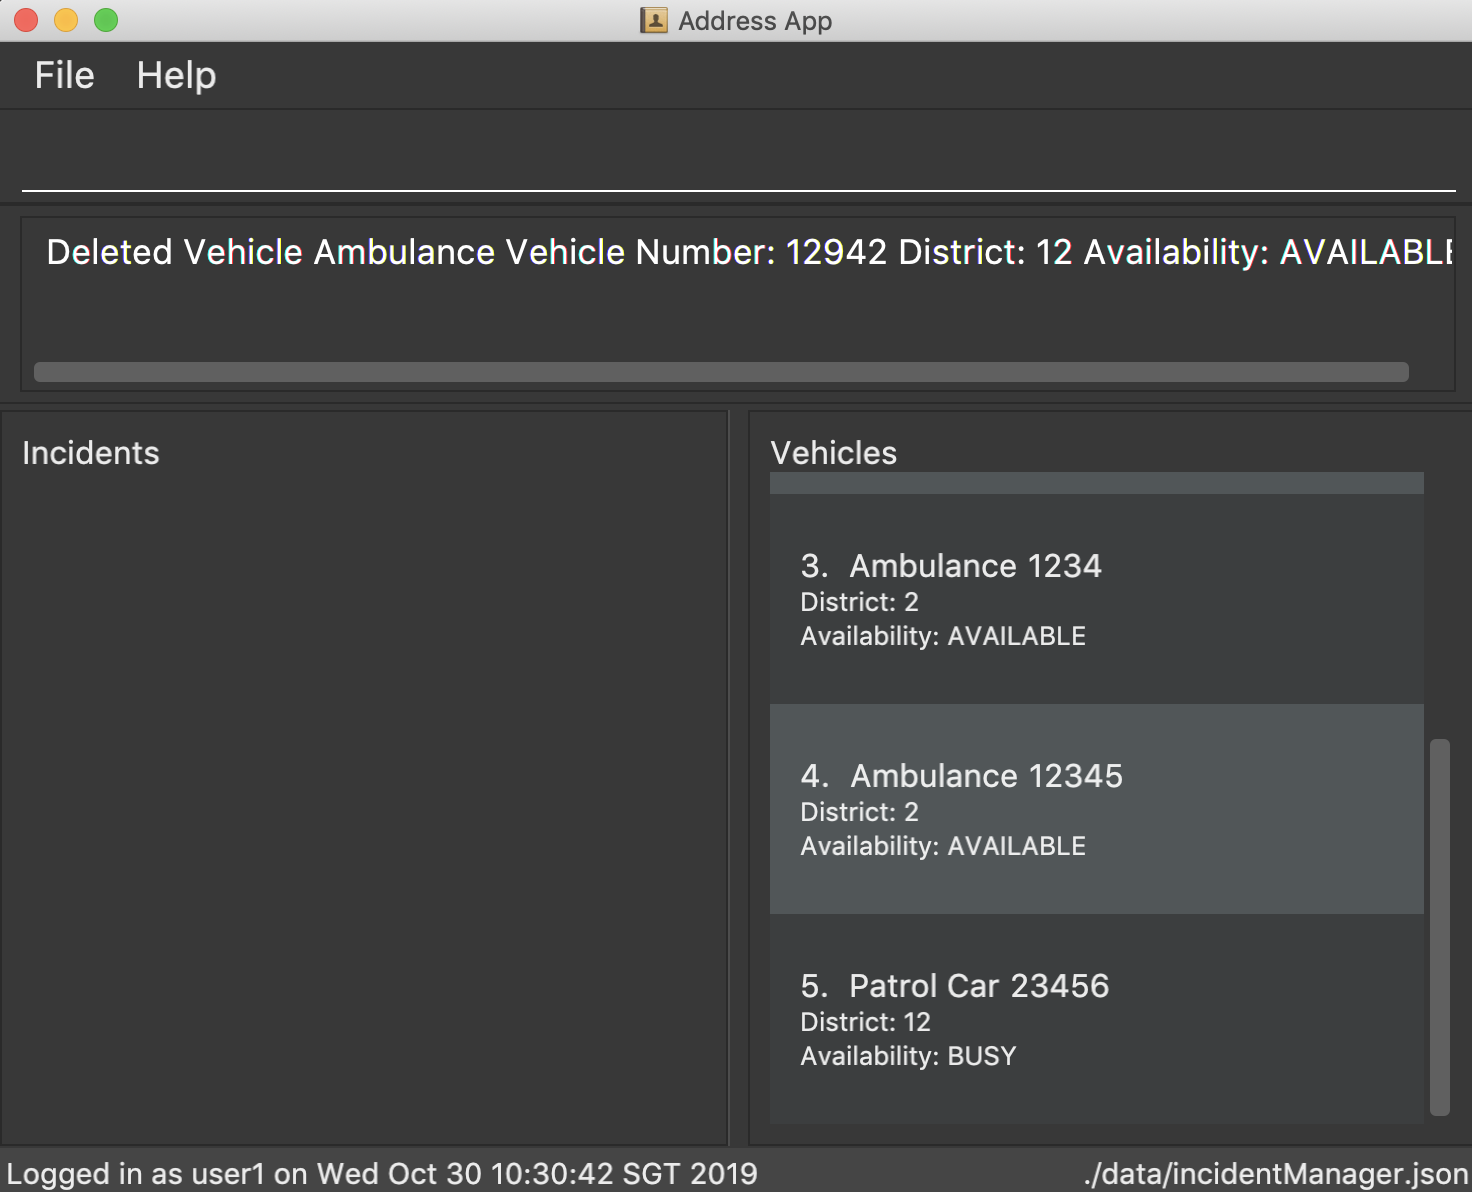
3.22. Deleting a Vehicle: delete-v
Deletes a vehicle in the list as identified by the index.
Format: delete-v [INDEX]
3.23. Exiting the program : exit
Exits the program.
Format: exit
3.24. Saving the data
Incident Manager data are saved in the hard disk automatically after any command that changes the data.
There is no need to save manually.
3.25. Decrypting data files [coming in v2.0]
Decrypts the incident manager data file.
Format: decrypt PASSWORD
Data files will be encrypted by default. Users can decrypt the file with the command above.
3.26. Creating new incidents even when no vehicle is available in the given district. [coming in v2.0]
User can choose to create an incident pending vehicle dispatchment.
Format: new dist/DISTRICT auto/Y r/pending
4. FAQ
Q: How do I transfer my data to another Computer?
A: Install the app in the other computer and overwrite the empty data file it creates with the file that contains the data of your previous Incident Management System folder.
5. Command Summary
-
Help :
help -
Login :
login u/USERNAME w/PASSWORD -
Logout :
logout -
Swap :
swap -
Register :
register n/NAME p/PHONE_NUMBER e/EMAIL u/USERNAME w/PASSWORD [t/TAG]…
e.g.register n/James Ho p/22224444 e/jamesho@example.com u/Agent-3 w/password t/Admin t/Team-01 -
Update :
update [INDEX] [n/NAME] [p/PHONE_NUMBER] [e/EMAIL] [u/USERNAME] [w/PASSWORD] [t/TAG]…
e.g.update 2 n/James Lee e/jameslee@example.com -
List Accounts :
list-a [KEYWORD] [MORE_KEYWORDS]
e.g.list-a Admin -
Find Account :
find-a KEYWORD [MORE_KEYWORDS]
e.g.find-a James Jake -
Delete Account :
delete-a INDEX
e.g.delete-a 3 -
New :
new dist/DISTRICT auto/[Y/N] [v/INDEX]
e.g.new dist/1 auto/n v/1 -
Fill
-
fill(to list all draft incidents ready for filling) -
fill [INDEX] [p/CALLER_NUMBER] [desc/DESCRIPTION](to fill specified incident report)
e.g.fill 1 p/98984932 desc/This is a sample description for incident 1 in district 3.
-
-
Submit
-
submit(to list all completed draft incidents ready for submission) -
submit[INDEX] (to submit specified incident report)
e.g.submit 4
-
-
List Incidents :
list-i -
Find Incidents :
find-i [op/KEYWORD(s)] [desc/KEYWORD(s)] [id/KEYWORD] [self]
e.g.find-i op/alex yeoh desc/6 self -
Edit Incidents :
edit-i-
edit-ito list all the incident reports that are available for edit -
edit-i [INDEX] [dist/DISTRICT] [p/CALLER_NUMBER] [desc/DESCRIPTION]
e.gedit-i 1 dist/21 p/12345678 desc/Incident description
-
-
Add Vehicles :
add-v [dist/DISTRICT] [vnum/VEHICLE_NUMBER] [vtype/VEHICLE_TYPE] [a/AVAILABILITY]
e.g.add-v dist/2 vnum/SFD1234A vtype/Ambulance a/busy -
List Vehicles :
list-v -
Find Vehicles :
find-v [dist/KEYWORDS] [vtype/KEYWORD] [vnum/KEYWORD]
e.g.find-v dist/1 2 3 -
Edit Vehicles :
edit-v [INDEX] [dist/DISTRICT] [vtype/VEHICLE_TYPE] [a/AVAILABILITY]
e.g.edit-v 1 dist/2 vtype/patrol car a/busy -
Delete Vehicles :
delete-v [INDEX]
e.g.delete-v 1